background image

11

10

M E T R O

3

 P R A M 

~

  I N S T R U C T I O N  M A N UA L

M E T R O

3

 P R A M 

~

  I N S T R U C T I O N  M A N UA L

•  When the vehicle is being folded and unfolded, there is 

potential for fingers or parts of the body to be injured 
and due care should be exercised.

•  Overloading, incorrect folding or the use of  

non-approved accessories may cause injury or damage 
your Redsbaby METRO

³

.

•  Ensure you follow the regular maintenance and care 

instructions included in this manual. Pay special attention 
to maintenance and care of the brakes.

•  The Redsbaby METRO

³

 must only be used for one  

(1) child.

•  Do not hang bags on the Redsbaby METRO

³

 handles, as 

this can cause it to become unstable.

•  Do not lift or carry the Redsbaby METRO

³

 when a child is in it.

•  Do not lift or carry the Redsbaby METRO

³

 when fully 

assembled. Only lift and carry when folded.

•  The Redsbaby METRO

³

 is designed for use on flat or 

gentle sloping surfaces and may be unstable on higher 
sloping and uneven surfaces. The vehicle may tip over 
when used incorrectly on steep inclines/declines.

•  Take care when changing terrains and when going over 

uneven surface levels (inclines/declines/curbs/obstacles) 

GENER AL SAFET Y 

PRECAUTIONS:

Summary of Contents for METRO 3 Pram

Page 1: ...Getting ready for the journey INSTRUCTION MANUAL METRO Pram...

Page 2: ...L Family life is all about creating memories that last a lifetime and we re committed to celebrating life s beautiful moments a philosophy that touches everything we do We can t wait to join you on yo...

Page 3: ...Frame 14 Brake component 14 Rear wheels 15 Front swivel wheels 15 Seat extension canopy and bumper bar 16 Basket 16 Using your METRO 17 Unfolding 17 Folding 18 Lifting and carrying your METRO safely 1...

Page 4: ...the images of this instruction manual Your METRO frame is only compatible with the JIVE METRO seat unit or JIVE METRO bassinet Do not use your METRO frame with any other model of pram seat or bassinet...

Page 5: ...the goods fail to be of acceptable quality and the failure does not amount to a major failure The 24 Month Warranty period starts from the date your product s are dispatched from our warehouse This in...

Page 6: ...l damage abuse or neglect Damage to handle bar grips or fabrics as a result of normal handling and daily use Airline transport damage check your Redsbaby product carefully after it has been handled by...

Page 7: ...and stable packaging to avoid any damage occurring in transit We do not take responsibility of any damage that occurs in transit to and from our pram repairer Repairs and replacements provided within...

Page 8: ...ld be replaced as and when necessary Brakes are available through contacting our Customer Care team at info redsbaby com au Should any parts of the METRO become stiff or difficult to operate ensure th...

Page 9: ...ctly on the product IMPORTANT Do not place any fabric or other component of your METRO in the dryer Allow all parts to dry thoroughly before storing IMPORTANT Do not use products that contain alcohol...

Page 10: ...ys follow safety instructions for assembly folding and use Always ensure that your METRO is correctly assembled and locks are engaged before use After unpacking immediately discard any plastic wrappin...

Page 11: ...aby METRO Use the harness at all times When not in use disconnect shoulder straps from the waist strap and or buckle The harness can form loops which may cause a strangulation hazard Never leave a har...

Page 12: ...Redsbaby JIVE METRO Buggyboard The maximum weight of a child on the board is 20kg 44 1lbs Ensure you securely connect the JIVE METRO Buggyboard to the tubing that runs between the rear wheels of your...

Page 13: ...kes The Redsbaby METRO must only be used for one 1 child Do not hang bags on the Redsbaby METRO handles as this can cause it to become unstable Do not lift or carry the Redsbaby METRO when a child is...

Page 14: ...r pram Ensure you apply pressure to the handle to lift the front wheels over uneven surface levels or when meeting an incline or decline as required also called popping the front wheels Failure to tak...

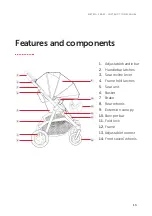
Page 15: ...2 3 4 5 6 7 8 9 10 11 13 14 12 1 Adjustable handle bar 2 Handle bar latches 3 Seat recline lever 4 Frame fold latches 5 Seat unit 6 Basket 7 Brake 8 Rear wheels 9 Extension canopy 10 Bumper bar 11 Fol...

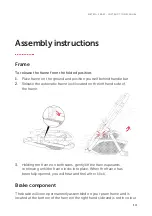
Page 16: ...c frame lock located on the left hand side of the frame 3 Holding the frame on both sides gently lift the frame upwards continuing until the frame locks into place When the frame has been fully opened...

Page 17: ...ked in place IMPORTANT Ensure you check that the wheels are clicked in correctly by tugging them outwards Failure to attach the wheels correctly will result in them falling off the pram while in use T...

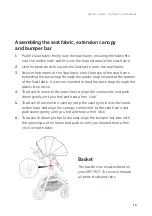
Page 18: ...se of the seat frame by feeding the base strap through the plastic loop located at the bottom of the Seat fabric It is recommended to feed the base strap through the plastic loop twice 4 To attach the...

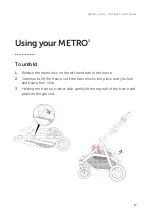
Page 19: ...old 1 Release the frame lock on the left hand side of the frame 2 Continue to lift the frame until the frame locks into place and you feel and hear a firm click 3 Holding the frame on either side gent...

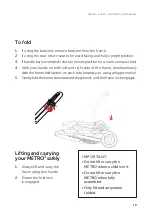
Page 20: ...oth left and right side of the frame simultaneously slide the frame fold latches on each side towards you using a trigger motion 5 Gently fold the frame down toward the ground until the frame lock eng...

Page 21: ...e in the released position firmly to ensure the brake lock is not touching the rear wheel Engaging and releasing the brake The brake is located next to the right rear wheel of the METRO The brake is i...

Page 22: ...ear and feel a click 2 Push the METRO forwards until you hear a second click in both front wheels 3 To unlock simply press the buttons again When released successfully you will hear and feel a click A...

Page 23: ...ar a firm click when each strap is secured IMPORTANT For the safety of your child the 5 point safety harness must be properly fitted and adjusted 2 To unlock the 5 point safety harness simply press th...

Page 24: ...on 3 Adjust the shoulder strap A1 and A2 waist straps B1 and B2 and crotch strap D to the desired fit 4 Adjust the shoulder height by accessing the back of the seat and feeding the shoulder strap tab...

Page 25: ...lower or raise the seat If the lever is not fully lifted the seat will not move 2 To reverse remove the seat unit by pushing the connectors located on either side of the seat unit inwards and lift up...

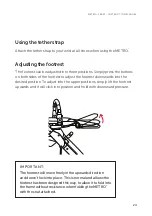
Page 26: ...est to adjust the footrest downwards into the desired position To adjust into the upper positions simply lift the footrest upwards and it will click into position and hold with downward pressure IMPOR...

Page 27: ...25 METRO3 PR AM INSTRUCTION MANUAL We can t wait to join you on your journey and see your story unfold Share them with us on Exciting times ahead...

Page 28: ...26 METRO3 PR AM INSTRUCTION MANUAL REDSBABY is a registered trademark of Redsbaby Pty Ltd ABN 68 625 563 519 Redsbaby Pty Ltd 2020...

Reviews: