background image

16

Turn on the console.

See step 1 on page 11.

Select one of the two custom programs.

To select one of the
two custom programs,
press the Programs
button repeatedly until
the Custom indicator
lights.

Note: If the custom program has not yet been
defined, see step 3 to create the program. If
the program is already defined, see step 4 to
use the program.

Press the Start button or begin pedaling to
create the program.

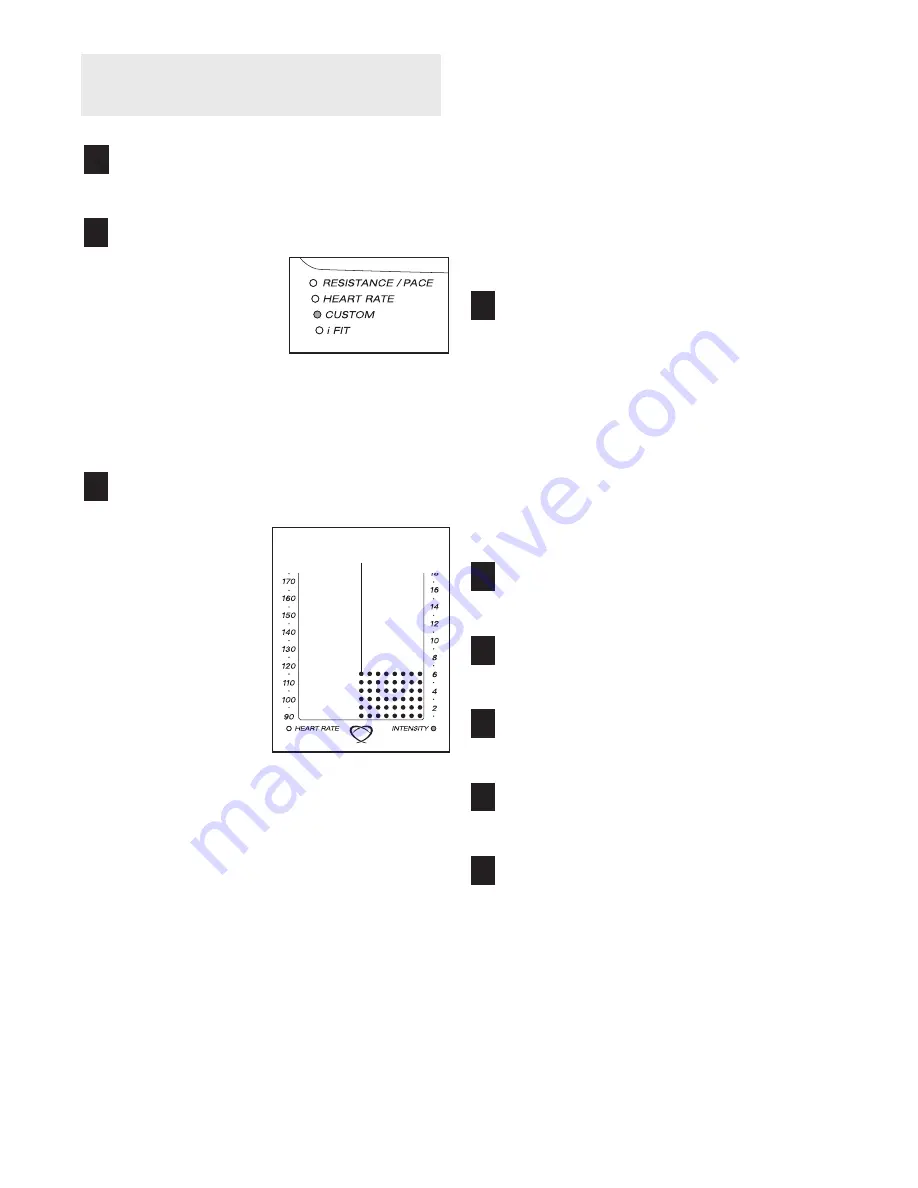
Refer to the matrix.
Each custom pro-
gram is divided into
40 one-minute seg-
ments. One resis-
tance setting and
one pace setting
can be pro-
grammed for each
segment. The resis-
tance setting for the
first segment will be
shown in the flash-
ing Current
Segment column of the matrix. (The pace settings
are not shown in the matrix.) To program a resis-
tance setting and a pace setting for the first seg-
ment, simply adjust the resistance of the pedals
as desired by pressing the Quick Resistance but-
tons, and pedal at the desired pace.  

When the first segment of the program ends, a
series of tones will sound and the current resis-
tance setting and the current pace setting will be

saved in memory. 

The columns of indicators will

then move one column to the left, and the resis-
tance setting for the second segment will be
shown in the flashing Current Segment column.
Program a resistance setting and a pace setting
for the second segment as described above.   

Continue programming resistance and pace set-
tings for as many segments as desired; custom
programs can have up to 40 segments. The resis-
tance and pace settings that you have pro-
grammed will be saved in memory.

Press the Start button or begin pedaling to
start the program.

The custom program will function in almost the
same way as a preset program (see steps 3 and
5 on page 13).

If desired, you can redefine the program while
using it. To change the resistance or pace set-
ting for the current segment, 
simply press the
Quick Resistance buttons or change your pedal-
ing pace to the new desired pace. When the cur-
rent segment ends, the new setting will be saved
in memory.

Adjust the angle of the ramp as desired.

See step 4 on page 11.

Monitor your progress with the displays.

See step 5 on page 11.

Measure your heart rate if desired.

See step 6 on page 12.

Turn on the fans if desired.

See step 7 on page 12.

When you are finished exercising, the console
will automatically turn off.

See step 8 on page 12.

9

8

7

6

5

4

3

2

1

Current Segment

HOW TO CREATE AND USE A CUSTOM
PROGRAM

Summary of Contents for RBE0995.1

Page 1: ...TIONS As a manufacturer we are com mitted to providing complete customer satisfaction If you have questions or if parts are damaged or missing PLEASE CONTACT OUR CUSTOMER SERVICE DEPARTMENT DIRECTLY C...

Page 2: ...back straight when using the ellip tical exerciser do not arch your back 11 If you feel pain or dizziness while exercis ing stop immediately and begin cooling down 12 The pulse sensor is not a medical...

Page 3: ...is RBE0995 1 The serial num ber can be found on a decal attached to the exercise cycle see the front cover of this manual To avoid a registration fee for any service needed under warranty you must reg...

Page 4: ...tity needed for assembly Note Some small parts may have been preassembled If a part is not in the parts bag check to see if it has been preassembled M8 Split Washer 85 11 M8 x 25mm Washer 119 2 M8 x 1...

Page 5: ...m Plastic Spacer and the other side of the U bracket Then insert the straight end of a Hairpin Cotter Pin 65 through the hole in the Clevis Pin 65 111 95 2 1 85 85 95 3 3 Slide an M8 x 25mm Washer 119...

Page 6: ...m Spacer 87 onto the barrel of the Union Set 86 While another person aligns the indicated holes in the Left Pedal Assembly 39 a Pedal Arm Wheel 52 and a Pivot Shaft 10 insert the barrel through all of...

Page 7: ...89 9 8 26 28 4 27 89 94 94 Lower Pulse Wire Lower Pulse Wire Upper Pulse Wire 10 Apply a small amount of the included Teflon lubricant to a paper towel and rub a thin film of the lubricant onto both o...

Page 8: ...o the corresponding con sole wire harnesses Then attach the Console to the Upright with six M4 x 16mm Screws 89 being care ful not to pinch the wires Attach the Upright Cover 22 to the Upright 4 with...

Page 9: ...lugged in the ellip tical exerciser s incline system may automatically calibrate itself During the calibration process two dashes will appear in the Ramp display while the ramp rises to the highest po...

Page 10: ...l ogy Having iFIT com interactive technology is like hav ing a personal trainer in your home Using the included audio cable you can connect the elliptical exerciser to your home stereo portable stereo...

Page 11: ...2 Monitor your progress with the displays The matrix When the manual mode or the iFIT com mode is selected the matrix will show a track representing 1 4 mile As you exercise the indi cators around the...

Page 12: ...tal contacts too tightly For optimal performance periodically clean the metal contacts using a soft cloth never use alcohol abrasives or chemi cals Turn on the fans if desired To turn on the fans at l...

Page 13: ...o the left The resistance setting for the second segment will then be shown in the flashing Current Segment column and the resistance of the pedals will automatically change to the resis tance setting...

Page 14: ...ips frequently for the program to operate properly Each time you hold the hand grips keep your hands on the metal contacts for at least 30 seconds Note When you are not holding the handgrips the lette...

Page 15: ...column of the matrix and the last segment ends Note During the program you can manually over ride the resistance setting for the current seg ment if desired with the Quick Resistance but tons However...

Page 16: ...indicators will then move one column to the left and the resis tance setting for the second segment will be shown in the flashing Current Segment column Program a resistance setting and a pace setting...

Page 17: ...to a 1 8 Y adapter available at electronics stores Plug the Y adapter into the PHONES jack on your CD player Plug your headphones into the other side of the Y adapter HOW TO CONNECT YOUR PORTABLE STER...

Page 18: ...adapter Plug the Y adapter into the LINE OUT jack on your stereo HOW TO CONNECT YOUR COMPUTER Note If your computer has a 1 8 LINE OUT jack see instruction A If your computer has only a PHONES jack se...

Page 19: ...he adapter into the AUDIO OUT jack on your VCR B Plug one end of the audio cable into the jack beneath the console Plug the other end of the cable into the adapter Plug the adapter into an RCA Y adapt...

Page 20: ...al trainer will begin guiding you through your workout Simply follow your personal trainer s instructions The program will function in almost the same way as a preset program see steps 3 and 5 on page...

Page 21: ...ur Web site at www iFIT com Follow the desired links on our Web site to select a program Read and follow the on line instructions for using a program Follow the on line instructions to start the progr...

Page 22: ...ss the Programs button Note A combination of letters and numbers will appear in the display 3 Press the 30 Quick Ramp button The ramp will rise to the highest position and then move down to the lowest...

Page 23: ...ys tem your exercise must be aerobic Aerobic exer cise is activity that requires large amounts of oxygen for prolonged periods of time This increases the demand on the heart to pump blood to the muscl...

Page 24: ...wer Board Bracket 49 1 Power Board 50 1 Power Board Bracket Cover 51 2 Wheel 52 2 Pedal Arm Wheel 53 4 Wheel Cap 54 1 C Magnet 55 1 Spring 56 1 Power Cord 57 1 Lower Wire Harness 58 1 Upper Wire Harne...

Page 25: ...Bolt 106 2 Frame Cushion 107 1 Clamp 108 1 Reed Switch Bracket 109 1 M5 x 16mm Self tapping Screw 110 2 M8 x 47mm Button Screw 111 4 8mm Plastic Spacer 112 1 Clevis Pin 113 4 8 x 9mm Screw 114 4 M5 N...

Page 26: ...28 94 94 94 94 4 20 89 18 33 32 120 120 19 120 120 34 5 89 14 13 88 88 88 88 16 15 58 24 7 90 32 20 91 89 29 30 90 90 6 24 27 89 103 123 35 103 123 35 85 100 92 96 89 89 89 89 89 85 110 110 59 89 89...

Page 27: ...6365 65 111 46 67 107 40 89 108 109 47 120 77 80 78 82 112 123 76 98 75 12 99 73 73 72 71 79 97 97 72 76 99 11 74 82 82 55 54 45 81 105 103 104 83 84 48 113 89 50 44 123 38 98 116 101 89 89 89 89 89 9...

Page 28: ...use improper or abnormal usage or repairs not provided by an ICON authorized service center products used for commercial or rental purposes or products used as store display models No other warranty b...

Reviews: