background image

6

ASSEMBLY

Assembly requires two persons.

Place all parts of the elliptical crosstrainer in a cleared area and remove the

packing materials. Do not dispose of the packing materials until assembly is completed.  

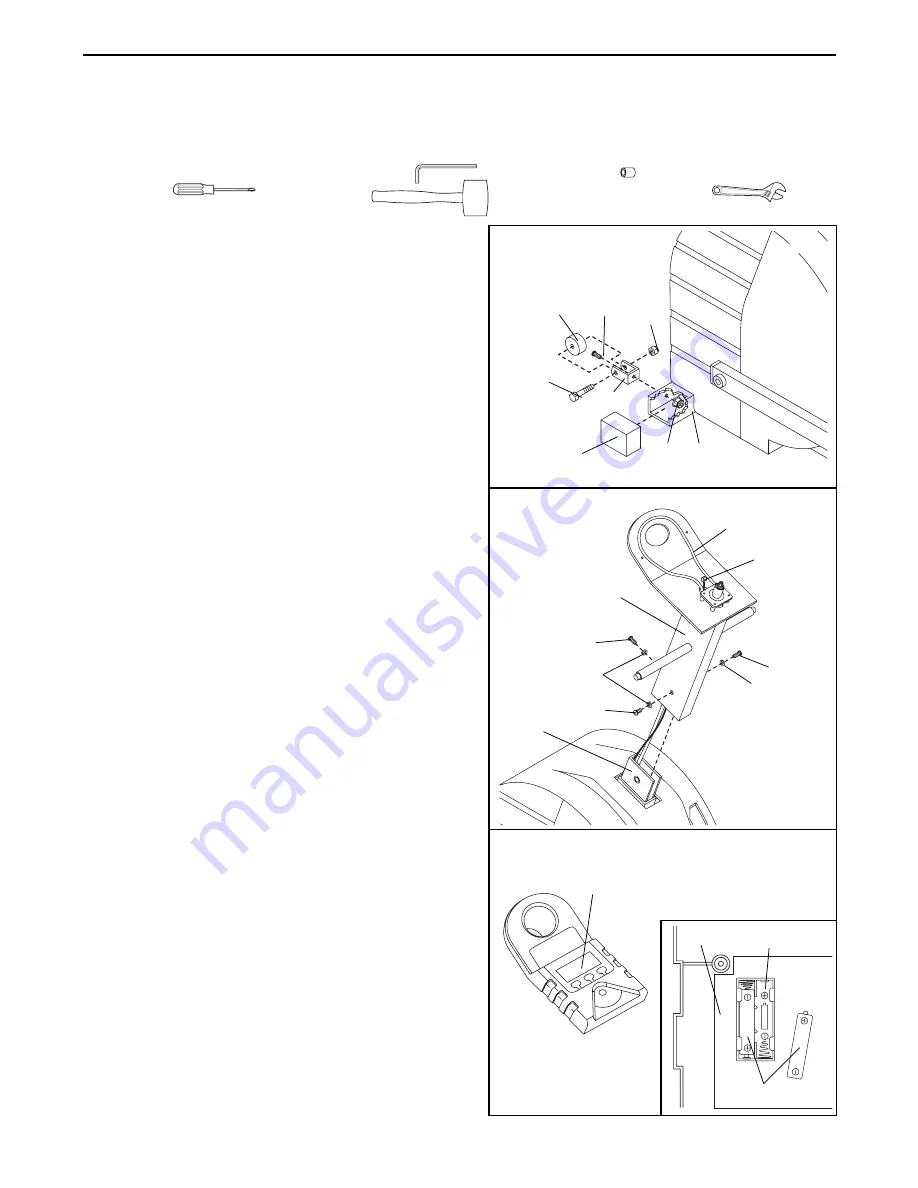
Assembly requires the included allen wrench                  and push nut tool      , and your own phillips
screwdriver                      rubber mallet                             and two adjustable wrenches                  .

2. Hold the Upright (6) in the position shown. Carefully

pull the Resistance Control Wire (48) and the Reed
Switch Wire (52) up through the Upright until there is
no slack between the Upright and the Frame (1).

Slide the Upright (6) onto the Frame (1). 

Be careful

to avoid pinching the Resistance Control Wire
(48) and the Reed Switch Wire (52).

Tighten a 3/8Ó

Button Head Screw (65) and a 3/8Ó Lock Washer
(66) into the front of the Upright and the Frame.
Next, tighten two 3/8Ó Button Head Screws and 3/8Ó
Lock Washers into the sides of the Upright and the
Frame. Note: It may be necessary to loosen the front
Button Head Screw slightly in order to attach the
other two Button Head Screws. 

Firmly tighten all

three Button Head Screws.

1. Attach a Wheel Bracket (82) to the front of the Frame

(1) with a 3/8Ó Button Head Screw (65) and a 3/8Ó
Flange Nut (88). Attach a Wheel (83) to the Wheel
Bracket with a 3/8Ó x 1 3/4Ó Bolt (84) and a 3/8Ó
Nylon Locknut (85). Make sure that the Wheel turns
after you have tightened these parts. Attach the other
Wheel Bracket and Wheel to the Frame in the same
way.

Press two 2Ó x 3Ó Caps (38) onto the front of the
Frame (1). Press the other two 2Ó x 3Ó Caps onto the
back of the Frame (not shown).

2

6

48

52

65

65

65

66

66

1

3. The Console (43) requires two ÒAAÓ batteries (not

included). Alkaline batteries are recommended. 

To install batteries, turn over the Console (43) (see
the inset drawing). Insert two batteries into the bat-
tery clip. 

Make sure that the negative ends of the

batteries (marked ÒÐÓ) are touching the springs
in the battery clip. 

3

43

43

Batteries

Battery Clip

1

88

38

84

82

85

83

65

1

Summary of Contents for RBEL68082

Page 1: ...al Number Decal QUESTIONS If you have questions or if there are missing or damaged parts please call direct to our toll free Customer Hot Line The trained technicians on our Customer Hot Line will pro...

Page 2: ...rvice center to products used for commercial or rental pur poses or to products used as store display models No other warranty beyond that specifically set forth above is authorized by ICON ICON is no...

Page 3: ...when mounting and dismounting 9 Each time you stop exercising allow the pedals to slowly come to a stop 10 Keep your back straight when using the elliptical crosstrainer Do not arch your back 11 If yo...

Page 4: ...you use the REEBOK elliptical crosstrainer If you have additional questions please call our Customer Service Department toll free at 1 800 999 3756 Monday through Friday 6 a m until 6 p m Mountain Ti...

Page 5: ...y needed for assembly Note Some small parts may have been pre attached If a part is not in the parts bag check to see if it has been pre attached 3 8 Button Head Screw 65 5 3 8 Lock Washer 66 3 3 8 Ny...

Page 6: ...of the Upright and the Frame Note It may be necessary to loosen the front Button Head Screw slightly in order to attach the other two Button Head Screws Firmly tighten all three Button Head Screws 1 A...

Page 7: ...bar 5 cannot be moved toward the Upright 6 or toward the Push Nuts 60 Press a Pivot Cap 57 into the Small Pivot Cover Repeat this step to attach the Right Handlebar not shown 6 Make sure that there ar...

Page 8: ...there is one bar This shows that during the first two minutes of program 1 the target pace will be about 1 5 miles per hour see the scale at the left end of the graph In the second column there are fi...

Page 9: ...just your pace until only one bar appears in the right column As the program progresses the target pace will change periodical ly as the target pace changes adjust your pace to keep both columns at th...

Page 10: ...eel the pedals will continue to move until the flywheel stops When the pedals are stationary step off the highest pedal first Then step off the lowest pedal Inspect and tighten all parts of the ellipt...

Page 11: ...ment Repeat until the console displays cor rect feedback When the Reed Switch is correctly adjusted reattach the hood HOW TO ADJUST THE V BELT If the V belt 44 slips as you exercise it should be adjus...

Page 12: ...lories for energy If your goal is to burn fat keep your heart rate in the lower half of your train ing zone as you exercise Aerobic Exercise If your goal is to strengthen your cardiovascular sys tem y...

Page 13: ...achilles tendons bend your back leg as well Stretches Calves achilles tendons and ankles 4 Quadriceps Stretch With one hand against a wall for balance reach back and grasp one foot with your other ha...

Page 14: ...1 2 x 4 Cap 41 2 Pedal 42 1 Hood 43 1 Console 44 1 V belt 45 2 Foam Grip 46 1 J hook 47 1 5 16 Hex Nut 48 1 Resistance Control Assembly 49 2 Extension Spring 50 1 Resistance Belt 51 1 Cable Clip 52 1...

Page 15: ...18 78 31 19 20 9 10 53 28 72 22 27 23 24 24 25 37 16 17 22 46 47 11 50 49 35 34 14 13 12 13 14 15 32 30 38 21 53 28 32 52 53 36 53 28 53 48 67 71 28 62 61 9 21 19 20 38 78 18 17 16 39 29 29 3 8 22 22...

Page 16: ...onday through Friday 6 a m until 6 p m Mountain Time excluding holidays To help us assist you please be prepared to give the following information when calling The MODEL NUMBER of the product RBEL6808...

Reviews: