background image

16

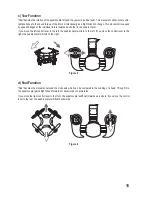
e) Roll Function

"Roll" denotes the movement around the centre line which can be compared to the sideways rolling of a ball (or the 

sideways crawl of a crab). In this way, through lifting one side the quadrocopter moves independent of its forward 

direction to the side.

If you move the right control lever to the left, the quadrocopter will float to the left as a whole. If you move the control 

lever to the right, the quadrocopter will float to the right. 

Figure 7

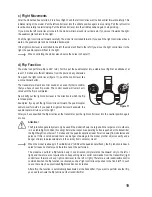
f)  Flight Mode

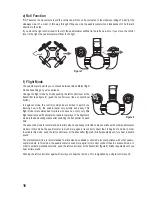
The quadrocopter permits you to choose between three different flight 

modes depending on your experience. 

Change the flight mode by briefly pushing the left control lever at the 

transmitter (see figure 8) (push the control lever like a conventional 

button).
In beginner mode, the control commands are limited to permit you 

learning  how  to  fly  the  quadrocopter  very  quickly  and  easily.  This 

flight mode is recommended for pilots who have no or only very little 

flight experience with helicopters or quadrocopters yet. The beginner's 

mode is the basic configuration after switching the transmitter on each 

time.
The advanced mode is recommended to pilots who have already collected some experience with other quadrocopter 

models. In this mode, the quadrocopter is much more agile in its control conduct than in beginner's mode. In order 

to activate this mode, push the left control lever at the transmitter (figure 8) briefly repeatedly until you hear a double 

sound. 
The professional mode is recommended to pilots who have already collected a lot of experience with other quadro-

copter models. In this mode, the quadrocopter is even more agile in its control conduct than in advanced mode. In 

order to activate professional mode, push the left control lever at the transmitter (figure 8) briefly repeatedly until you 

hear a triple sound. 

Pushing the left control lever again will return you to beginner's mode. This is signalled by a single control sound.

Figure 8

Summary of Contents for 1526043

Page 1: ...Operating Instructions Electro Quadrocopter Q Pro FPV RtF Item No 1526043 ...

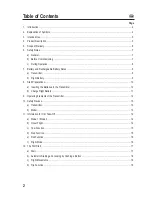
Page 2: ...Battery 9 8 Start Preparations 10 a Inserting the Batteries in the Transmitter 10 b Charge Flight Battery 11 9 Operating Elements of the Transmitter 12 10 Safety Devices 13 a Transmitter 13 b Model 13 11 Information for First Take Off 14 a Mode 1 Mode 2 14 b Hover Flight 14 c Yaw Function 15 d Nod Function 15 e Roll Function 16 f Flight Mode 16 12 The First Start 17 a Start 17 b Automatic Starting...

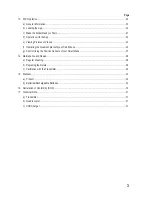
Page 3: ...Quadrocopter with your Smartphone 23 g Control Using the Position Sensors of your Smartphone 27 14 Maintenance and Repair 28 a Regular Cleaning 28 b Replacing the Rotors 28 c Calibration with the Transmitter 29 15 Disposal 30 a Product 30 b Batteries Rechargeable Batteries 30 16 Declaration of Conformity DOC 30 17 Technical Data 31 a Transmitter 31 b Quadrocopter 31 c USB Charger 31 ...

Page 4: ...r this if you pass on the product to any third party Therefore retain these operating instructions for reference All company names and product names are trademarks of their respective owners All rights reserved If there are any technical questions please contact International www conrad com contact United Kingdom www conrad electronic co uk contact 2 Explanation of Symbols The exclamation mark in ...

Page 5: ...rated cam era The control is possible in mode 1 and mode 2 equally In the professional field such flight devices are already used for the most diverse of tasks State of the art microprocessor controlled electronics with position control and acceleration sensors stabilise the flight position and flying altitude of the quadrocopter Q Pro FPV Live transmission using the camera installed in the quadro...

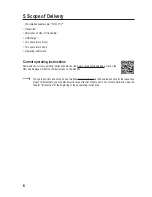
Page 6: ...the current operating instructions via the link www conrad com downloads or scan the QR code displayed Observe the instructions on the website The spare part list can be found on our website www conrad com in the download section for the respective product Alternatively you may also email to request the list of spare parts For contact information see the chapter Introduction at the beginning of th...

Page 7: ...before commissioning your model Observe In some EU countries you are required to have insurance for any flying models The unauthorized conversion and or modification of the product or its components is inadmissible for safety and approval reasons This product is not a toy and not suitable for children under 14 years of age The product must not get damp or wet Do not leave any packaging material un...

Page 8: ...ng operation of the model For this reason take a break of 5 to 10 minutes before recharging the firmly integrated flight battery in the quadrocopter Never switch off the remote control transmitter while the model is in use After landing always first switch the on off switch at the quadrocopter to the off position OFF Only then may the remote control transmitter be switched off In case of a defect ...

Page 9: ...Do not recharge normal batteries There is a risk of fire and explosion Make sure that the polarity is correct when inserting the batteries pay attention to plus and minus If the device is not used for an extended period of time e g storage remove the inserted batteries from the remote control to avoid damage from leaking batteries Always replace the whole set of batteries Do not mix full batteries...

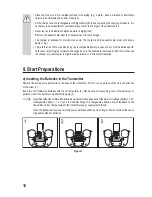
Page 10: ...ygen due to the chemicals contained in them Do not expose the charger or quadrocopter to high low temperatures or to direct solar radiation 8 Start Preparations a Inserting the Batteries in the Transmitter Remove the battery compartment lid on the back of the transmitter For this you need to push the lid in the direction of the arrow 1 Insert two micro AAA size batteries with the correct polarity ...

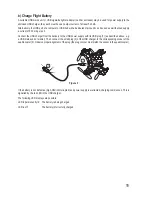
Page 11: ...ivery to the USB power supply with its USB plug 1 as described above e g a USB mains unit or similar Then connect the small plug 2 of the USB charger to the corresponding socket of the quadrocopter 3 Observe proper alignment of the plug the plug contour must match the socket in the quadrocopter Figure 2 If the battery is not defective high Ohmic interrupted and power supply is warranted charging c...

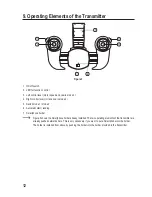
Page 12: ...n mode 2 5 Switch mode 1 mode 2 6 Automatic start landing 7 Smartphone holder Figure 3 shows the Smartphone holder already installed The two operating elements of the transmitter are already pushed outwards here This is only necessary if you want to put a Smartphone into the holder The holder is installed from above by pushing the holder into the holder provided in the transmitter ...

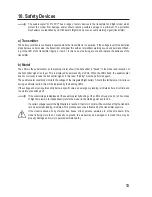
Page 13: ...the quadrocopter does not correctly receive the transmitter signal In this case binding must be performed again The quadrocopter constantly monitors the voltage of the integrated flight battery Should this fall below a critical level during a particular period this will be indicated by the flashing LEDs If the voltage undercut is permanently below a specific value an emergency landing is initiated...

Page 14: ...ter the transmitter is switched off b Hover Flight For a simpler and consistent explanation of steering classic terminology is used here as well This comes from flight language and is widely used Directional descriptions are always to be interpreted from the perspective of a virtual pilot in the model The two black rotors are considered direction indicators They mean front The explanations are all...

Page 15: ...he left control lever to the left the quadrocopter will turn to the left If you move the control lever to the right the quadrocopter will turn to the right Figure 5 d Nod Function Nod denotes the movement around the cross axis which can be compared to the nodding of a head Through this the quadrocopter gains flight speed forwards or backwards or decelerates If you move the right control lever to t...

Page 16: ...flight mode is recommended for pilots who have no or only very little flight experience with helicopters or quadrocopters yet The beginner s mode is the basic configuration after switching the transmitter on each time The advanced mode is recommended to pilots who have already collected some experience with other quadrocopter models In this mode the quadrocopter is much more agile in its control c...

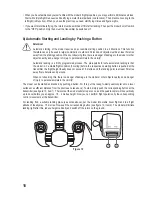
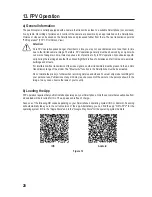
Page 17: ...t up Now put both control levers into the neutral position Pull and hold both control levers to the position that you used for starting the ro tors see figure 9 for approx two seconds to switch off the rotors again Now increase the rotating speed of quadrocopter rotors by pushing the left control lever forward slowly until the quadrocopter takes off and hovers in front of you at a height of approx...

Page 18: ...e automated landing is that the model is in a stable flight condition hovering before the respective operating button is pushed at the transmitter the flight height ideally does not exceed 1 5 metres and the landing point is at least 5 metres away from obstacles and persons When not observing this there is a danger of damage to the model or other objects nearby and a danger of injury to persons an...

Page 19: ...which the flip is to take place Examples If you push the right control lever forward the quadrocopter will turn over forwards If you push the right control lever backward the quadrocopter will turn over to the right After you have specified the flip direction at the transmitter put the right control lever into the neutral position again at once Attention The flip function generally must only be us...

Page 20: ...mals buildings and streets For interference free transmission of the video signals no other transmitters must be present in the 2 4 GHz transmission range of the model The Bluetooth function in the Smartphone must be deactivated Do not violate the privacy of others when recording pictures and videos You must only make recordings for your personal use Publications of any kind may require consent of...

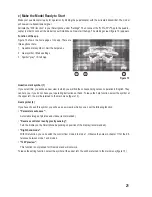
Page 21: ...ng notes on operation in English They can help you if you do not have your operating instructions at hand To leave the help function select the symbol at the upper left You will be returned to the main menu figure 13 Gear symbol 2 If you have chosen this symbol you will see a new view in which you can set the following function Parameters auto save Automatic storage of pictures and videos recommen...

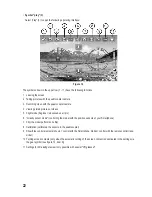
Page 22: ...ed user pro 6 Gravity sensor mode controlling the model with the position sensors of your Smartphone 7 Flip the model performs one flip 8 Calibration calibrates the sensors in the quadrocopter 9 Show hide control elements shown control with the Smartphone hidden control with the remote control trans mitter 10 Turning screen contents only when the automatic turning of the screen content is deactiva...

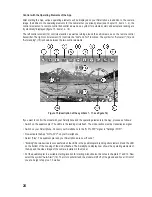
Page 23: ...reen content will appear Select either Pictures or Video Depending on your selection another screen content will appear with the saved pictures or videos You can open them for viewing by tapping them To delete pictures or videos select the corre sponding file touch it for a longer time and then following the screen instructions f Operating the Quadrocopter with your Smartphone The quadrocopter Q P...

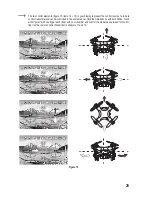
Page 24: ...you want to control the model with your Smartphone and the operating elements in the App proceed as follows Switch on the quadrocopter The LEDs in the landing struts flash The model will now emit a transmission signal Switch on your Smartphone Connect your Smartphone to the Q Pro FPV signal in Settings WIFI Now activate the App Q Pro FPV on your Smartphone Select play The quadrocopter and your Sma...

Page 25: ...rs of a remote control transmitter and can be controlled in the same manner Hold the Smartphone with both hands Touch either point with one finger each best with your thumbs and control the model as explained for control ling it with a remote control transmitter in chapters 11 and 12 Figure 16 ...

Page 26: ...tops drifting to the left A drift of the control function Nod can be fixed with the respective trim element 18 If the options of the trim elements are not sufficient to make the model fly stably or if it is flying differently from what you are used to you need to re calibrate the sensors of your quadrocopter For this put the quadrocopter onto a level surface ready to start Push the icon for calibr...

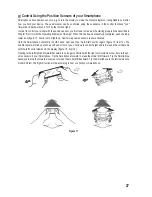
Page 27: ...il it lights up Control via position sensors is now activated Hold the Smartphone horizontally in both hands Last push the Auto Start symbol again figure 15 item 14 The quadrocopter will start up at once and float in front of you Continue to control height and turn around the vertical axis with the left control element in the display figure 15 item 12 Floating to the left right and forward backwar...

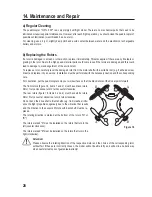
Page 28: ...med with the necessary caution and the corresponding care For orientation put the quadrocopter onto your work surface so that the black rotors of the model point forward The front rotors figure 18 items 1 and 2 must have black rotors Rotor 1 turns clockwise rotor 2 turns counter clockwise The rear rotors figure 18 items 3 and 4 must have white rotors Rotor 3 turns counter clockwise rotor 4 turns c...

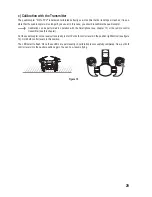
Page 29: ...an be performed in operation with the Smartphone see chapter 13 or the remote control transmitter see this chapter Put the quadrocopter onto a level surface ready to start Put both control levers in the position right bottom see figure 19 Hold both control levers in this position The LEDs start to flash Once these LEDs are permanently lit calibration is successfully completed Now put both control ...

Page 30: ...ve heavy metals are Cd cadmium Hg mercury Pb lead the names are indicated on the battery rechargeable battery e g below the rubbish bin symbol shown on the left You may return used batteries rechargeable batteries free of charge at the official collection points in your community in our stores or wherever batteries rechargeable batteries are sold You thus fulfil your statutory obligations and cont...

Page 31: ...tput for FPV video image 10 mW Total height 28 mm Diameter 44 mm Diameter of the rotors 30 mm Take off weight approx 19 g Camera resolution 0 4 Mp Resolution photo and video 720 x 576 Frame rate 25 frames s Video format AVI Image format JPG Permissible flight operation in buildings and in wind still conditions Permitted temperature range 0 C to 40 C Permitted humidity max 75 rel humidity non conde...

Page 32: ...ved Reproduction by any method e g photocopy microfilming or the capture in electronic data processing systems require the prior written approval by the editor Reprinting also in part is prohibited This publication represent the technical status at the time of printing Copyright 2017 by Conrad Electronic SE 1526043_V3_0617_02_VTP_m_en ...

Reviews: