background image

89

22. Technical data

a) Remote control

Frequency range ..............................................2.460 – 2.480 GHz
Number of channels .........................................4
Transmission power..........................................< 20 dBm
Transmission range ..........................................approx. 45 m
Operating voltage .............................................6 V/DC via 4 AA/Mignon batteries 
Dimensions (W x H x D) ...................................140 x 185 x 70 mm (without smartphone holder)
Smartphone holder span ..................................max. 83 mm
Weight incl. batteries ........................................270 g

b) Quadrocopter

FPV frequency range ........................................2.406 – 2.428 GHz
Transmission power..........................................< 20 dBm
Transmission range ..........................................approx. 50 m
Power supply ....................................................3.7 V/750 mAh (1S LiPo)
Dimensions (Ø x H) ..........................................337 x 84 mm
Distance between rotor shafts (diagonal) .........193 mm
Propeller diameter ............................................126 mm
Take-off weight incl. battery ..............................103 g

c) Camera

Video resolution ................................................1280 x 720 pixels at 25 frames/s (recording format MP4)
Image resolution ...............................................1280 x 720 pixels (recording format JPG)
Memory card .....................................................MicroSD with up to 128 GB (Class 4 - 10)

Summary of Contents for Blackster R6 Pro FPV WiFi

Page 1: ...Bedienungsanleitung Elektro Quadrocopter Blackster R6 Pro FPV WiFi RtF Best Nr 1576770 Operating Instructions Electric Quadrocopter Blackster R6 Pro FPV WiFi RtF Item No 1576770 ...

Page 2: ...alten des Senders 13 10 Inbetriebnahme des Quadrocopters 14 a Laden des Flugakkus 14 b Montage der Landebeine 15 c Montage der Propellerschutzbügel 15 d Überprüfen des Antriebs 16 e Einsetzen des Flugakkus 17 f Einschalten des Quadrocopters 18 g Grundsätzliche Informationen zum Steuern von Quadrocoptern 20 h Praktische Flugtipps für den ersten Start 23 i Starten des Quadrocopters 24 j Trimmen des ...

Page 3: ...sensoren 36 17 FPV Betrieb 37 a Allgemeine Informationen 37 b App laden 37 c Aufrufen der App 38 d Smartphone als Kameramonitor nutzen 40 18 Wartung und Pflege 42 a Allgemein 42 b Auswechseln der Propeller 42 19 Beheben von Störungen 43 20 Entsorgung 44 a Produkt 44 b Batterien Akkus 44 21 Konformitätserklärung DOC 44 22 Technische Daten 45 a Sender 45 b Quadrocopter 45 c Kamera 45 Seite ...

Page 4: ... wenn Sie dieses Produkt an Dritte weitergeben Heben Sie deshalb diese Bedienungsanleitung zum Nachlesen auf Alle enthaltenen Firmennamen und Produktbezeichnungen sind Warenzeichen der jeweiligen Inhaber Alle Rechte vorbehalten Bei technischen Fragen wenden Sie sich bitte an Deutschland www conrad de kontakt Österreich www conrad at www business conrad at Schweiz www conrad ch www biz conrad ch 2 ...

Page 5: ...nen anderen Einsatz ist dieses System nicht geeignet Eine andere Verwendung als zuvor beschrieben kann zur Beschädigung des Produktes mit den damit verbundenen Gefahren wie z B Kurzschluss Brand elektrischer Schlag etc führen Das Produkt darf nicht feucht oder nass werden Das Produkt ist nicht für Kinder unter 14 Jahren geeignet Beachten Sie alle Sicherheitshinweise dieser Bedienungsanleitung Dies...

Page 6: ...ortrieb Der Quadrocopter fliegt in die jeweilige Richtung Am Modell drehen sich zwei Propeller im Uhrzeigersinn und zwei Propeller entgegen dem Uhrzeigersinn Durch eine gezielte Drehzahländerung der beiden Propellergruppen zueinander rechtsdrehende Propeller drehen etwas schneller und linksdrehende Propeller drehen etwas langsamer oder auch umgekehrt ist es möglich dass sich der Quadrocopter in gl...

Page 7: ...z B über eine Haftpflichtversicherung Falls Sie bereits eine Haftpflichtversicherung besitzen so informieren Sie sich vor Inbetriebnahme des Modells bei Ihrer Versicherung ob der Betrieb des Modells mitversichert ist Beachten Sie In verschiedenen Ländern der EU besteht eine Versicherungspflicht für alle Flugmodelle Informieren Sie sich auch über die lokalen gesetzlichen Vorschriften zum Betrieb vo...

Page 8: ...lichen Teile am Modell müssen leichtgängig funktionieren dürfen jedoch kein Spiel in der Lagerung aufweisen Überprüfen Sie vor jeder Inbetriebnahme den korrekten und festen Sitz der Rotoren Der zum Betrieb erforderliche Flugakku muss vor dem Einsatz geladen werden Achten Sie bei den Batterien im Sender auf eine noch ausreichende Restkapazität siehe Sender LED Sollten die Batterien leer sein so tau...

Page 9: ...rien und Akkus im täglichen Leben heute eine Selbstverständlichkeit ist bestehen zahlreiche Gefahren und Probleme Beachten Sie deshalb unbedingt die nachfolgend genannten allgemeinen Informationen und Sicherheitshinweise zum Umgang mit Batterien und Akkus Batterien Akkus gehören nicht in Kinderhände Lassen Sie Batterien Akkus nicht offen herumliegen es besteht die Gefahr dass diese von Kindern ode...

Page 10: ...us Sollte die äußere Isolierung des Akkus beschädigt sein bzw der Akku verformt bzw aufgebläht sein darf er auf keinen Fall aufgeladen werden In diesem Fall besteht akute Brand und Explosionsgefahr Beschädigen Sie niemals die Außenhülle des Flugakkus zerschneiden Sie die Folienumhüllung nicht stechen Sie nicht mit scharfen Gegenständen in den Flugakku Es besteht Brand und Explosionsgefahr Laden Si...

Page 11: ...e Roll Funktion 6 Drucktaste für den automatischen Start 7 Drucktaste für den Beginner Sport und Experten Modus 8 Drucktaste für die automatische Landung 9 Drucktaste für die Video Foto Funktion 10 Ein Aus Schalter 11 Trimmtaste bei diesem Modell ohne Funktion 12 Drucktaste für die WiFi Licht Funktion 13 Steuerknüppel für die Pitch und Gier Funktion 14 Drucktaste für die Headless Return Funktion 1...

Page 12: ...rien 1 5 V Zelle und keine Akkus 1 2 V Zelle für die Stromversorgung des Senders Zum Einlegen der Batterien gehen Sie wie folgt vor Lösen Sie mit einem geeigneten Schraubendreher die Halteschraube 1 des Batteriefachdeckels 2 an der Sen derrückseite Drücken Sie auf die beiden geriffelten Flächen 3 und schieben Sie den Batteriefachdeckel nach unten ab Legen Sie 4 AA Mignon Batterien entsprechend den...

Page 13: ...n Signalton ab Bewegen Sie den Steuerknüppel nun ganz nach unten Der Sender gibt erneut einen kurzen Signalton ab und die LED Anzeige leuchtet jetzt dauerhaft Schalten Sie danach den Sender mit dem Ein Aus Schal ter 10 wieder aus Sollte die Stromversorgung für den vorschriftsmäßigen Betrieb des Senders nicht mehr ausreichend sein so blinkt die LED Anzeige siehe Bild 3 Pos 15 alle 1 5 Sekunden und ...

Page 14: ...ku vollständig geladen erlischt die rote LED im USB Stecker Trennen Sie unmittelbar nach dem Ladevorgang den Flug akku vom Ladekabel und ziehen Sie den USB Stecker des Ladekabels aus dem Computer Notebook bzw Steckerla der Achtung Schließen Sie das USB Kabel nicht an einem USB Hub ohne eigenes Netzteil an z B ein USB Port in einer Tastatur o ä da hier der Strom für die Ladefunktion nicht ausreiche...

Page 15: ...rn wird der Quad rocopter mit vier Kunststoffbügeln geliefert Um die Schutzbügel aufstecken zu können müssen zunächst die Kunststoffabdeckungen 1 aus den Hal teschächten 2 gezogen werden Nun können die Propellerschutzbügel 3 in den Hal teschacht eingeschoben werden Arbeiten Sie dabei mit sanftem Druck damit die Schutzbügel korrekt einrasten und sicher halten Wichtiger Hinweis Auch wenn zum Zweck d...

Page 16: ...ufwand fliegen Aus die sem Grund sollten Sie die Funktion der Antriebspropeller vor jedem Flug kurz prüfen Drehen Sie dazu jeden einzelnen Propeller vorsichtig mit dem Finger und überprüfen Sie den Rundlauf und die Leichtgängigkeit Beachten Sie dabei die Drehrichtungen der verschiedenen Propeller Zwei Propeller drehen sich von oben gesehen im Uhrzeigersinn A und zwei Propeller drehen sich ent gege...

Page 17: ...tem Einbau darf kein Spalt zwischen Akku und dem Gehäuse des Quadrocopters zu sehen sein Um den Akku wieder zu entfernen drücken Sie auf die beiden geriffelten Flächen 4 und 5 und ziehen den Akku gefühlvoll nach hinten aus dem Schacht Tipp aus der Praxis Wenn Sie bereits bei Einschieben leicht auf die beiden geriffelten Flächen drücken lässt sich der Akku leichter verriegeln Wichtig Wenn Sie den Q...

Page 18: ...üppel anschließend ganz nach unten Der Sender gibt erneut einen kurzen Signalton ab Die LEDs im Quadrocopter flackern für ca 2 Sekunden und leuchten nach erfolgreicher Bindung dauerhaft Die LED Anzeige im Sender leuchtet ebenfalls dauerhaft Der Quadrocopter ist nun startbereit Wichtig Während des Einschaltvorgangs sollte sich kein zweiter 2 4 GHz Sender in unmittelbarer Nähe befinden Der Quadrocop...

Page 19: ... oder wenn eine Datenverbindung zu einem Smartphone besteht blinkt unmittelbar neben der roten LED eine blaue LED Die Funktion der Kamera sowie die WiFi Signalübertragung kann per Fernsteuerung ein und ausgeschal tet werden Betätigen Sie dazu die Drucktaste für die WiFi Licht Funktion siehe auch Bild 1 Pos 12 ein Mal kurz nach unten hinten Bei jeder Betätigung des Tasters ändert sich der Schaltzus...

Page 20: ...en zur Verfügung Pitch Funktion Mit Hilfe der Pitch Funktion wird die Flughöhe eines Quadrocopters beeinflusst siehe Bild 11 Die Steuerung erfolgt mit dem linken Steuerknüppel siehe auch Bild 1 Pos 13 Wenn die Motoren per Fernsteuerbefehl gestartet wurden laufen sie im Leerlauf Wird nun der Steuerknüppel aus seiner Mittelposition nach vorne geschoben erhöhen die Propeller die Drehzahl und der Quad...

Page 21: ... den Quadrocopter von oben gesehen um die Hochachse nach links dreht siehe Pfeile in Bild 12 Wird der Steuerknüppel nach rechts bewegt fallen die Drehzahländerungen der Propeller genau umgekehrt aus und das Modell dreht sich nach rechts Bild 12 Roll Funktion Mit Hilfe der Roll Funktion können Sie den Quadrocopter seitlich nach rechts und links bewegen siehe Bild 13 Die Steuerung erfolgt mit dem re...

Page 22: ...uerknüppel siehe auch Bild 1 Pos 3 Wird der Knüppel leicht nach vorne gedrückt werden von der Elektronik im Quadrocopter die Propellerdrehzahlen so verändert dass sich das Modell leicht nach vorne neigt und somit auch nach vorne fliegt Steuern Sie am Sender nach hinten fallen die Drehzahländerungen der Propeller genau umgekehrt aus und das Modell fliegt nach hinten Bild 14 ...

Page 23: ...blasene Luft bis zum Boden reicht Bodeneffekt ist die Fluglage deutlich instabiler Sollten die Propeller an Gegenständen anstoßen und blockiert werden so schieben Sie den Pitch Knüppel unverzüg lich in die unterste Stellung damit die betroffenen Antriebsmotoren nicht weiter mit Strom versorgt werden Achtung wichtig Versuchen Sie niemals den fliegenden Quadrocopter mit der Hand zu fassen Es besteht...

Page 24: ...orsichtig nach vorne bewegen wird der Quadro copter die Propellerdrehzahlen deutlich erhöhen und abheben Mit dem rechten Steuerknüppel können Sie ein eventuelles Abdriften nach vorne oder hinten bzw zur Seite leicht korrigieren Ist die gewünschte Flughöhe erreicht bewegen Sie den linken Steuerknüppel wieder in die Mittelstellung Der Quadrocopter kann nun dank eines barometrischen Sensors selbsttät...

Page 25: ...llung der Trimmung erreicht werden vom Sender keine Signaltöne mehr abgegeben Die Mittelstellung der Trimmung wird mit einem längeren Signalton akustisch angezeigt Wenn Sie den Quadrocopter später sicher im Griff haben können Sie die Trimmung auch während des Fluges optimal einstellen Roll Trimmung Will der Quadrocopter seitlich nach rechts driften bzw kippen so nehmen Sie die Drehzahl zurück bis ...

Page 26: ...en Sie den Vorgang sooft bis das Modell keinerlei Tendenz mehr zeigt nach vorne zu driften Will der Quadrocopter nach hinten driften betätigen Sie die Trimmtaste für die Nick Funktion nach oben Bild 17 Die Trimmung für die Roll und Nick Funktion wird nicht gespeichert Nach dem Aus und Einschalten des Senders steht die Trimmung wieder in der Mittelstellung Achtung Sollte die Trimmung sehr weit vers...

Page 27: ...ste Position und halten ihn in dieser Stellung fest bis die Propeller stehen bleiben Der Quadrocopter kann jetzt ausgeschaltet werden Methode 2 Wenn sich der Quadrocopter im Schwebeflug befindet betätigen Sie die Taste 8 für die automatische Lande funktion Der Quadrocopter wird nun die Flughöhe selbsttätig verrin gern bis er wieder auf den Landebeinen steht Während dieser Zeit blinken die LEDs im ...

Page 28: ...us diesem Grund eignet sich dieser Modus ideal für fortgeschrittene Anwender Experten Modus Im Experten Modus steht ihnen die max Steuerempfindlichkeit zur Verfügung Diese Einstellung ist für erfahrene Anwender und für den Einsatz des Quadrocopters im Außenbereich vorgesehen Aktivierung der unterschiedlichen Flug Modi Nach dem Einschalten befindet sich der Sender automatisch im Beginner Modus Um v...

Page 29: ...öne ab Bewegen Sie nun den Steuerknüppel für die Nick und Roll Funktion siehe Bild 1 Pos 3 schnell bis zum An schlag in die Richtung in die der Quadrocopter flippen soll und führen Sie danach den Steuerhebel unverzüglich zurück in die Mittelstellung Der Quadrocopter wird den Überschlag in die gewünsch te Richtung durchführen und der Sender beendet danach den Flip Modus Um einen weiteren Überschlag...

Page 30: ...Bild 21 Abb A Solange der Modellpilot dann genau hinter dem Quadrocopter steht und in die zuvor festgelegte Richtung blickt wird der Quadrocopter aus seiner Sicht so reagieren wie am Sender gesteuert wird Wenn nach vorne gesteuert wird fliegt der Quadrocopter aus Sicht des Piloten auch nach vorne siehe dunkler Pfeil in Bild 21 Abb B Wenn sich der Quadrocopter im Flug z B um 90 nach links gedreht h...

Page 31: ...im 3er Rhythmus ab und die roten und gelben LEDs im Quadrocopter blinken kon tinuierlich Der Quadrocopter fliegt nun im Headless Mode Um den Headless Mode wieder abzuschalten drücken Sie erneut die Drucktaste 14 für die Headless Return Funktion Die Signaltöne des Senders verstummen und die LEDs im Quadrocopter leuchten wieder dauerhaft Der Quadrocopter fliegt jetzt wieder im Normal Modus Bild 22 ...

Page 32: ...ichtung bildet Ist der Quadrocopter seitlich versetzt würde er bei Aktivierung der Return Funktion u U am Piloten seitlich vorbeifliegen und sich somit wieder entfernen siehe Bild 23 Abb C Bild 23 Return Funktion Return Funktion Um die Return Funktion zu aktivieren drücken und halten Sie die Drucktaste für die Headless Return Funktion sie he Bild 22 Pos 14 Zum Zeichen für die aktivierte Return Fun...

Page 33: ...des Quadrocop ters in den Kartenschacht 2 Für eine übersichtliche Darstellung auf den Ab bildungen wurde die Empfängerantenne 3 aus der Halterung 4 genommen Die Kontakte der Karte müssen entsprechend der oberen Abbildung in Bild 24 nach unten zeigen Wenn Sie die Kar te mit der Fingerspitze ganz eindrücken wird sie automatisch verriegelt Zum Entnehmen der Karte drücken Sie erneut mit dem Finger auf...

Page 34: ... und nicht z B mit dem Dateisystem NTFS Um die Videoaufzeichnung zu beenden drücken und halten Sie die Drucktaste für die Video Foto Funktion so lange bis der Sender wieder zwei kurze Signaltöne abgibt Die beiden gelben LEDs an den hinteren Propellern leuchten jetzt wieder dauerhaft Achtung wichtig Die Videoaufzeichnung muss in jedem Fall per Bedientaster beendet werden da sonst die aufgezeichne t...

Page 35: ...Kartenschacht Achten Sie darauf dass der Quadrocopter ausgeschaltet ist wenn Sie die Speicherkarte einsetzen oder entfernen Andernfalls könnten Dateien auf der Speicherkarte beschädigt werden Berühren Sie die Kontakte auf der Rückseite der Speicherkarte nicht Die Speicherkarte muss korrekt und vollständig in den Kartenschacht eingesteckt werden andernfalls kann es zu Beschä digungen kommen Beachte...

Page 36: ...Untergrund Bewegen Sie anschließend die beiden Steuerknüppel des Senders siehe Bild 26 Pos 3 und 13 in die jeweils rechte untere Ecke und halten die beiden Steuerknüppel in dieser Position fest Die LEDs im Sender und im Quadrocopter beginnen schnell zu blinken Nach kurzer Zeit gibt der Sender einen Signalton ab und die Sender LED leuchtet wieder dauerhaft Führen Sie nun die Steuerknüppel wieder in...

Page 37: ...n und weitab von Menschen Tieren Gebäuden und Straßen ist Für eine störungsfreie Übertragung der Videosignale dürfen keine weiteren Sender im 2 4 GHz Sendebe reich des Modells vorhanden sein Die Funktion Bluetooth muss im Smartphone deaktiviert sein Achten Sie bei den Bild und Videoaufnahmen auf die Privatsphäre anderer Die Aufnahmen sind nur für Ihren pri vaten Gebrauch gestattet Für Veröffentlic...

Page 38: ...etzen der Trimmungswerte auf die Werksparameter Altitude Hold Automatische Flughöhenstabilisierung Aktivierung empfohlen Right hand mode Ist die Funktion deaktiviert verhalten sich die virtuellen Steuerknüppel am Smartphone siehe Bild 29 Pos 11 und 13 ebenso wie die Steuerknüppel am mitgelieferten Sender Steuermode 2 Ist die Funktion aktiviert sind an den virtuellen Steuerknüppeln des Smartphones ...

Page 39: ...peicherung erfolgt auf dem Smartphone 6 Gespeicherte Videos und Fotos am Smartphone betrachten 7 Headless Mode aktivieren 8 Kamera Bild am Smartphone drehen 9 3D Ansicht nur in Verbindung mit einer VR Brille für Smartphones möglich 10 Schaltfläche für automatischen Start 11 Virtueller Steuerknüppel für Pitch Gier Funktion 12 Schaltfläche für automatische Landung 13 Virtueller Steuerknüppel für die...

Page 40: ...rstellt werden kann Jetzt kann die Bildübertragung zum Smartphone aktiviert werden Rufen Sie in Ihrem Smartphone im Bereich Einstellungen das Einstellmenü für die WLAN Funktion auf Nehmen Sie den Sender und anschließend den Quadrocopter in Betrieb Die LEDs im Quadrocopter müssen dauerhaft leuchten Nach kurzer Zeit erscheint im Smartphone Display die WLAN Verbindung des Quadrocopters Aktivieren Sie...

Page 41: ...die WLAN Funktion auf Schalten Sie den Quadrocopter mit Hilfe des Funktions Tasters Bild 1 Pos 10 ein Die LEDs am Quadrocopter blinken langsam Nach kurzer Zeit erscheint im Smartphone Display die WLAN Verbindung des Quadrocopters Aktivieren Sie diese WLAN Verbindung damit der Quadrocopter und das Smartphone miteinander Daten austauschen können Verlassen Sie im Smartphone den Bereich Einstellungen ...

Page 42: ...Entfernen Sie danach mit einem geeigneten Schrauben dreher die Propeller Halteschraube 2 Nun kann der Propeller nach oben von der Welle 3 ab gezogen werden Achten Sie bei der Auswahl des neuen Propellers 4 auf die Drehrichtung Die Propeller sind an der Unterseite mit entsprechenden Kennbuchstaben A oder B gekennzeich net siehe auch Bild 7 Die Montage des neuen Propellers erfolgt in umgekehrter Rei...

Page 43: ...ders prüfen Einschaltvorgang des Quadrocopters erneut durchführen LEDs im Quadrocopter leuchten nicht Prüfen ob der Flugakku korrekt eingeschoben wurde Flugakku zu Testzwecken noch einmal laden Propeller laufen nicht an Ladezustand vom Flugakku überprüfen Flugakku zu Testzwecken noch einmal laden Einschaltvorgang wiederholen Quadrocopter kippt beim Start zur Seite Einschaltvorgang des Quadrocopter...

Page 44: ...m Hg Quecksilber Pb Blei die Bezeichnung steht auf den Batterien Akkus z B unter dem links abgebildeten Mülltonnen Symbol Ihre verbrauchten Batterien Akkus können Sie unentgeltlich bei den Sammelstellen Ihrer Gemeinde unseren Filialen oder überall dort abgeben wo Batterien Akkus verkauft werden Sie erfüllen damit die gesetzlichen Verpflichtungen und leisten Ihren Beitrag zum Umweltschutz 21 Konfor...

Page 45: ...m Gewicht inkl Batterien 270 g b Quadrocopter FPV Frequenzbereich 2 406 2 428 GHz Sendeleistung 20dBm Senderreichweite ca 50 m Stromversorgung 3 7 V 750 mAh 1S LiPo Abmessungen Ø x H 337 x 84 mm Rotorwellenabstand diagonal 193 mm Propellerdurchmesser 126 mm Abfluggewicht inkl Akku 103 g c Kamera Videoauflösung 1280 x 720 Pixel bei 25 Bilder s Aufzeichnungsformat MP4 Bildauflösung 1280 x 720 Pixel ...

Page 46: ...itching on the transmitter 57 10 Getting started with the quadrocopter 58 a Flight battery charging 58 b Attaching the landing legs 59 c Attaching the propeller guard 59 d Checking the drive 60 e Inserting the flight battery 61 f Switching the quadrocopter on 62 g Basic information on steering quadrocopters 64 h Practical flight tips for the first start 67 i Starting the quadrocopter 68 j Trimming...

Page 47: ...ors 80 17 FPV operation 81 a General information 81 b Loading the app 81 c Opening the app 82 d Use your smartphone as a camera monitor 84 18 Maintenance and cleaning 86 a General information 86 b Changing the propeller 86 19 Troubleshooting 87 20 Disposal 88 a Product 88 b Batteries 88 21 Declaration of Conformity DOC 88 22 Technical data 89 a Remote control 89 b Quadrocopter 89 c Camera 89 ...

Page 48: ...ember this if you pass on the product to any third party Keep these operating instructions in a safe place for future reference All company and product names are trademarks of their respective owners All rights reserved If there are any technical questions please contact International www conrad com contact United Kingdom www conrad electronic co uk contact 2 Explanation of symbols This symbol is ...

Page 49: ... of use Usage other than that described above can lead to damage to the product and may involve additional risks such as short circuits fire electrical shocks etc The product must not become damp or wet The product is not suitable for children under 14 years of age Always follow the safety information in these operating instructions They contain important information on how to handle the product s...

Page 50: ...ts as thrust The quadrocopter flies in the respective direction On the model two propellers turn clockwise and two turn anti clockwise Through a targeted change of speed of the two propeller groups relative to each other propellers turning to the right turn somewhat faster and propellers turning to the left turn somewhat slower or vice versa it is possible to turn yaw the quadrocopter around the v...

Page 51: ...ome EU countries you are required by law to have insurance for all model aircraft You should also check the local statutory regulations for using model aircraft In Germany for example the regulations for operators of model aircraft of all types are established in the German Air Traffic Ordinance Any breaches of the statutory regulations established could lead to severe penalties as well as restric...

Page 52: ...start the quadrocop ter without the safety guards c During use Do not take any risks when using the product Your own safety and that of your environment depends completely on your responsible use of the model Improper use can cause serious injury and damage to property Ensure that you maintain a sufficient distance from people animals and objects Fly your model only if your ability to respond is u...

Page 53: ...his purpose 1 2 V use suitable battery chargers Batteries 1 5 V are meant to be used once only and must be disposed of when empty Please observe the correct polarity when inserting batteries or connecting to a charger observe posi tive and negative Wrong polarity may damage the transmitter the quadrocopter and the recharge able batteries There is also a risk of fire and explosion Always exchange t...

Page 54: ... on a fire proof surface e g a plate Keep the battery away from flammable objects As the charger and the LiPo rechargeable flight battery heat up during the charging procedure it is necessary to ensure sufficient ventilation Never cover the charger and the rechargeable flight battery Disconnect the flight battery from the charging cable when the battery is fully charged Do not expose the charger o...

Page 55: ... roll function 6 Push button for automatic start 7 Push button to switch between beginner sport and expert mode 8 Push button for automatic landing 9 Push button for the video photo function 10 On Off switch 11 Trim button no function on this model 12 Push button for the WiFi light function 13 Joystick for the pitch and yaw function 14 Push button for the headless return function 15 LED indicator ...

Page 56: ...of the transmitter for operational safety and operating time reasons To insert the batteries proceed as follows Remove the retaining screw 1 on the battery compart ment cover 2 on the back of the transmitter To open the battery compartment press the two corrugat ed surfaces 3 and slide the battery compartment cover upwards Insert 4 AA Mignon batteries with correct polarity following the instructio...

Page 57: ...er emits a short beep Now move the joystick all the way down The transmitter emits another beep and the LED display now remains on Then switch off the transmitter again using the on off switch 10 If the power supply is no longer sufficient for the correct operation of the transmitter the LED display flashes see Figure 3 no 15 every 1 5 seconds and the remote control emits an alarm sound at the sam...

Page 58: ... battery is fully charged the red LED on the USB plug goes out Disconnect the flight battery from the charging cable im mediately after charging and unplug the USB plug on the charging cable from the computer notebook or charger plug Attention Do not connect the USB cable to a USB hub without its own power supply e g a USB port on a keyboard etc as the current is not high enough for the charge fun...

Page 59: ...h the quadrocopter for protection against the rotating propellers To attach to the guards the plastic covers 1 must first be removed from the retaining grooves 2 Only now can you can the insert the propeller guard 3 into the retaining groove Apply gentle pressure so that the protective guard clicks into place and is held securely Important note Even when the quadrocopter is shown without the prote...

Page 60: ...ption For this reason you should check the function of the drive propellers before each flight To do this turn each individual propeller carefully with your finger and check the concentricity and the ease of move ment When doing this pay attention to the rotational directions of the various propellers Two propellers turn clockwise when seen from above A and two propellers turn anti clockwise B Fig...

Page 61: ...en correctly installed there is no gap between the bat tery and the quadrocopter s housing To remove the battery again press down on the two cor rugated surfaces 4 and 5 and gently pull the battery back wards out of the bay Practical tips If you press gently on the two corrugated areas when slid ing the battery in the battery locks into place more easily Important When you are not using the quadro...

Page 62: ...t will go The trans mitter again emits a short beep The LEDs in the quadrocopter flicker for approx 2 seconds and remain on after successful binding The LED indicator on the transmitter also remains on The quadrocopter is now ready to start Important There should be no other 2 4 GHz transmitters in the immediate vicinity during the switching on process The quadrocopter must not be moved or turned ...

Page 63: ...itten to the memory card or if there is a data connection to a smartphone a blue LED flashes right next to the red LED The camera and the WiFi signal transmission can be switched on and off by remote control To do this quickly push the push button for the WiFi light function see Figure 1 no 12 down wards backwards Each press of the button changes the status of the camera or the WiFi function Figur...

Page 64: ...ilable Pitch function With the pitch function you can control the flying height of the helicopter see Figure 11 Steering is done with the left joystick see also Figure 1 no 13 When the motors are started by remote control they run at idle speed If the joystick is now pushed forwards from its central position the rotational speed of the propellers increase and the quadrocopter lifts off Once the de...

Page 65: ...he vertical axis to the left as seen from above See the arrows in Figure 12 If the joystick is moved to the right the speed changes of the propellers come out exactly the opposite and the model turns to the right Figure 12 Roll function The roll function allows you to move the quadrocopter sideways to the right and to the left see Figure 13 Steering occurs with the right joystick see also Figure 1...

Page 66: ...t joystick see also Figure 1 no 3 If you push the stick forward slightly the electronics in the quadrocopter change the propeller speeds so that the model tilts slightly to the front and thus also flies forward If you steer backward on the transmitter exactly the opposite speed changes of the propellers occur and the model flies backward Figure 14 ...

Page 67: ...ecause if the quadrocopter flies so low that the air blown downwards by the propellers reaches the ground ground effect the altitude is significantly more unstable Should the propellers run into objects and become blocked immediately push the pitch joystick to the lowest setting so that the affected drive motors are no longer supplied with power Attention important Never try to grab hold of the fl...

Page 68: ... the propellers running the quadrocopter will significantly in crease the propeller speed and take off With the right joystick you can easily correct any drift forwards or backwards or to the side Once the desired altitude is reached move the left joystick back to the centre position The quadrocopter can now hover at a steady altitude thanks to its barometric sensor The altitude can be controlled ...

Page 69: ...sition is reached no more beeps are emitted by the transmitter The trim s centre position is indicated acoustically by a longer beep If you subsequently have the quadrocopter securely under control you can also optimally adjust the trim during flight Roll trimming If the quadrocopter drifts or tips sideways to the right reduce the speed until the quadrocopter once more stands safely on its landing...

Page 70: ...t was sufficient Repeat the procedure until the model does not show any tendency to drift forward If the quadrocopter wants to drift backward press the button for the nod function upwards Figure 17 The trim for the roll and nod functions is not saved After you switch the transmitter on and off the trim returns to the centre position Attention If big adjustments have to be made to the trim the posi...

Page 71: ...and hold it in this position until the propellers have come to a standstill The quadrocopter can now be turned off Method 2 If the quadrocopter is in hover flight mode press the button 8 for the automatic landing function The quadrocopter will now reduce its flight altitude itself until it is on its landing legs again During this time the LEDs on the quadrocopter will flash slowly Once the quadroc...

Page 72: ...more sharply to the transmitter s steering commands For this reason this mode is ideal for advanced users Expert mode Expert mode gives you maximum control sensitivity This setting is intended for experienced users and for use of the quadrocopter in the outdoor areas Activation of the different flight modes When it is switched on the transmitter is automatically in beginner mode To switch from beg...

Page 73: ... continuously Now move the joystick for the bob and roll function see Figure 1 no 3 quickly to the limit stop in the direction in which the quadrocopter should flip and then immediately bring the joystick back to the centre position The quadrocopter executes the roll over in the desired di rection and afterwards the transmitter ends the flip mode To be able to fly another flip you have to push the...

Page 74: ...row in Figure 21 Diagram A As long as the model pilot is then directly behind the quadrocopter and looking in the desired forwards direction the quadrocopter will react from the pilot s perspective as the pilot commands it on the transmitter When the command is forwards the quadrocopter flies forwards from the pilot s perspective see dark arrow in Figure 21 Diagram B If the quadrocopter has e g tu...

Page 75: ...a 3 beat rhythm and the red and yellow LEDs in the quadrocopter flash continuously The quadrocopter is now flying in headless mode To switch headless mode off briefly press the push but ton 14 for the headless return home function again The transmitter s beeps stop and the LEDs on the quadrocop ter remain permanently on The quadrocopter is now flying in normal mode again Figure 22 ...

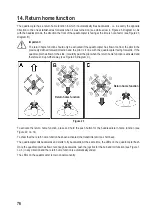
Page 76: ...s If the quadrocopter has flown to the side it could fly past the pilot when the return home function is activated and therefore end up further away see Figure 23 Diagram C Figure 23 Return home function Return home function To activate the return home function press and hold the push button for the headless return home function see Figure 22 no 14 To show that the return home function has been ac...

Page 77: ...iagram The receiver antenna 3 has been removed from the bracket 4 so that the diagram is clearer The contacts of the card must face downwards as shown in the top diagram in Figure 24 When you push the card all the way in with your fingertip it is automatically locked in place To remove the card press on the card again with your finger see lower image in Figure 24 The locking mecha nism releases an...

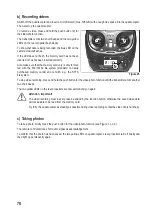
Page 78: ...not with e g the NTFS file system To stop video recording press and hold the push button for the video photo function until the transmitter emits another two short beeps The two yellow LEDs on the rear propellers are now permanently on again Attention important The video recording must in every case be ended by the function button otherwise the saved video data will not be able to be read from the...

Page 79: ...rd slot Make sure that the quadrocopter is switched off when you insert or remove the memory card Otherwise data on the memory card could be damaged Do not touch the contacts on the back of the memory card The memory card must be correctly and completely inserted into the card slot otherwise it may be damaged Pay attention to the legal principles of your country regarding the creation of photos an...

Page 80: ...he two joysticks on the transmitter see Figure 26 no 3 and 13 to the bottom right position and hold the two joysticks in this position The LEDs in the transmitter and in the quadrocopter start to flash quickly After a short time the transmitter emits a beep and the transmitter LED is permanently on again Now return the joysticks back to the centre position Short ly afterwards the LEDs in the quadr...

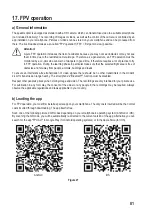
Page 81: ...obstacles and far away from people animals buildings and roads To ensure an interference free transmission of video signals there should be no other transmitters in the model s 2 4 GHz transmission range nearby The smartphone s Bluetooth function must be disabled Respect other people s privacy when storing image and video The recordings are only intended for your private use For publication in any...

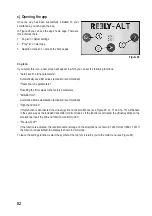
Page 82: ...values to the factory parameters Altitude Hold Automatic altitude stabilisation activation recommended Right hand mode If this function is deactivated the virtual joystick on the smartphone see Figure 29 no 11 and no 13 will behave in the same way as the included transmitter control mode 2 If the function is activated the virtual joysticks on the smartphone invert the bob and function control mode...

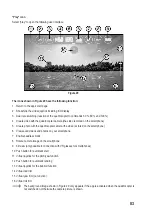
Page 83: ...era the video is stored on the smartphone 6 View saved videos and photos on your smartphone 7 Enable headless mode 8 Rotate camera image on the smartphone 9 3D view only possible in connection with VR glasses for smartphones 10 Push button for automatic start 11 Virtual joystick for the pitch yaw function 12 Push button for automatic landing 13 Virtual joystick for the bob roll function 14 Virtual...

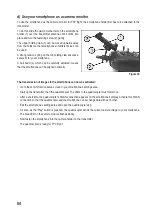
Page 84: ...artphone can be aligned optimally The transmission of images to the smartphone can now be activated Go to the WLAN function setup screen in your smartphone s settings area Start up the transmitter then the quadrocopter The LEDs in the quadrocopter must remain on After a short time the quadrocopter s WLAN connection appears on the smartphone s display Activate this WLAN connection so that the quadr...

Page 85: ...N function setup screen in your smartphone s settings area Then switch on the transmitter using the function button see Figure 1 no 10 The LEDs on the quadrocopter flash slowly After a short time the quadrocopter s WLAN connection appears on the smartphone s display Activate this WLAN connection so that the quadrocopter and the smartphone can exchange data with each other Exit the smartphone s set...

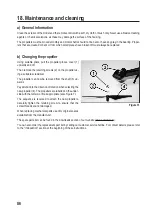
Page 86: ... the propeller us ing a suitable screwdriver The propeller can now be removed from the shaft 3 up wards Pay attention to the direction of rotation when selecting the new propeller 4 The propellers are labelled on the under side with the letter A or B as appropriate also Figure 7 The sequence is reversed to attach the new propellers Carefully tighten the retaining screw to ensure that the screw thr...

Page 87: ...ontrol transmitter Perform the quadrocopter switch on sequence again LEDs on the quadrocopter do not light up Check that the flight battery is inserted correctly Charge the flight battery again for testing purposes Propellers do not start Check the charge state of the flight battery Charge the flight battery again for testing purposes Repeat switching on process The quadrocopter tilts to the side ...

Page 88: ...ved are Cd Cadmium Hg Mercury Pb Lead indicated on the battery e g below the trash icon on the left Used batteries can be returned free of charge to local collection points our stores or any retailers selling batteries You thus fulfil your statutory obligations and contribute to the protection of the environment 21 Declaration of Conformity DOC Conrad Electronic SE Klaus Conrad Straße 1 D 92240 Hi...

Page 89: ... mm Weight incl batteries 270 g b Quadrocopter FPV frequency range 2 406 2 428 GHz Transmission power 20 dBm Transmission range approx 50 m Power supply 3 7 V 750 mAh 1S LiPo Dimensions Ø x H 337 x 84 mm Distance between rotor shafts diagonal 193 mm Propeller diameter 126 mm Take off weight incl battery 103 g c Camera Video resolution 1280 x 720 pixels at 25 frames s recording format MP4 Image res...

Page 90: ...90 ...

Page 91: ...91 ...

Page 92: ...ublication represent the technical status at the time of printing Copyright 2017 by Conrad Electronic SE Dies ist eine Publikation der Conrad Electronic SE Klaus Conrad Str 1 D 92240 Hirschau www conrad com Alle Rechte einschließlich Übersetzung vorbehalten Reproduktionen jeder Art z B Fotokopie Mikroverfilmung oder die Erfassung in elektronischen Datenverarbeitungsanlagen bedürfen der schriftlich...

Reviews: