background image


VISION VXL


24 


8540615 • 19/12/2014 • Rev.8


CHECKOUTS AND MAINTENANCE 

VERIFICATION OF BARRIER EFFICIENCY 


Before each work shift or just after switching on, check the correct operation of the 
photoelectric barrier. 

Proceed  as  follows,  intercepting  the  beams  using  the  appropriate  test  object  (available  on 
request). 


The correct test object must be used for testing, depending on the barrier resolution. 
See page 26 for the correct ordering code. 

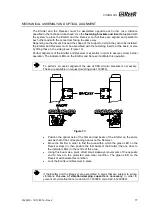
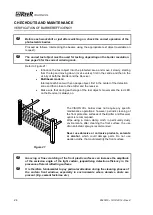
Refer to Figure 21: 

  Introduce  the  test  object  into  the  protected  area  and  move  it  slowly,  starting 

from the top and moving down (or vice versa), first in the centre and then in the 
vicinity of both the Emitter and the Receiver. 


Multibeam models:  

Intercept each beam with an opaque object, first in the center of the detection 
zone and then close to the emitter and the receiver.  


Make sure that during each stage of the test object’s movements the red LED 

on the Receiver is always on. 


Figure 21 


The  VISION  VXL  barrier  does  not  require  any  specific 
maintenance  operations;  however,  periodic  cleaning  of 
the front protective surfaces of the Emitter and Receiver 
optics is recommended. 
Wipe  using  a  clean,  damp  cloth;  in  particularly  dusty 
environments,  after  cleaning  the  front  surface,  the  use 
of an anti-static spray is recommended. 
 

Never use abrasive or corrosive products, solvents 
or  alcohol

,  which  could  damage  parts.  Do  not  use 

woollen cloths, that could electrify the front surface. 


Grooving or fine scratching of the front plastic surfaces can increase the amplitude 
of  the  emission  angle  of  the  light  curtain,  jeopardising  detection  efficiency  in  the 
presence of lateral reflecting surfaces. 


It is therefore fundamental to pay particular attention during the cleaning phases of 
the  curtain  front  window,  especially  in  environments  where  abrasive  dusts  are 
present. (E.g. cement factories, etc). 

Summary of Contents for VISION VXL

Page 1: ...CTION CABLES 10 EXAMPLE OF CONNECTION WITH AD SR0 WITH START RESTART INTERLOCK ACTIVATED 12 CONFIGURATION AND OPERATION MODES 12 K1 K2 EXTERNAL CONTACTORS CONNECTION 13 MULTIPLE SYSTEMS 13 USE OF DEFL...

Page 2: ...rier system features an automatic self diagnosis function that enables it to detect every malfunctions in an maximum execution time of 0 5 sec This safety system is permanently active and does not req...

Page 3: ...gure 1 The resolution is constant irrespectively of work conditions as it only depends on the geometric characteristics of the lenses and the distance between the centres of two adjacent lenses The he...

Page 4: ...width and height of the relative access area to be calculated Compare these dimensions with the maximum working range and the height of the protected area in relation to the specific model The general...

Page 5: ...must be taken in order to prevent the formation of condensation on the lenses which could have an adverse effect on monitoring POSITION The position of the VXLE Emitter and the VXLR Receiver must pre...

Page 6: ...proach speed of object to the dangerous area mm sec t1 response time of the safety barrier in seconds sec t2 machine response time in seconds meaning the time required for the machine to interrupt the...

Page 7: ...figuration of the machine the dangerous area can be accessed from above the highest beam of the barrier must be at a height H of at least 1800 mm from the base G of the machine Figure 4 Multibeam Mode...

Page 8: ...between the outer limit of the dangerous area and the most external optical beam is greater than or equal to the minimum safety distance S calculated as follows S 1600 t1 t2 1200 0 4H where H is the...

Page 9: ...trical connections must be made according to the diagrams in this manual In particular do not connect other devices to the connectors of the Emitter and Receiver For reliability of operation when a di...

Page 10: ...131 2 ref Par Configuration and operation modes 6 Pink SEL_B INPUT 4 Yellow K1_K2 INPUT External contactors Feedback Table 2 WARNINGS REGARDING THE CONNECTION CABLES For connections over 50m long use...

Page 11: ...e of connection in MANUAL mode with external contactors K1 K2 Figure 7 Example of connection in AUTOMATIC mode with external contactors K1 K2 Figure 8 If the TEST function is not required by the appli...

Page 12: ...ease consider the risk analysis of your application about this matter In AUTOMATIC functioning the two static outputs OSSD1 and OSSD2 follow the status of the guarded opening with the area guarded cle...

Page 13: ...ERATION MODE SEL_A PIN 5 connected to 24VDC PIN 2 SEL_B PIN 6 connected to 24VDC PIN 2 through the RESTART pushbutton K1_K2 PIN 4 connected to 0VDC MANUAL without K1 K2 feedback control SEL_A PIN 5 co...

Page 14: ...L 14 8540615 19 12 2014 Rev 8 Figure 9 Systems installed alongside each other A Installation of two adjacent Emitters Overlapping systems B L shaped installation C Crossed positioning of Emitters and...

Page 15: ...vide a U shaped protection Figure 10 The following rules should be taken into consideration when using deviation mirrors Place the mirrors so as to ensure compliance with the minimum safety distance S...

Page 16: ...flecting surfaces and the protected area The minimum distance d must be calculated according to the distance l between the Emitter and the Receiver considering that the angle of projection and recepti...

Page 17: ...and Receiver facilitate this operation To perform an easier alignment the use of SFB circular brackets is necessary These are available on request ordering code 1330974 Figure 13 Position the optical...

Page 18: ...ver units labels are visualized depending on the system operation phase The tables below shows the different signals ref Figure 14 EMITTER RECEIVER Figure 14 EMITTER SIGNALS Normal operation MEANING R...

Page 19: ...ack enabled OFF ON blinking every 1 2sec ON BREAK condition A ON OFF OFF OFF CLEAR condition B ON OFF ON OFF GUARD Condition C OFF ON OFF OFF A Barrier occupied output disabled B Barrier free output d...

Page 20: ...out a periodical system test As decribed above the VISION VXL barrier features an automatic self diagnosis function which is permanently active and verify the entire VXL operation with a periodic auto...

Page 21: ...4 Response time ms 7 11 5 16 20 24 28 5 33 37 Overall barrier ht mm 261 411 561 711 861 1011 1161 1311 PFHd 2 44E 08 3 56E 08 4 68E 08 5 8E 08 6 92E 08 8 05E 08 9 17E 08 1 03E 07 DCavg 94 0 93 7 93 6...

Page 22: ...551 701 851 1001 1151 1301 1451 1601 1751 1901 B protected area 160 310 460 610 760 910 1060 1210 1360 1510 1660 1810 C 85 Fastening 2 LS Brackets with 2 mounting inserts 3 LS Brackets with 3 mounting...

Page 23: ...gure 18 LL and LH TYPE fastening brackets optional Figure 19 Fastening brackets for deviation mirrors Figure 20 Deviation mirrors Model H SP100S 250 SP300S 400 SP400S 540 SP600S 715 SP700S 885 SP900S...

Page 24: ...Make sure that during each stage of the test object s movements the red LED on the Receiver is always on Figure 21 The VISION VXL barrier does not require any specific maintenance operations however p...

Page 25: ...eeR laboratories OSSD static outputs error ON OFF OFF 2 consecutive pulses Carefully check the connection of terminals 1 and 3 OSSD on the connector If necessary adjust load reducing the current requi...

Page 26: ...comply with those specified in the technical data sheet the barrier power supply should be kept separate from that of the other electric power equipment electric motors inverters frequency converters...

Page 27: ...2 C8D95 90 8 pin M12 female connector 5 m cable 1330983 C8D910 90 8 pin M12 female connector 10 m cable 1330984 C8D915 90 8 pin M12 female connector 15 m cable 1330985 C8DM9 Straight 8 pin M12 female...

Page 28: ...onnel not authorised by ReeR tampering etc Accidents or collisions also during transportation or due to acts of God Other reasons for which ReeR cannot be held responsible Repairs will be carried out...

Reviews: