background image

The accessible surface
may be hot during
operation.

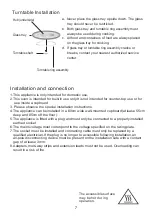
Hub (underside)

Glass tray

Turntable ring assembly

a.  Never place the glass tray  upside down. The glass

     tray should never be restricted.

b.  Both glass  tray and turntable  ring  assembly must
     always be used during cooking.
c.  All food and containers of food are always placed

     on the glass tray for cooking.

d. 


If glass tray or turntable ring assembly cracks or

     breaks, contact your nearest authorized service

     center.

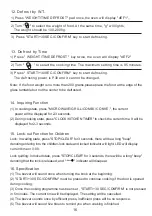
Turntable Installation

Turntable shaft

Installation and connection

1.This appliance is only intended for domestic use.
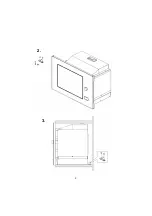
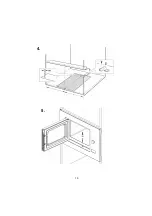
2.This oven is intended for built-in use only.It is not intended for counter-top use or for
    use inside a cupboard.
3. Please observe the special installation instructions.
4.The appliance can be installed in a 60cm wide wall-mounted cupboard(at lease 55cm
   deep and 85cm off the floor).
5.The appliance is fitted with a plug and must only be connected to a properly installed
   earthed socket.
6.The mains voltage must correspond to the voltage specified on the rating plate.
7.The socket must be installed and connecting cable must only be replaced by a
   qualified electrician.If the plug is no longer to accessible following installation,an
   all-pole disconnecting device must be present on the installation side with a contact
   gap of at lease 3mm.
8.Adapters,multi-way strips and extension leads must not be used. Overloading can
   result in a risk of fire.

7

Summary of Contents for BMC25SS

Page 1: ...many years of good service 0844 8001128 CNA TRADING APPLIANCES Customer Service In case of difficulty please call the Customer Service Helpline on our helpline number When calling customer service ple...

Page 2: ...t is important not to break or tamper with the safety interlocks b Do not place any object between the oven front face and the door or allow soil or cleaner residue to accumulate on sealing surfaces c...

Page 3: ...oven cavity for storage purposes Do not store items such as bread cookies etc inside the oven 12 Remove wire twist ties and metal handles from paper or plastic containers bags before placing them in...

Page 4: ...operated by means of an external timer or separate remote control system 28 WARNING Ensure that the appliance is switched off before replacing the lamp to avoid the possibility of electric shock 29 Ac...

Page 5: ...cord 2 If a long cord set or extension cord is used 1 The marked electrical rating of the cord set or extension cord should be at least as great as the electrical rating of the appliance 2 The extens...

Page 6: ...ay break Heat resistant oven glassware only Make sure there is no metallic trim Do not use cracked or chipped dishes Follow manufacturer s instructions Do not close with metal tie Make slits to allow...

Page 7: ...materials from the carton and oven cavity Your oven comes with the following accessories Glass tray 1 Turntable ring assembly 1 Instruction Manual 1 Metal shields the food from microwave energy Metal...

Page 8: ...se only It is not intended for counter top use or for use inside a cupboard 3 Please observe the special installation instructions 4 The appliance can be installed in a 60cm wide wall mounted cupboard...

Page 9: ...0 1 1 1 1 1 0 0 C 0 0 0 0 Installation Instructions Please Read the Manual Carefully Before Installation 1 8 600 560 8 45 45 5 0 min 380 2 5...

Page 10: ...2 3 9...

Page 11: ...4 5 11 6Sigma 5 4 5 10...

Page 12: ...figures flash OPERATION INSTRUCTION NOTE the step quantities for the adjustment time of the coding switch are as follow 0 1 min 5 seconds 1 5 min 10 seconds 5 10 min 30 seconds 10 30 min 1 minute 30 9...

Page 13: ...E for times or turn to select the combination function Stop turning when C 1 C 2 C 3 C 4 displays 3 Press START 30SEC CONFIRM to confirm 4 Turn to adjust the cooking time The time setting should be 0...

Page 14: ...VE GRILL COMBI CONVE key once and P100 display 2 Press MICROWAVE GRILL COMBI CONVE for times or turn to select the convection function When convection temperature displays it indicates convection func...

Page 15: ...s START 30SEC CONFIRM key to cook with 100 microwave power This program can be set as one of multi stage 2 Turn to adjust the timer The MAX time is 95 minutes 3 Press START 30SEC CONFIRM to confirm 1...

Page 16: ...50 600 150 350 500 150 250 350 450 650 50 with water 450ml 100 with water 800ml 150 with water 1200ml 200 400 600 475 200 300 400 500 750 1000 1200 A8 Cake A9 Pizza A10 Chicken 150 250 350 450 600 1 2...

Page 17: ...Lock out Function for Children Lock In waiting state press STOP CLEAR for 3 seconds there will be a long beep denoting entering into the children lock state and locked indicator will light LED will di...

Page 18: ...ld be separately collected and treated If at any time in future you need to dispose of this product please do NOT dispose of this product with household waste Please send this product to WEEE collecti...

Reviews: