background image

1

2

. Note

1> The oven lamp will be on for all functions.

 (except pyrolytic function)

2> Once the cooking programme has been set and the"         " button 


is not pressed within 5 minutes,

the current time will be displayed or turn back to waitting state. The setting program will be invalid.
3> The buzzer will sound once when effectively pressed, if not effectively pressed there will be no response.


4> The buzzer will sound five times to remind you when cooking has finished.

11

.

Pyrolytic Function

This function allows  you to clean thoroughly the oven cavity.
1>Rotate " K1 " to select the pyrolytic function. LED will display "PYA".
2>Press  "       " to confirm the cooking. And the default time is 2 hours, "PYA" will display on the LED.
3>Rotate " K1 " to change the pyrolytic time. There have two levers time can be selected "1:30 or 2:00". 

Note: 
A) When the oven door is not closed, pressing start button will be invalid, LED display "DOOR", "PYA".
B) When the oven's center temperature is highter than 320°C, pressing start button will be invalid. The
LED will display "COOL" and "PYA". When the oven's center temperature is lower than 200°C, press 
cancel button once , it will pause; press again, it will return to waiting state. If highter than 200°C, press 
cancel button once, it will return to waiting state directly. 
C) Open the door when the oven is  working, the LED will display "DOOR" and the buzzer will sound
continuously until the door was closed or press cancel button.
D) Before activating the pyrolytic cleaning function, remove any excessive spillage and make sure that
oven is empty. Do not leave anything inside it (e.g. pans, baking tray, dripping pan, slider bracket etc.) 
as this could heavily damage them. 
E) When finished pyrolytic cleaning, don't interrupt the power in an hour.

10

Summary of Contents for RUB70PYS

Page 1: ...UB70PYS Built in Electric Oven User Manual...

Page 2: ...0 90 minutes to clean oil impurities inside the cavity During the first use it is completely normal that there will be a slight smoke and odors If it does occur you merely have wait for the smell to c...

Page 3: ...p to avoid the possibility of electric shock The means for disconnection must be incorporated in the fixed wiring in accordance with the wiring specifications Children should be supervised to ensure t...

Page 4: ...e the temperature probe recommended for this oven Excess spillage must be removed before cleaning During pyrolytic cleaning accessible parts may become hotter than normal Young children should be kept...

Page 5: ...te the fixing holes open the oven door and look inside To allow adequate ventilation the measurements and distances adhered to when fixing the oven IMPORTANT DECLARATION OF COMPLIANCE When you have un...

Page 6: ...nergy Dishes are lightly browned on the outside and still moist on the inside Note This function is suitable for grilling or roasting big pieces of meat at a higher temperature The temper ature can be...

Page 7: ...temperatrue to continue cooking 3 Lamp Setting 1 Rotate K1 to select the relevant function then the corresponding icon will be on 4 Inquiring function OPERATION INSTRUCTIONS 1 Clock Setting After conn...

Page 8: ...ing time has been set press to start cooking If the cooking is paused press to resume cooking 2 During cooking process press once to pause the cooking Press twice to cancel the cooking 8 Energy Saving...

Page 9: ...finish cooking setting and the clock will be on the screen with reservation sign always lighting But no other function signals are presented Reservation time can be checked by pressing 3 seconds late...

Page 10: ...time can be selected 1 30 or 2 00 Note A When the oven door is not closed pressing start button will be invalid LED display DOOR PYA B When the oven s center temperature is highter than 320 C pressin...

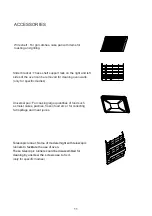
Page 11: ...niversal pan For cooking large quantities of food such as moist cakes pastries frozen food etc or for collecting fat spillage and meat juices Telescopic runner Some of models might with telescopic run...

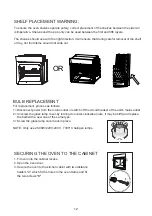
Page 12: ...ps SECURING THE OVEN TO THE CABINET 1 Fit oven into the cabinet recess 2 Open the oven door 3 Secure the oven to the kitchen cabint with two distance holders A which fit the holes in the oven frame an...

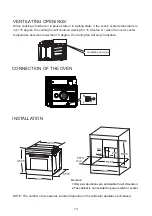
Page 13: ...imension 2 The cabinet is not include the power switch or socket CONNECTION OF THE OVEN L N VENTILATING OPENINGS When cooking is finished or in pause state or in waiting state if the oven s center tem...

Page 14: ...steel parts Do not use a high pressure cleaner for cleaning the unit The baking pans may be washed in mild detergent CLEANING AND MAINTENANCE This appliance is marked according to the European directi...

Reviews: