background image


UK 

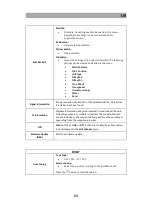
77 


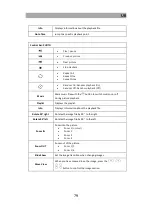
Previous chapter / Next chapter 


Play / pause 


Stop playback 


Switch to media mode. 

Note: 


To switch back to TV mode, press the 

 button and select DVB-T, DVB-C or 

DVB-S. 

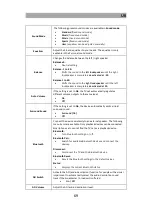
Start USB playback: 

1.


Select a USB file that you want to play. 

2.


A preview playback starts. 

3.


To start full screen playback, press the 

 button. 

4.


When a USB playback has started, press the 

 button to open the control bar. 

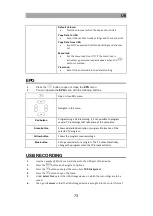
Control bar: MOVIE 


Play / pause 


Rewind 


Fast forward 


Previous chapter 


Next chapter 


Stop playback. 

Charset 


Customize subtitle design. 


Repeat all 


Repeat One 


Repeat None 


Random On: Random playback (On) 


Random Off: Random playback (Off) 


Set a loop for A B playback. 


Set A: set the starting point. 


Set B: set the end point. 

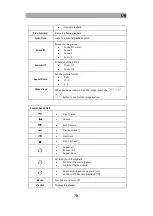
Playlist 

Displays the playlist. 

Info 

Displays information about the playback file. 

▐►


Slow motion playback: 


SF2X 


SF4X 


SF8X 


SF16X 

Summary of Contents for LDDW190 Plus

Page 1: ...B S S2 DVB C CI Slot DVD Laufwerk Bluetooth Model Nr LDDW190 LDDW220 LDDW240 Lesen Sie sich die gesamte Anleitung des Fernsehers sorgf ltig durch bevor Sie das Ger t benutzen Bewahren Sie die Anleitun...

Page 2: ...RBEREITEN 12 GRUNDBEDIENUNG 12 ERSTINSTALLATION 12 EINGANGSQUELLEN 15 TV MEN 16 KANAL 16 BILD 23 TON 24 ZEIT 26 OPTIONEN 26 SPERREN 28 EPG 29 USB AUFNAHME PROGRAMMIEREN 30 DVD 31 MEDIEN 33 TECHNISCHE...

Page 3: ...Netzkabels ber scharfe Kanten Trennen Sie den Fernseher bei Gewitter oder l ngerer Nichtbenutzung von Netz Halten Sie das Ger t von Spritz und Tropfwasser fern Es d rfen keine mit Fl ssigkeiten gef l...

Page 4: ...ichtigt lassen Beachten Sie beim Aufstellen des Ger tes das eine ausreichende Bel ftung vorhanden ist Stellen Sie das Ger t niemals in N he von W rmequellen auf und verdecken Sie keine der L ftungs ff...

Page 5: ...n angenehmen TV Genuss wird weiches indirektes Licht empfohlen Um eine Besch digung des Ger tes zu vermeiden stellen Sie den Fernseher so auf dass keine Gegenst nde in das Ger t schwenken k nnen Beach...

Page 6: ...mit den im Lieferumfang enthaltenen Schrauben C und einem Schraubendreher nicht enthalten an das TV Ger t 3 Halten Sie den Stand Fu D an die Unterseite des Mittelst cks C und achten Sie auf die richti...

Page 7: ...ger am Ger t frei Das versperren des Infrarotempf ngers kann zu Verbindungsproblemen mit der Fernbedienung f hren INPUT Eingangsquellen Men ffnen MENU Ger temen ffnen Schlie en CH CH CH N chstes Progr...

Page 8: ...B T Antenne oder der Kabelanlage KOPFH RER OUT 3 5mm Kopfh reranschluss Bei Verwendung werden die internen Lautsprecher stumm geschaltet USB 1 USB 2 2x USB Anschluss f r USB Sticks und Festplatten max...

Page 9: ...Eingangsquelle ausw hlen Informationsanzeige im TV Modus Men Navigationstasten Auswahl best tigen Men ffnen Men schlie en Sendersuchlauf Men ffnen Wenn der TV als PC Monitor verwendet wird um das Bil...

Page 10: ...letext Seite festhalten Vorheriger Titel Teletext Schnellwahlleiste durchschalten Disk auswerfen EPG Men ffnen schlie en Zwischen TV Radio Senderliste wechseln DVD Titelauswahl Aufnahme starten Favori...

Page 11: ...us bevor Sie CI Module in den CI Slot stecken Schieben Sie anschlie end die Smart Card in das CI Modul 1 Schalten Sie den Fernseher ein und vergewissern Sie sich dass als Quelle DTV ausgew hlt ist 2 W...

Page 12: ...den Sie alle weiteren externen Ger te z B Blu Ray Player usw mit den passenden Anschl ssen am TV Ger t GRUNDBEDIENUNG Ger t Ein Aus Standby Eingangsquellen Men ffnen Schlie en Men Hoch Runter Links Re...

Page 13: ...t DVB S Erstinstallation DVB T TV Anschluss Antenne DVB T Service Typ TV ATV TV ATV Haben Sie alle Einstellungen vorgenommen dr cken Sie die Taste um den Suchlauf zu starten Erstinstallation DVB S TV...

Page 14: ...Multischalter LNB ein Position A B Suchen Startet den Suchlauf Erstinstallation DVB C TV Anschluss Kabel DVB C Service Typ TV ATV TV ATV Suchmodus Voll Netzwerk Scan Frequenz KHz Nur verf gbar wenn S...

Page 15: ...nkt aus wenn Sie eine Analoge Kabelanlage oder DVB T Antenne an den TV2 Anschluss angeschlossen haben AV W hlen Sie diesen Men punkt aus wenn Sie ein externes Ger t z B Video Rekorder an den MINI AV A...

Page 16: ...ken Sie die Taste um das TV Men zu ffnen 2 W hlen Sie mit den Tasten den Men punkt Kanal aus 3 Dr cken Sie Sie die Taste um in das Kanal Men zu gelangen 4 Die folgenden Men punkte stehen im Kanal Men...

Page 17: ...lters LNB ein Position A B Dr cken Sie die Taste wenn Sie alle Men punkte eingestellt haben Suchen Startet den Sendersuchlauf Manueller Sendersuchlauf In dem Men punkt Manueller Sendersuchlauf stehen...

Page 18: ...ueller Sendersuchlauf stehen folgende Optionen zur Auswahl Speichern unter W hlen Sie die Programmnummer aus auf der der Sender gespeichert werden soll Ton System BG I DK L Farb System Auto PAL SECAM...

Page 19: ...elliten hinzuf gen OK Taste ffnet die Einstellungen des ausgew hlten Satelliten Die folgenden Einstellungen k nnen im Men angezeigt und bearbeitet werden Satellitenname Orbit Positio LNB Typ DiSEqC1 0...

Page 20: ...ch Auswahl des Kanals Signalbalken Zeigt die Signalst rke an Dr cken Sie die Taste um den Suchlauf zu starten Analoger manueller Sendersuchlauf Speichern unter W hlen Sie die Programmnummer aus auf de...

Page 21: ...das eingesteckte CI Modul und der Karte an Nur aktiv wenn ein Modul gesteckt ist Modul und Karte sind nicht im Lieferumfang enthalten und m ssen gesondert vom Empfangsanbieter erworben werden 5V Anten...

Page 22: ...tet die Sendersuche Signalbalken Zeigt die Signalst rke an Analoger manueller Sendersuchlauf Startet einen manuellen Analogen Sendersuchlauf Die folgenden Einstellungen stehen zur Verf gung Speichern...

Page 23: ...en werden 5V Antennenspannung Stellen Sie die 5V Versorgungsspannung f r externe Antennen am Anschluss TV2 DVB C T2HD Ein oder Aus LCN LCN Stellen Sie die LCN Ein oder Aus Ist LCN auf Ein gestellt wir...

Page 24: ...neinstellungen Ihren Bed rfnissen anpassen und speichern 1 Dr cken Sie die Taste um das TV Men zu ffnen 2 W hlen Sie mit den Tasten den Men punkt Ton aus 3 Dr cken Sie Sie die Taste um in das Ton Men...

Page 25: ...edergabeger t finden Bluetooth Bluetooth Einstellung Ein Ausschalten Verbinden Suchen Sie nach verf gbaren Bluetooth Ger te und verbinden Sie die Ger te Entkoppeln Trennen Sie die Verbindung zwischen...

Page 26: ...ie Taste eingestellt werden Auto Standby Stellen Sie die Zeit ein nach der das Ger t automatisch in den Standby Modus wechselt wenn keine Bedienung stattfindet Zeitzone Stellen Sie die Zeitzone anhand...

Page 27: ...Dieser Men punkt setzt alle getroffenen Einstellungen Kanal Bild Ton auf den Auslieferzustand zur ck Anschlie end befindet sich das Ger t im Auslieferzustand HDMI Einstellungen Stellen Sie die HDMI CE...

Page 28: ...rdpasswort 0000 oder das angepasste Passwort ein Passwort ndern Hier k nnen Sie ein neues Passwort festlegen Bitte notieren Sie sich das neue Passwort gut Das Standard Passwort lautet 0000 Sender sper...

Page 29: ...opieren Importieren Sie die Exportierten Hotelmodus Einstellungen und Senderliste Menu lock Stellen Sie die Men Sperre Ein oder Aus Ist die Men sperre aktiviert erscheint eine Passwortabfrage wenn die...

Page 30: ...n alle Daten vom USB Speicher gel scht 7 Jetzt ist der USB Speicher f r die Aufnahme vorbereitet Sofortaufnahme 1 Dr cken Sie die Taste und die Aufnahme beginnt 2 Dr cken Sie die Taste um die Aufnahme...

Page 31: ...r ein kurzes St ck in den Laufwerksschacht schieben Die Disk wird automatisch eingezogen 4 Die Wiedergabe startet automatisch 5 Verwenden Sie die folgenden Tasten zur Steuerung der Disk Wiedergabe Im...

Page 32: ...len Sie die gew nschte Sprache f r den DVD Ton aus 1 Die gew hlte Sprache wird f r die Wiedergabe automatisch ausgew hlt 2 Die Sprachen sind je nach DVD sehr unterschiedlich Sie k nnen die Sprache auc...

Page 33: ...edien Men navigieren Men punkt ausw hlen best tigen Zur ckspulen Vorspulen Vorheriges Kapitel N chstes Kapitel Wiedergabe Pause Wiedergabe Stoppen Zum USB Modus wechseln Hinweis Um zur ck in den TV Mo...

Page 34: ...iste Zeigt die Wiedergabeliste an Info Zeigt Informationen ber die Wiedergabe Datei an Zeitlupenwiedergabe SF2X SF4x SF8X SF16X Normale Wiedergabe Schritt vor Einzelbildwiedergabe Zeit Zu einem bestim...

Page 35: ...ige Wiedergabe Aus Stumm Ton Ein oder Aus schalten Wiedergabeliste Zeigt die Wiedergabeliste an Info Zeigt Informationen ber die Wiedergabe Datei an Zeit Zu einem bestimmten Wiedergabepunkt springen B...

Page 36: ...h rechts Drehen 90 links Dreht die Bild Datei im 90 Winkel nach links Zoom Ins Bild rein Zoomen Zoom 1 Normal Zoom 2 Zoom 4 Zoom 8 Zoom Aus dem Bild raus Zoomen Zoom 1 2 Zoom 1 4 Slide Show Stellen Si...

Page 37: ...sung 1920x1080 Max Frame rate 60fps Max Datenrate 150Mbps mp4 MEPG MPEG 2 MPEG 4 H 265 Xvid MJPEG MP3 AAC PCM ts trp MPEG 1 MPEG 2 H 265 VC 1 MP1 MP2 MP3 AAC mpg mpeg MPEG 1 MPEG 2 MP1 MP2 MP3 AAC PCM...

Page 38: ...ildqualit t berpr fen Sie ob das Antennenkabel richtig angeschlossen ist Kontrollieren Sie die manuelle TV Abstimmung des TV Senders Ver ndern Sie die Bildeinstellungen Helligkeit Farbe Bildsch rfe Ko...

Page 39: ...achtungswinkel V 178 H 178 TV Funktion TV Standard BG DK I L Kan le ATV DVB T C S 100 1000 5000 Videotext ATV DTV 1000 1000 Anschl sse Power Input DC 12V 24V 1 COXIAL OUT 1 HDMI 1 ARC 1 HDMI 2 1 CVBS...

Page 40: ...cd m 200 cd m Farben 16 7M Farben Betrachtungswinkel V 178 H 178 TV Funktion TV Standard BG DK I L Kan le ATV DVB T C S 100 1000 5000 Videotext ATV DTV 1000 1000 Anschl sse Power Input DC 12V 24V 1 CO...

Page 41: ...cd m 200 cd m Farben 16 7M Farben Betrachtungswinkel V 178 H 178 TV Funktion TV Standard BG DK I L Kan le ATV DVB T C S 100 1000 5000 Videotext ATV DTV 1000 1000 Anschl sse Power Input DC 12V 24V 1 C...

Page 42: ...ausm ll entsorgt werden m ssen Es gibt getrennte Sammelsysteme f r das Recycling in der EU F r weitere Informationen wenden Sie sich bitte an die rtliche Beh rde oder Ihren H ndler bei dem Sie das Pro...

Page 43: ...DE 43 ENERGIE LABEL...

Page 44: ...DE 44...

Page 45: ...DE 45...

Page 46: ...DE 46 GEW HRLEISTUNG...

Page 47: ...ED TV with DVB T T2HD DVB S S2 DVB C CI Slot DVD drive Bluetooth Model No LDDW190 LDDW220 LDDW240 Read the entire manual for the TV carefully before using the unit Keep the instructions in a safe plac...

Page 48: ...going to be used for a longer period of time Keep the device away from splashing water and dripping water No objects filled with liquids may be placed on the device Note Do not place any open sources...

Page 49: ...o not use the device in a wet or damp environment such as the bathroom steam room or near a swimming pool Do not use the device if moisture condensation can occur Any repairs may only be carried out b...

Page 50: ...apter Power supply Active DVB T antenna TV stand incl screws User manual 4x M4 Vesa screws MOUNTING WALL BRACKET STAND Wall bracket The TV set is equipped with mounting points M4 for a wall bracket wa...

Page 51: ...2 Screw the centre piece B to the TV set using the screws C supplied and a screwdriver not included 3 Hold the stand foot D against the underside of the centre piece C and ensure that it is correctly...

Page 52: ...eceiver on the device free Blocking the infrared receiver can lead to connection problems with the remote control INPUT Open the input sources menu MENU Device menu Open Close CH CH CH Next program CH...

Page 53: ...E OUT Cinch audio output For connecting external audio devices TV1 DVB S S2 TV2 DVB C T2 T2HD TV1 Connection of the satellite antenna TV2 Connection of the DVB T antenna or the cable system EARPHONE O...

Page 54: ...Select audio Numeric keys Determine number of digits Switch between the last two programs Select the input source Information dislay in TV mode Navigation buttons Confirm selection Open menu Close me...

Page 55: ...the teletext Previous Title Teletext page hold Next Title Teletext Switch through quick selection bar Eject disc Open close EPG menu Switch between TV Radio station list Start recording Open favourit...

Page 56: ...ion off before you insert the CI module into the CI slot Then slide the smart card into the CI module 1 Turn on the TV and make sure the source is DTV 2 When the CAM is recognized the following text i...

Page 57: ...yer etc to the appropriate connections on the TV set Note Place the TV set on a level and stable surface BASIC OPERATION Device on off standby Input source menu open close Menu navigation up down left...

Page 58: ...e DVB S First installation of DVB T First Time Installation TV Connection DTV Tune Type TV DTV ATV TV Once you have made all the settings press the button to start the search First installation of DVB...

Page 59: ...and that matches the multiswitch LNB Frequency Enter the frequency suitable for the multiswitch LNB Position A B Search Starts the search First installation of DVB C TV Connection Cable Tune Type DTV...

Page 60: ...antenna to the TV1 connection ATV Select this menu item if you have connected an analog cable system or DVB T antenna to the TV2 connection AV Select this menu item if you have connected an external...

Page 61: ...n and choose between DVB S DVB C DVB T 2 Press the button to open the TV menu 3 Use the buttons to select the Channel menu item 4 Press the button to enter the Channel menu 5 The following menu items...

Page 62: ...utton when you have set all menu items Search Starts the channel search DVB S Manual Tuning The following options are available in the Manual station search menu item Satellite Select the satellite Tr...

Page 63: ...I DK L Color System Auto PAL SECAM Current Select the current station to be changed Search Press the or button to start the search Fine Tune Press the or button to fine tune the frequency Programme E...

Page 64: ...formation Shows reception information of the selected station Only active if a station has been found CI Information Displays information about the inserted CI module and the card Only active when a C...

Page 65: ...earch Press the or button to start the search Fine tune Press the or button to fine tune the frequency Programm Edit Red button Delete selected station Yellow button Move a selected channel to the des...

Page 66: ...search Scan Mode Full Network scan Frequency KHz Only available if the search mode is set to Network Scan Auto Manually Network ID Only available if the search mode is set to network scan Auto Manuall...

Page 67: ...heart Press the button when the menu is closed to open the favorites list Button 0 Delete the complete channel list Signal Information Shows reception information of the selected station Only active...

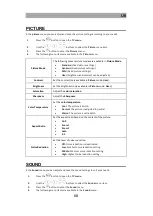
Page 68: ...ilable in Picture mode User Saturation Adjust the color saturation Sharpness Adjust the Sharpness Color Temperature Set the color temperature Cool The picture is bluish Normal The picture is adjusted...

Page 69: ...ally regulates different volume outputs to the same level On Off Surround Sound If the setting is set to On the device automatically emits virtual surround sound Surround On Off Bluetooth Connect the...

Page 70: ...following items Start source start program start volume Sleep Timer Set a time after which the device should automatically switch to standby mode Can also be set using the button Auto Standby Set the...

Page 71: ...m time for a recording Reset This menu item resets all the settings made channel picture sound to the delivery status The device is then in the delivery state HDMI CEC Set the HDMICEC settings The opt...

Page 72: ...s are secured with a password entry Parental Guidance Define a value for the protection of minors in order to protect TV content that is harmful to minors with a password Key Lock Set the lock for the...

Page 73: ...mming a USB recording It is not possible to program several TV recordings that take place at the same time Green button Shows a detailed description program information of the selected TV program Yell...

Page 74: ...time or that overlap Playback recording 1 Press the button navigate to Media and confirm with the button 2 Navigate to Movie and press the button 3 Select the storage medium and press the button C USB...

Page 75: ...de press the button to open or close the disc settings menu Note Use the key to return to the previous menu item 2 The following setting options are available in the menu Image settings TV SYSTEM NTSC...

Page 76: ...re you can change the password for the DVD mode The default password is 0000 Note Please make a note of the new password PARENTAL Set the level for parental control For certain discs where the parenta...

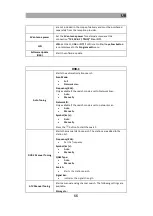
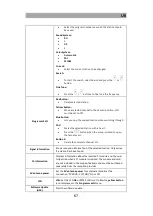
Page 77: ...4 When a USB playback has started press the button to open the control bar Control bar MOVIE Play pause Rewind Fast forward Previous chapter Next chapter Stop playback Charset Customize subtitle desig...

Page 78: ...ture format Auto 16 9 4 3 Move View When you have zoomed in on the image press the button to control the image section Control bar MUSIC Play pause Rewind Fast forward Previous track Next track Stop p...

Page 79: ...switch music on or off during picture playback Playlist Displays the playlist Info Displays information about the playback file Rotate 90 right Rotates the image file by 90 to the right Rotate 90 lef...

Page 80: ...1080 Max Frame rate 60fps Max data rate 150Mbps mp4 MEPG MPEG 2 MPEG 4 H265 Xvid MJPEG MP3 AAC PCM ts trp MPEG 1 MPEG 2 H 265 VC 1 MP1 MP2 MP3 AAC mpg mpeg MPEG 1 MPEG 2 MP1 MP2 MP3 AAC PCM mkv MPEG 2...

Page 81: ...eceiver are correctly connected Bad picture quality Check that the antenna cable is properly connected Check the manual TV tuning of the TV channel Change the picture settings brightness color sharpne...

Page 82: ...V 178 H 178 TV function TV Standard BG DK I L Channels ATV DVB T C S 100 1000 5000 Teletext ATV DTV 1000 1000 Connections Power Input DC 12V 24V 1 COXIAL OUT 1 HDMI 1 ARC 1 HDMI 2 1 CVBS OUT 1 L R LIN...

Page 83: ...178 H 178 TV function TV Standard BG DK I L Channels ATV DVB T C S 100 1000 5000 Teletext ATV DTV 1000 1000 Connections Power Input DC 12V 24V 1 COXIAL OUT 1 HDMI 1 ARC 1 HDMI 2 1 CVBS OUT 1 L R LINE...

Page 84: ...V 178 H 178 TV function TV Standard BG DK I L Channels ATV DVB T C S 100 1000 5000 Teletext ATV DTV 1000 1000 Connections Power Input DC 12V 24V 1 COXIAL OUT 1 HDMI 1 ARC 1 HDMI 2 1 CVBS OUT 1 L R LIN...

Page 85: ...hold waste at the end of its service life There are separate collection systems for recycling in the EU For more information please contact your local authority or your dealer BATTERIES AND RECHARGEAB...

Page 86: ...UK 86...

Page 87: ...UK 87...

Page 88: ...UK 88...

Page 89: ...UK 89 WARRANTY...

Reviews: