107
Systems
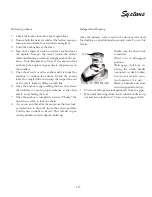
The macerator (overboard
discharge pump) option is
located in the engine room.
It is connected to a normally
closed seacock. In locals
where it is approved the
seacock is
opened
and the
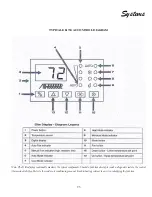
macerator is activated through a key switch and button
located at the ship’s main salon control panel (shown
above). At that point waste travels from the waste holding
tank through the macerator pump where it is ground up
and then exits through the hull bottom at the open seacock.
See the photo.
To Use Macerator (If Installed):
Make sure it is legal to pump waste overboard
before starting the operation.
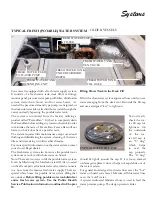
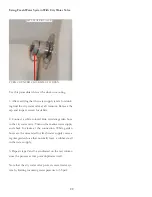
Locate the overboard discharge seacock in the
engine room. Usually this seacock can be identified by the
stack of tie wraps next to it. Also, look for the incoming
hose that runs from the output side of the macerator to
the seacock. It is normally a 1 1/2” diameter white hose.
Since the seacock by law must be have another means
besides the handle to keep it closed the tie wrap serves that
need. Cut the tie wrap to access the seacock handle.
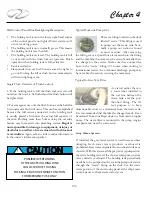
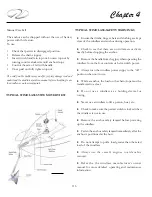
Typical Macerator (Overboard Discharge Pump)
KEY SWITCH
MACERATOR
ON BUTTON
MACERATOR
BREAKER
MACERATOR
SEACOCK IN
OPEN
POSITION
TIE WRAPS
HOSE FROM
MACERATOR
MACERATOR SEACOCK
Turn the seacock handle to the “open” position.
It should be positioned in line as shown in the photo.
Activate the macerator breaker at the 12 volt salon
main DC control panel.
At the level monitor panel shown above turn the
key to the “on” position. With the key switch being held in
the “on” position push in on the macerator button to start
the overboard discharge. Continue to discharge the waste
until the monitor panel shows empty for the waste tank.
At this point, shut off the macerator switch, deactivate key
switch and turn macerator breaker to the “off ” position.
Close the seacock handle. It should now be at a 90
degree angle to the seacock.
Use a tie wrap and refasten the seacock handle
tightly so it can not be moved.
At this point you may desire to add an approved
holding tank deodorant by flushing the correct amount
down the toilet.
Summary of Contents for 26 EXPRESS
Page 1: ...OWNER S MANUAL 26 EXPRESS 26 XO 4 2019...
Page 28: ...28 Chapter 2 NAVIGATION LIGHT RULES...
Page 50: ...50 Chapter 3...
Page 51: ...51 Rules Of The Road...
Page 73: ...73 Systems TYPICAL 12 VOLT HELM SWITCH PANELS PORT SWITCH PANEL STARBOARD SWITCH PANEL...
Page 121: ...121 Systems...
Page 122: ...122 Chapter 4...
Page 123: ...123 Systems...
Page 124: ...124 Chapter 4...
Page 125: ...125 Systems...
Page 126: ...126 Chapter 4...
Page 127: ...127 Systems...
Page 128: ...128 Chapter 4...
Page 129: ...129 Systems...
Page 130: ...130 Chapter 4...
Page 153: ...153 Engine Controls REGAL 26 XO TANK LABEL...
Page 177: ...177 Engine Controls SEA STAR STEERING SYSTEM SCHEMATIC OVERVIEW...
Page 262: ...262 Chapter 8 OVERBOARD DISCHARGE PAN DRAIN TYPICAL VECTOR COMPACT AC SYSTEM AIR FILTER...
Page 275: ...275 Cosmetic Care Maintenance...
Page 294: ...294 Chapter 9 HOT WATER HEATER...
Page 298: ...298 Chapter 9 STEREO DIAGNOSTIC CHART...
Page 299: ...299 Troubleshooting STEREO DIAGNOSTIC CHART...
Page 300: ...300 Chapter 9 STEREO DIAGNOSTIC CHART...
Page 303: ...303 Troubleshooting THRUSTER BOW...
Page 304: ...304 Chapter 9 TYPICAL WINDLASS...
Page 321: ...321 Technical Information TECHNICAL DRAWINGS...
Page 325: ...Technical Information 322 26 EXPRESS GALVANIC ISOLATOR WIRING...
Page 326: ...Technical Information 323 TYPICAL NMEA 2000 NETWORK COMPONENTS...
Page 328: ...Technical Information 325 26 EXPRESS TYPICAL DC GROUND CIRCUITRY...
Page 329: ...Technical Information 326 26 EXPRESS TYPICAL TRIM TAB SWITCH CIRCUITRY...
Page 330: ...Technical Information 327 26 EXPRESS TYPICAL GFCI CIRCUITRY...
Page 331: ...Technical Information 328 26 EXPRESS TYPICAL FIRE EXTINGUISHER GROUND CIRCUITRY...
Page 332: ...Technical Information 329 26 EXPRESS TYPICAL STEREO BLUETOOTH WIRING EARLIER...
Page 333: ...Technical Information 330 26 EXPRESS TYPICAL SWITCH PANEL HARNESS PLUG CIRCUITRY...
Page 334: ...Technical Information 331 26 EXPRESS TYPICAL SWITCH PANEL CIRCUITRY...
Page 335: ...Technical Information 332 26 EXPRESS BATTERY MANAGEMENT PANEL FRONT CIRCUITRY...
Page 336: ...Technical Information 333 26 EXPRESS BATTERY MANAGEMENT PANEL REAR CIRCUITRY...
Page 337: ...Technical Information 334 26 EXPRESS DOMESTIC 120 VOLT MAIN AC PANEL...
Page 338: ...Technical Information 335 26 EXPRESS OVERSEAS 230 VOLT MAIN AC PANEL...
Page 339: ...Technical Information 336 26 EXPRESS DOMESTIC 120 VOLT MAIN AC PANEL...
Page 340: ...Technical Information 337 26 EXPRESS GALLEY ELECTRIC BREAKOUT 1...
Page 341: ...Technical Information 338 26 EXPRESS GALLEY ELECTRIC BREAKOUT 2...
Page 342: ...Technical Information 339 26 EXPRESS GALLEY ELECTRIC BREAKOUT 3...
Page 343: ...Technical Information 340 26 EXPRESS GALLEY ELECTRIC BREAKOUT 4...
Page 344: ...Technical Information 341 26 EXPRESS GALLEY ELECTRIC BREAKOUT 5...
Page 345: ...Technical Information 342 26 EXPRESS GALLEY ELECTRIC BREAKOUT 6...
Page 347: ...Technical Information 344 26 EXPRESS MACHINERY LAYOUT PROFILE VIEW EXPLODED...
Page 348: ...Technical Information 345 26 EXPRESS MACHINERY LAYOUT TOP VIEW EXPLODED...
Page 353: ...Technical Information 350 26 EXPRESS TYPICAL BOW PLAN WINDLASS...
Page 359: ...Technical Information 356...
Page 360: ...Technical Information 357...
Page 361: ...Technical Information 358...
Page 362: ...Technical Information 359...
Page 363: ...Technical Information 360...
Page 364: ...Technical Information 361...
Page 365: ...Technical Information 362...
Page 366: ...Technical Information 363...
Page 367: ...Technical Information 364...
Page 368: ...Technical Information 365...
Page 369: ...Technical Information 366...
Page 370: ...Technical Information 367...
Page 371: ...Technical Information 368...
Page 373: ...Technical Information 370...
Page 374: ...Technical Information 371...
Page 375: ...Technical Information 372...
Page 376: ...Technical Information 373...
Page 377: ...Technical Information 374...
Page 379: ...Technical Information 376...
Page 381: ...Technical Information 378...
Page 382: ...Technical Information 379...
Page 383: ...Technical Information 380...
Page 384: ...Technical Information 381...
Page 386: ...Technical Information 383...
Page 387: ...Technical Information 384...
Page 388: ...Technical Information 385...
Page 389: ...Technical Information 386...


