background image

112

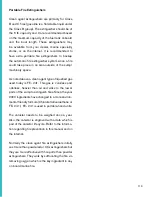
Automatic Fire Extinguishing System

Stern drive engines use 
a powered ventilation 
(blower) system and may 
have installed an optional 
fire extinguishing system 
in the sump capable of 
automatic and manual 
activation. The dash 
monitor utilizes an 
instrument display unit 
light that provides the 
operator with a system 
status of a charged or 
uncharged condition by 
an audible alarm and 
icons. With the ignition 
switch on and a no light 
condition indicates that 
the system has been 
discharged. 

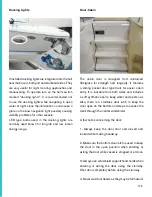
If the fire extinguishing system should discharge the 
ignition system will be instantaneously interrupted 
and the engine will shut down. See the automatic 
fire extinguisher manual in the owner’s packet for 
additional details.

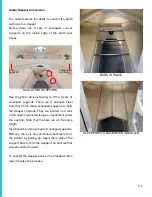
If a fire has started in the 
engine compartment the 
system will automatically 
discharge or the operator 
can manually discharge 
the extinguisher. Find 
the system manual cable 
assembly located in 
the cockpit. To use the 
manual remote remove 
the safety pin from the 

“Fire T Handle” and pull firmly on the “Fire” handle 
which will activate the fire extinguisher unit in the 
engine compartment. A loud “rushing air” sound 
may be heard. Complete discharge will take several 
seconds. Keep the compartment closed for a 
period of time sufficient to permit the agent to soak 
all areas of the protected space. This allows hot 
metals and fuel time to cool. Refer to the automatic 
fire extinguisher owner’s manual for additional 
information. 

Note: The boat operator needs to educate the crew 
on  fire protection and more specifically the automatic 
fire extinguishing system in the event that he becomes 
incapacitated. It is a good idea to practice by having 
a mock fire drill.

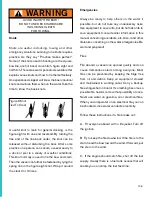
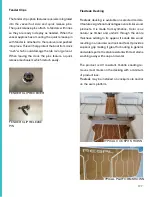
IF INSTALLED, FIXED FIRE EXTINGUISHER

SYSTEM MUST BE SUITABLE FOR

A COMPARTMENT VOLUME OF 135 CU. FT. 

NOTICE

Summary of Contents for LS4C

Page 1: ...REGAL LS4C OWNER S MANUAL OCTOBER 2018 EDITION...

Page 2: ...rine Industries Inc distribution center or a service center as soon as the problem exists The war ranty repairs should be completed in a reason able amount of time not to exceed 30 days If you have an...

Page 3: ...maintenance beyond the scope of this manual Your Regal dealer carries a line of factory approved parts and accessories Your Regal dealer can provide information regarding national training organizati...

Page 4: ...e Your Regal boat was built with the same attention to detail and quality of construction that we would expect in a craft we would purchase ourselves Whether you re a veteran boater or a newcomer we s...

Page 5: ...l Vessel Information Chapter 2 Safety On Board Chapter 3 Rules Of The Road Chapter 4 Systems Chapter 5 Engine Controls Chapter 6 Vessel Operation Chapter 7 Auxiliary Equipment Operation Chapter 8 Care...

Page 6: ...51 4360 or go to the internet at regal boats com to find the closest Regal dealership In keeping with its commitment to improvement Regal Marine Industries Inc is continually upgrad ing the product li...

Page 7: ...capacity plate this plate represents boat manufacturers who participate in the National Marine Manufacturer s Association small boat certification program The driver of the vessel shall read and under...

Page 8: ...rite down the HIN for future reference It can be especially useful when ordering parts from your Regal dealer A second HIN number is found in a hidden loca tion This second HIN is useful to authoritie...

Page 9: ...Flares ________________________________________ Flash Light ________________________________________ VHF Radio Person Filing Report ______________________ Cell Phone __ ____________________ Name______...

Page 10: ...ll bilge water has drained and the drain plug is installed before launching If your boat if it has been out of the water Check that all required safety equipment is on board and in good working condit...

Page 11: ...tor Spare Parts Air Filters Engine Generator Oil Filters Engine Generator Drive Oil Filters Basic Gear Supplies Tow Line Lubricating Oil Liquid Wrench Mooring Lines Duct Electricians Tape Dock Fenders...

Page 12: ...n of vendor warranties registration mate rials owner s manual operation installation and maintenance instructions for auxiliary equipment supplied with or installed on your Regal boat Owner s Responsi...

Page 13: ..._______________________________ Policy ______________________________________________________________________ USCG Phone ___________________ Local Po lice ____________________________________ Marina P...

Page 14: ...addition to the Lifetime Limited Structural Hull Warranty Regal offers a Transferable Five Year Limited Structural Hull Warranty Under the Five Year Transferable Limited Structural Hull Warranty Rega...

Page 15: ...t first notify the authorized Regal selling dealer from whom the boat was purchased of any claim under this Limited Warranty within the applicable Limited Warranty period and within a reasonable perio...

Page 16: ...not in any way prolong extend or change any terms set forth in this limited warranty n Water damage to dry rot to condensation to or absorption by interior surfaces wood structures or polyurethane fo...

Page 17: ...EXPRESS INTENT OF PURCHASER REGAL AND DEALER THAT THIS ARBITRATION PROVISION APPLIES TO ALL DISPUTES INCLUDING CONTRACT DISPUTES TORT CLAIMS FRAUD CLAIMS AND FRAUD IN THE INDUCEMENT CLAIMS STATUTORY C...

Page 18: ...nance information but is not hazard related An information label provides tips on a variety of topics Become familiar and under stand all safety precaution labels Immediate hazardous situation that if...

Page 19: ...to operate your boat in a storm condition take common sense precautions wear PFD s store gear reduce speed and if possible head for safe refuge It is best to avoid operating your boat in foggy weath e...

Page 20: ...autious of forecasted electrical storms and high winds Always have up to date charts aboard as a back up to your plotter and auto pilot option Charts can be obtained at your closet marina on line stor...

Page 21: ...ne to sit anywhere on the boat not specifically designed as seating While under way ALWAYS insist passengers sit in a seat and set an example by doing this yourself Never drink and drive As captain yo...

Page 22: ...following for each type For type V to be counted they must be used according to the la bel instructions In addition all boats over 16 must carry one Type IV throw able PFD Some states require that PFD...

Page 23: ...ts featuring designs for vari ous sport activities are examples of Type III Type IV Intended for calm inland water with heavy vessel traffic where help is constantly present It is de signed to be thro...

Page 24: ...bagged jackets by squeezing If you hear air escaping the bag is defective and the PFD should be thrown away Grab the cover with the fingers If the cover ma terial rips the PFD is rotted and should be...

Page 25: ...for electrical fires The carbon dioxide unit uses CO2 gas under high pressure with a funnel discharge hose usually swivel mounted This extinguisher leaves no residue and does not cause interior engin...

Page 26: ...irearms and therefore must be carefully han dled Check with local and state regulations since some of these device are considered firearms and are prohibited It is best to carry red aerial flares whic...

Page 27: ...GS NOVEMBER CHARLIE SQUARE FLAG BALL PERSON WAVING HANDS MORSE CODE S O S MAYDAY BY RADIO ENSIGN UPSIDE DOWN PARACHUTE RED FLARE RED METEOR FLARES SMOKE FOG HORN SOUNDED CONTINUOUSLY GUN FIRED AT 1 MI...

Page 28: ...Identity MMSI number before using the DSC feature A MMSI number identifies each DSC radio like a telephone number The FCC requires a ship station license for all vessels equipped with a marine VHF ra...

Page 29: ...29 Navigation Light Rules...

Page 30: ...below that explains the garbage and plastic dumping laws in detail Immediately notify the USCG if your vessel discharges oil or hazardous substances in the water Call toll free 1 800 424 8802 Report...

Page 31: ...ain specified distances from shore as determined by the nature of that garbage United States vessels of 26 feet or longer must display in a prominent location a durable placard at least 4 x 9 notifyin...

Page 32: ...r vessel is outfitted to meet USCG standards Remember to check with local and state authorities for additional equipment requirements Make sure your vessel certificate of numbers are on the boat updat...

Page 33: ...it For safety sake avoid the following 1 Do not park by other boats with their engine idling or generator cycling for an extended period of time 2 Do not disable the carbon monoxide alarms that come w...

Page 34: ...y ventilate cabin and cockpit areas Determine the probable source of the carbon monoxide and correct the condition immediately Anyone with symptoms of CO poisoning should be placed in a fresh air envi...

Page 35: ...x i d e C O a c c u m u l a t i o n ventilate your cabin and cockpit while underway Open a forward hatch porthole or window to allow air to travel through the boat s interior and cockpit See the illus...

Page 36: ...lor awareness decreases especially with red and green which happen to be the colors of boat navigation lights buoys and channel markers Alcohol will greatly increase your heat loss so it increases the...

Page 37: ...ing 8 Improper boat handling especially high speed turns in rough water Using trim improperly 9 Being too far from shore with inadequate fuel supply or navigational aids 10 Passengers especially child...

Page 38: ...l or the Coast Guard escort vessel on channel 16 of the VHF radio 2 Also you must operate at minimum speed within 500 yards of these vessels Rendering Assistance The operator of a vessel is obligated...

Page 39: ...ended maximum capacity label Typical label shown vary by platform type model Read and understand the warning label above regarding teak surfing Fishing Most boaters fish from time to time With the pro...

Page 40: ...waves are created The stronger the wind and increased distance across the water enlarges the wave action Other factors that can cause problem situations for vessels are fog currents and tidal changes...

Page 41: ...e getting behind the wheel Order Inland International Navigation Rules from Superintendent of Documents U S Government Printing Office Washington DC 20402 Tel 202 512 1800 Fax 202 512 2250 Navigation...

Page 42: ...he road Be alert and ready to take immediate action 14 If a collision course is unavoidable neither boat has the right of way Both boats must react to avoid an accident according to the rules of the r...

Page 43: ...43 Navigation Rules...

Page 44: ...overtaking boat first signals with a single blast if that boat desires to pass on the starboard side of the boat ahead or a double blast if passing to port The overtaken craft responds with the same...

Page 45: ...rt facilities Use only up to date charts for navigation We recommend when purchasing a chart to look for the weather resistant ones Buoys provide a road map to keep the skipper on course and to avoid...

Page 46: ...46 Lateral Aids...

Page 47: ...47 Channel Markers Regulatory Markers...

Page 48: ...cal Information section Some bridges are tendered Know and use the proper bridge signals when approaching these bridges see bridge signals in this chapter You can also monitor and communicate on chann...

Page 49: ...49...

Page 50: ...50...

Page 51: ...r s information packet along with the troubleshooting chapter of this manual Be sure to read and follow any danger warning or caution labels in reference to boat systems or indi vidual equipment compo...

Page 52: ...and electric toilets are all components using a 12 volt DC system In the domestic DC system the red wire is designated as the hot or conductor wire and the black wire is referred to as the ground wire...

Page 53: ...BROWN 10 SUN ROOF BROWN 14 AFT BILGE PUMP MANUAL BROWN WHITE 14 AFT BILGE PUMP AUTO BROWN RED 14 FWD BILGE PUMP AUTO BROWN BLUE 14 FWD BILGE PUMP MANUAL BROWN PINK 16 CO DETECTOR BROWN BLACK 16 SHOWE...

Page 54: ...CIRCUIT BLUE BLACK 16 COCKPIT SOFT LIGHTS BLUE GREEN 16 INTERIOR SOFT LIGHTS BLUE 10 CABIN LIGHT MAIN CIRCUIT FEED GRAY 14 NAVIGATION LIGHTS RUN NING BOW TRANSOM LIGHTS GRAY BLACK 14 NAVIGATION LIGHTS...

Page 55: ...RED 6 POSITIVE FEED MAIN ALTERNATOR CHARGE RED 4 POSITIVE FEED MAIN RED 2 POSITIVE FEED MAIN STARTER BATTERY GENERATOR RED 2 0 POSITIVE FEED MAIN START ER BATTERY PURPLE 16 STBD IGNITION HOUR METER W...

Page 56: ...oups which identify the height length and width of the bat tery This is useful information should a replace ment battery become necessary Note that the Z 5 Z 3 currently use 31 A series battery ies Co...

Page 57: ...a deeper layer of electrolyte over the plates but eventually it can run dry On the 31 series engine cranking batteries keep all terminals clean connections tight and your electrical system in top shap...

Page 58: ...on and combine batteries positions This particular battery switch is connected to dual batteries and this set up supplies additional reserve capacity to run extra accessories and to supply cranking a...

Page 59: ...ve breakers push the yel low lever down until it ratchets in the on position TYPICAL BATTERY MANAGEMENT PANEL outside view DUAL BATTERY SWITCH SHOWN 3 This fuse protects the stereo memory circuit This...

Page 60: ...ery charger shore plug Read and understand the fol lowing warning label PREVENT SEVERE INJURY OR DEATH FROM FIRE EXPLOSION OR ELECTRICAL SHOCK THIS DEVICE MUST BE CONNECTED TO A GROUND FAULT CIRCUIT I...

Page 61: ...ecommendations on how and where to use the battery charger see previous pages 2 These 15 amp fuses protect each of the battery circuits If the positive and negative battery cables are somehow reversed...

Page 62: ...red boots on the rear of the battery switch Periodically check to ensure the boots cover the nuts securely and that the connections and nuts are tight Disconnect the battery ies positive wires before...

Page 63: ...ght CPT CAB LTS A 10 amp fuse protects the blue LED style blue cockpit lights which allows safer night maneuvering throughout the cockpit DOCK LTS This 15 amp fuse protects the option al hull docking...

Page 64: ...bilge pump system with the automatic position is on even with the main battery switch turned off at the battery manage ment panel STEREO This 10 amp fuse protects the Fusion stereo circuit Note that i...

Page 65: ...re is out and metal parts have an opportunity to cool down Typical fire extinguishers have a discharge time of only 10 to 12 seconds so you need to use them before the fire gets too large When using a...

Page 66: ...d gasoline with the following minimum octane rating for stern drive engines Minimum pump octane number 87 AKI The use of leaded fuels will damage the catalysts and can not be used with catalytic conve...

Page 67: ...eral times for safety requirements and quality by the fuel tank supplier in house personnel and independent inspections by National Marine Manufacturers Association personnel Fuel Fill Fitting The fue...

Page 68: ...soline fuel tank feed line that runs from the fuel tank to an engine fuel component uses an anti siphon valve The valve is threaded into the fuel tank fitting at the feed line The valve is pulled off...

Page 69: ...rench catch container and clean rags for emergencies Never use automotive style fuel filters on your vessel Dispose of all fuel residue materials in an environmentally safe fashion These filters are a...

Page 70: ...t weather and water conditions Cleats and anchor locker are safely accessible from the cabin for docking anchoring applications Close hatch and lock all latches against the frame securely before makin...

Page 71: ...itoring is achievable Note that with the battery switches in the off position there is no power to the helm and the ignition switch will not function All electrical features are protected by the main...

Page 72: ...RUN BLOWER BELOW CRUISING SPEEDS WARNING The powered ventilation system blower aids in removing any gas fumes from the engine compartment and any joined spaces In addi tion the blower removes any pol...

Page 73: ...rtical surfaces to aid in nighttime cockpit activity They are especially useful to light stairways deck walkways and swim platforms Docking Lights This switch controls the optional hull docking lights...

Page 74: ...ay Fresh Water This switch energizes the on board pressurized water system It permits the water pump to draw water from the water tank to any faucets or showers wash downs mounted on board Captain Sea...

Page 75: ...FIC INFORMATION NOTICE Typical Chemical Toilet Shown Helpful Hints Chemical Toilet Changes in the ambient temperature or the actu al height above sea level while traveling can cause rising or falling...

Page 76: ...76 Parts Description 1 Pump 2 Cap Flush Water Tank 3 Flush Water Tank 4 Holding Tank 5 Fill Level Display 6 Flush Grip 7 Locking Grip 8 Flush Button...

Page 77: ...the holding tank Refer to action 8 2 Press the flush button to flush the toilet Push the flush grip to close the slide valve Refer to action 9 Emptying Toilet W O Optional Pump Out Fittings Note that...

Page 78: ...78...

Page 79: ...n full contact the marina or designated business to have the tank pumped out They will install an adapter hose into the deck waste fitting and turn on a vacuum pump which will empty the waste After th...

Page 80: ...he unit offers independent control of your audio entertainment including balance sub woofer and volume level from multiple audio zones as part of the optional stereo performance package The standard h...

Page 81: ...81 Display Screens More product information along with operation manuals can be downloaded at the following web address www fusionentertainment com marine Connecting Media Player Using Dock...

Page 82: ...gear case It is important that this system continues to run unobstructed at all times to avoid hazardous situations and to ensure a safe voyage Raw water is drawn up into the vertical drive shaft hous...

Page 83: ...nd still others are used by the engine to generate a spark and ignite the fuel The battery switch controls electrical power distribution to the boat systems To regularly maintain your DC electrical sy...

Page 84: ...ter for audio controls on the vessel Note that the Garmin and Fusion circuitry use individual DC sources to power up the system The key switch does not power up these 2 systems 1 To power up the Garmi...

Page 85: ...es equipped with fuses that will burn out or blow when engine components attempt to draw more power than the piece of equipment or wiring can handle When the fuse blows it breaks the circuit and elect...

Page 86: ...on to engine oil such as power trim fluid and gear lubricants to reduce wear on moving components These fluids should be checked according to the recommended maintenance procedures determined by the e...

Page 87: ...opeller pitch shown by inches 2 Propeller type L for left or R for right 3 Propeller diameter in inches Refer to the engine manual for propeller removal and installation procedures as the application...

Page 88: ...der is secured in its folded position and that the cover if installed is in place 5 Check fuel supply levels Use the fuel 1 3 rule 6 Turn battery switch to the on position at the battery panel Before...

Page 89: ...If it does not start return to the neutral idle position and let it set a few minutes before re cranking the starter Never continuously pump the throttle After Starting 1 Allow the engines to idle fo...

Page 90: ...ther Volvo or MerCruiser may be equipped with a corrosion protection system The Volvo system is called the active corrosion protec tion system ACPS and the MerCruiser system is called a MerCathode sys...

Page 91: ...Shown N Neutral Only Button Safety Lanyard Lock Button Trim Button Display Safety Lanyard Locate the remote control handle in the neutral position Advance the neutral throttle position as instructed...

Page 92: ...nates automatic trimming of the drive if any test runs are performed with the rig land locked Cruise Control Activate the cruise control by pressing the button This feature controls the vessel speeds...

Page 93: ...doesn t crank the engine ensure the control lever is in the neutral position Note that the Volvo EVC stands for electronic vessel control and MerCruiser DTS stands for digital throttle and shift Both...

Page 94: ...the engine owner s manual for more information regarding power steering specifications Hints For Shifting DO NOT shift quickly from forward to reverse gear positions Drive system damage may occur DO...

Page 95: ...life jackets Has a float plan been filed and left with a component person Has the bilge been sniffed and the fuel system leak checked Are sea cocks open if applicable Is all communication equipment i...

Page 96: ...le Stop engines and any device that can cause a spark Disembark all passengers and crew not needed for fueling Fuel if possible during the daylight hours Check to ensure nobody is smoking in the boat...

Page 97: ...ern lines There are several lines that can be secured to the bow and stern and depending on their direction and use can be called other names Remember that forward and aft refer to the direction that...

Page 98: ...ow and stern lines should be relatively at a 45 degree angle with the dock The stern line can be attached to the near shore quarter cleat but will work more efficiently to the offshore quarter cleat T...

Page 99: ...es and shapes to fit both small and large vessels Fenders are normally designated in inches They are used between piers docks sea walls and the boat They protect the top sides of the boat from rubbing...

Page 100: ...nce the boat has gathered headway with the boat planing at the correct bow angle and the outboard drive unit and helm straight the boat tends to stay on a uniform course heading To assure the boat tri...

Page 101: ...ng enough to reverse the water flowing by the gear case As the power is increased the propeller thrust becomes strong enough to stop the flow of water past the lower unit and as the throttle is advanc...

Page 102: ...g will not compensate for an unbalanced load To operate the trim push the switch until the desired bow position is reached The trim may be operated at any boat speed or at rest Avoid operating the tri...

Page 103: ...trim changes as needed THE BOAT TRIM SHOULD BE ADJUSTED TO PROVIDE BALANCED STEERING AS SOON AS POSSIBLE EACH TIME YOU GET UNDERWAY SOME BOAT ENGINE PROPELLER COMBINATIONS MAY CREATE BOAT INSTABILITY...

Page 104: ...n of sand rock or mud on the bottom much better than a nylon line It should be galvanized to reduce corrosion Next attach a length of nylon line to the other end of the chain The nylon will stretch un...

Page 105: ...vessels worth for the assistance received IN THE EVENT YOUR VESSEL IS IN DISTRESS PRIOR TO ALLOWING ANY TOWING COMPANY OR PRIVATE AGENCY THE RIGHT TO PASS A LINE TO YOUR VESSEL BE SURE TO ESTABLISH T...

Page 106: ...ARE INCLUDING CLEATS FOR TOWING WARNING Emergencies Always be ready to help others on the water if possible but do not take any unnecessary risks Use equipment to save a life but do not risk a life to...

Page 107: ...ot breathing or unconscious place the victim on their back on a hard surface and do the following 1 If unconscious open the airway Neck lift head lift or chin head lift 2 If not breathing begin artifi...

Page 108: ...ater Allow for cord slack if in tidal zone 5 Check with marina owner to ensure his electrical system has been recently inspected and up to code 6 Yearly have a qualified marine electrician inspect you...

Page 109: ...L ARM ANCHOR SWIVEL SAFETY PIN ANCHOR SHANK CUTOFF SWITCH Anchor Windlass Introduction If installed the windlass may feature a stainless steel polished claw style anchor complete with swivel This anch...

Page 110: ...the fail safe pawl is disengaged from the gipsy and held clear of it by the fail safe lever See wind lass owner s manual for further information Be sure to pull the safety pin from the anchor shank b...

Page 111: ...m the gipsy before the anchor can be paid out again It is recommended that during the paying out pro cess the engines be run to stern before full scope is reached This will help prevent the rode from...

Page 112: ...ically dischargeortheoperator can manually discharge the extinguisher Find the system manual cable assembly located in the cockpit To use the manual remote remove the safety pin from the Fire T Handle...

Page 113: ...type of liquefied gas used today is FE 241 This gas is colorless and odorless heavier than air and sinks to the lower parts of the sump to extinguish fires Since the year 2000 ingredients have change...

Page 114: ...c mode utilizes a float switch Float switches use a device that sits at water level and when the float reaches a certain height it trips the switch and activates the bilge pump Periodically you may ne...

Page 115: ...he sleeper cushions They are located on a rack in the cabin starboard storage compartment under the cushion Note that the bars are all the same length Install each bar into each set of scalloped suppo...

Page 116: ...osed position Start snapping the cover to the deck by use of the eyelet snaps starting at the bow and working aft Continue snapping the cockpit cover to the deck snaps When you reach the rear corner l...

Page 117: ...rd camel backs are secured For further information refer to the canvas care instructions located in the bimini top center pocket CAMEL BACK TYPICAL BIMINI TOP WITH POWERTOWER AVOID POSSIBLE BODILY INJ...

Page 118: ...forward and or aft bow See the photo above Bimini Top Typical PowerTower Continued The first step in using the typical bimini top is to remove top from the boot Push both sides of the latch inward sim...

Page 119: ...the bimini top hardware shown is in the lay down position unattached to the hardware Note the photo on the next page with the top in place and the hardware connected JAW W LANYARD PIN SLIDING JAW AT B...

Page 120: ...FWD BOW SLIDING JAW IN BETWEEN PINS STRAIGHT PIN IN JAW FORWARD BOW 9 0 DEGREE PIN IN JAW AFT BOW ATTACH STRAP END AND LATCH TO FWD CAMEL BACK ON DECK CAMEL BACK SHOWN WITH HARDWARE ATTACHED TO JAWS...

Page 121: ...the lower 90 degree arm Follow the same procedure with the 90 degree arms on the other side 4 Note that the forward bow utilizes a strap and latch similar to the latch on the boot This strap assists...

Page 122: ...ecurely to bow and stern eyes Once on the road periodically pull over and check cover ratchet strap and pertinent hardware for tightness Note that select covers use dual aft straps Note not exceed man...

Page 123: ...123 INSTALLING TRAVEL STORAGE COVER Travel Storage Cover Typical Continued...

Page 124: ...ass Mating If installed cockpit sea grass mats feature urethane backing for marine environments The mats provide style comfort and durability as well as additional protection in environments where mic...

Page 125: ...gned from reinforced fiberglass for strength and longevity It features a sliding pocket door type track for easier cabin entry It is lockable from both sides and includes a soft synthetic seal to keep...

Page 126: ...perator s manual for detailed product information since the vast amount of information presented can not be covered here These Garmin manuals will cover features operation alarm and safety systems alo...

Page 127: ...CEIVER FENDER CLIP RELEASE PIN Flexiteek Decking Flexiteek decking is available on selected models It features significant advantages over similar wood products It is made from synthetics Color is as...

Page 128: ...mentarily to indicate a warm up period for the sensor The alarm horn will not sound during this period The alarm will continue as long as vapors are present The alarm horn may be silenced by pressing...

Page 129: ...to factory for repair Note that due to the harsh environmental conditions in marine applications it is recommended to replace the gasoline fume sensors every 3 to 4 years Refer to the equipment manuf...

Page 130: ...ess steel Read and un derstand all warning and information labels found in the vicinity of the ladder HAND HOLD LADDER To use the stern ladder grasp the ladder rung and push the ladder up and in until...

Page 131: ...ded for entering and exiting the water Make sure the drive is trimmed in as far as possible and the keys removed from the ignition switch be fore attempting to use the power platform Use the platform...

Page 132: ...d and aft Facing the box the left reset breaker protects the port power tower lift actuator The center reset breaker protects the starboard power tower lift actuator The far right breaker protects the...

Page 133: ...OWER SHALL NOT BE USED TO PULL INFLATABLE WATER SPORTS TOYS OF ANY KIND NEVER LET PASSENGERS SIT DIRECTLY BEHIND THE POWERTOWER ROPE ATTACHMENT POINT WHILE PULLING APPROVED WATER SPORTS ACTIVITIES DO...

Page 134: ...ter tank has run out of water When water is running at a faucet it is not unusual to hear the water pump activate as it is trying to build up the pressure required in the system Soon after the faucet...

Page 135: ...t turned off A broken line or loose line connection It is recommended that the water pressure pump switch be in the off position when leaving your boat to help prevent damage should a leak devel op in...

Page 136: ...nce without the use of the table to reach the recommended proportions use a quarter cup of household bleach for every 15 gallons of water the fresh water tank holds 4 Drain chlorine solution from enti...

Page 137: ...tective additive to the water system Turn the sprayer wand to activate deactivate water flow Transom Wash Down SeaDek Decking SeaDek Swim Platform As an option SeaDek is featured on select vessel swim...

Page 138: ...ink or transom shower is hammering and has air bubbles in it Check for air leaks in the system along with low water levels in the water tank 4 There is no water at any of the water related equipment i...

Page 139: ...in cockpit unit much easier It is a plug and play device and uses the same function buttons and rotary encoder as the helm head unit It features the ability to select various speaker zones on the vess...

Page 140: ...lounge Reverse the process to convert back to a bench seat backrest position Note that the sun lounge aft facing positions are not to be occupied when the vessel is making headway The aft port seat f...

Page 141: ...e will lock in the closest detent position 2 To rotate the seat and adjust the friction control pull handle B up to the horizontal position The seat is now ready to rotate to the desired position To i...

Page 142: ...CKET SEAT BOTTOM ALSO PERIODICALLY CHECK THE PEDESTAL FASTENERS FOR TIGHTNESS AND CORROSION CAUTION Periodically check floor insert pedestal fasteners for tightness and corrosion Also lubricate the to...

Page 143: ...le must be inserted down into one of the two sets of holes depending on how the table fits the seating arrangement The rod when attached to the table will prevent the table from turning while in use E...

Page 144: ...THE TOILET BEFORE SERVICING NEVER PLACE HANDS OR FINGERS IN THE BOWL DISCHARGE BECAUSE OF THE HIGH SPEED MACERATOR IMPELLER PLACED DIRECTLY BELOW THE BOWL DISCHARGE NEVER ATTEMPT TO DISLODGE AN OBJECT...

Page 145: ...ls such as paper towels pre moistened wipes condoms feminine hygiene products dental floss or house hold garbage 2 Use only non abrasive non petroleum products to clean the pump Thetford s Aqua Clean...

Page 146: ...her maintenance required on this component Holding Tank Typical If installed the holding tank features a polyurethane construction A center metal strap wrapped with a space age rubber insulator encaps...

Page 147: ...debris from sticking to the inside of the waste hose which in time could build up and affect the pump out process Toilet Overboard Discharge Pump If installed as an option to the electric head an over...

Page 148: ...s and hold the top portion of the switch until the desired up trimming angle is realized Make sure there are no body parts or any other components near the stern drive before you raise it To trim the...

Page 149: ...Obtaining A Trimmed Position Your vessel will reach a planing position at a specific speed This speed is determined by bottom design weight distribution water conditions and on board equipment As the...

Page 150: ...d the vessel Also when trimmed you will notice that tachometers show an increase in rpm s Rectifying A List Your vessel can use the trim tabs to rectify a list The trim tabs adjust the boat s attitude...

Page 151: ...to protect the system The underwater light option pro vides high out put long life and low heat emis sion The lights are made from a high impact resis tant polycarbonate housing The lights are install...

Page 152: ...can severely damage or discolor vinyl Try to remove stains immediately before they have a chance to penetrate the surface of the vinyl Powdered abrasives steel wool or industrial strength cleaners ar...

Page 153: ...a snake like S pattern across the surface first horizontally and then vertically Smaller polish jobs can use an L shape followed by a cir cular motion If you are still not able to remove the blemish...

Page 154: ...re can cause your boat s gel coated surface to change or fade Darker colors tend to fade more rapidly than lighter colors because they absorb more of the sun s rays ultra violet and infrared Basic mai...

Page 155: ...polishes are available as needed Ask your marine professional or Regal dealer for more information Fiberglass hulls are strong but they can be damaged A fiberglass hull has virtually no internal stre...

Page 156: ...on select bow cockpit covers and bimini tops Sunbrella is a woven fabric made from 100 solution dyed acrylic fiber It is color fast and will withstand long term exposure to the sun ultraviolet rays w...

Page 157: ...he top carefully around the bows and cover with the stor age boot provided The clear vinyl glass used in side curtains aft curtains visors and camper enclosures is very sus ceptible to heat and cold K...

Page 158: ...ENT STAINS CLEAN UP STEPS 1 2 3 Coffee Tea Chocolate B Permanent Marker E B C Household Dirt A B Grease D B Ketchup Tomato Products A B Latex Paint A B Oil Base Paint D B Mustard A B C Suntan Oil A B...

Page 159: ...until straight This normally will result in the propeller creating a vibration and if this occurs reduce rpm until back at mooring It is advantageous to carry the needed tools to change propellers inc...

Page 160: ...lose to the battery Contact across terminals will cause a short circuit and personal injury may result Tighten all battery connectors securely Check their tightness by pulling on the connectors They s...

Page 161: ...amp cloth Be sure to wear plastic gloves and eye protection See the illustration Install an anti corrosion lubricant to the posts before reinstalling the terminals This lubricant is available as a pas...

Page 162: ...engine and control box for excessive play Select vessels use electronic shifting which is called fly by wire Being the engines use electronics to shift it should be effortless An application of silic...

Page 163: ...at all areas of contact Also inspect the fuel tank for signs of leakage or abrasion Tighten all components as needed FUEL FEED FUEL SENDER ANTI SIPHON VALVE TYPICAL EPA FUEL TANK FUEL VENT FUEL FILL S...

Page 164: ...that are grounded connected by actually touching each other or through a wire or metal part are immersed in a conductive solution any material that can conduct electricity Anything but pure water is...

Page 165: ...and flow through the water to ground This will cause rapid corrosion of the metal at the point where the current leaves When a vessel nearby is plugged into shore pow er they can potentially tie your...

Page 166: ...ed Condition Corrective Action Sacrificial anodes consumed Replace anodes when 30 consumed Sacrificial anodes not grounded to drive Remove anodes clean con tact surface reinstall check for continuity...

Page 167: ...water See the photos below for anode location on your stern drive Zinc anodes in brackish or salt water need to be checked more frequently If the anodes seem to be requiring frequent replacement there...

Page 168: ...er s manual Also you can contact your closest Regal dealer or marine professional for more information Many times a problem can be solved by performing a logical sequence of elimination and or root ca...

Page 169: ...ircumstances causing the engine to work extra hard Debris in oil is holding heat more than normal bad oil filter Defective thermostat Starter Will Not Crank Battery weak dead or corroded or loose conn...

Page 170: ...Cranks But Will Not Start Fuel flow obstructed water in fuel Low battery voltage Engine ignition system malfunction Timing belt broken No fuel in tank Lanyard not attached Control not in neutral Hard...

Page 171: ...with debris Excess water in bilge leak Engine code system energized due to malfunction rpm s restricted Excessive Vibration Damaged propeller Damaged propeller shaft Loose broken motor mount Steering...

Page 172: ...172 ENGINE DIAGNOSTIC CHART Problem Possible Cause Buzzer Sounds Icon Lights Cooling system malfunction Engine oil level low or incorrect type Wrong spark plug heat range Oil pump malfunction...

Page 173: ...ing Faulty battery charger battery Battery Will Not Hold Charge Faulty old battery Loose battery cables Corroded battery terminals 12 Volt Equipment Not Working Fuse blown Take time to investigate why...

Page 174: ...r add cycle Water supply line kinked or not connected Check to make sure water supply line is connected to fresh water supply and is not kinked No power to pressure water pump fresh water switch off C...

Page 175: ...tion regarding storage maintenance procedures Also more specific information can be found in the engine manufacturer s owners manual AVOID SERIOUS INJURY OR DEATH DUE TO FIRE AND EXPLOSION DO NOT FILL...

Page 176: ...arts Boat Check hull bottom for any fiberglass damage After cleaning apply wax to hull and deck surfaces Pour a pint of 50 50 antifreeze into bilge pump Remove batteries Use a trickle charger as neede...

Page 177: ...ith water in accordance with the manufacturer s recommendations Available at marina RV stores 5 Pour solution into the water tank 6 Turn on pressure water pump switch 7 Open water faucet and purge unt...

Page 178: ...operation Verify there are no system leaks Add water to water tank Turn on faucet to purge tank Refill water tank Make sure all safety gear is on board and in excellent working condition After launchi...

Page 179: ...179 Trailer Make sure all equipment is in excellent working condition including winch tongue jack brake actuator lines and wheel bearings Check lighting with battery and extra trailer harness plug...

Page 180: ...engaged Make sure the bow of the boat is snug against the bow stop at the winch stand It is a good idea to tie another line or secure an extra cable to the winch stand and boat bow eye as a backup sys...

Page 181: ...half the poundage on all nuts Then set the torque wrench to the full poundage and fasten to the last foot poundage figure Check the trailer tires often for voids excessive wear or out of round tire c...

Page 182: ...is difficult in locating repair parts due to a breakdown Following is a checklist of recom mended items to add a safety net to your trip Trailer 1 Trailer tire jack 2 Spare hub assembly including whee...

Page 183: ...tie downs and the winch line to the bow Unplug the trailer harness connector so the hot trailer light bulbs won t blow out when they come in contact with water When backing in have someone assist givi...

Page 184: ...At times It may be necessary to further back the trailer into the water permitting easier cranking of the boat on to the trailer Once the boat is positioned correctly on the trailer have someone conn...

Page 185: ...the vertical partition or wall of a boat Cast off to let go or release Chine the line fore and aft formed by the intersection of the side and bottom of the boat Chock deck fitting used to secure or g...

Page 186: ...wind is blowing the side sheltered from the wind Leeward the direction toward which the wind is blowing PFD personal flotation device required for each person aboard Port the left side of the boat wh...

Page 187: ...leeper 115 California EVAP Regulation 2 California Spark Ignition Information 2 Canvas 116 156 Carbon Monoxide 33 Cardiopulmonary Resuscitation CPR 107 Cockpit Carpet 126 Cockpit Sea Grass Mat 126 Con...

Page 188: ...etector 128 Gel Coat Maintenance 154 General Boating Safety 19 Getting Underway 95 Glossary 185 H HIN 8 Horn 28 Hull Bottom 158 Hypothermia 107 I Ignition Panel Switch 88 Index 187 Instruments 84 Inte...

Page 189: ...Propellers 87 159 Q QR Label Owners Manual 6 R Radio Communications 28 Recommended Onboard Equipment 11 Recommissioning 178 Remote Stereo Control 139 Required Safety Equipment 32 Right Of Way 41 Rule...

Page 190: ...ilation 70 Vessel Information Sheet 13 Visual Distress Signals 26 W Water System Pressurized 134 Water Sports 39 Warning Labels 18 Warranty 14 Weather 40 Winterizing 175 Wiring Color Codes 53 Z Zinc A...

Page 191: ...ional equipment systems wiring along with technical information and drawings is subject to change without notice For more information contact your nearest authorized Regal dealer For the location of y...

Page 192: ...192 FUEL FILL HOSE ANTI SIPHON VALVE FUEL FEED HOSE FUEL VENT HOSE FUEL FILL TYPICAL DOMESTIC COMPLIANT FUEL SYSTEM LS SERIES FUEL TANK STERN DRIVE PROPULSION CARBON CANISTER FUEL SENDER...

Page 193: ...S CAN BECOME TRAPPED IN OR AROUND THE CONFINES OF YOUR VESSEL WARNING AVOID PERSONAL INJURY INTERRUPT SWITCH MUST BE ATTACHED TO OPERATOR WHILE ENGINE IS RUNNING QUALIFIED OPERATOR MUST BE IN CONTROL...

Page 194: ...194...

Page 195: ...195...

Page 196: ...196...

Page 197: ...197...

Page 198: ...198...

Page 199: ...KR P ARCH SPKR S TRANS SPKR P TRANS HEAD LIGHT P CPT LT P A TUB LTS P COCKPIT SPKR 2 P COCKPIT SPKR 1 FR WATER SAFETY BRAKE LTS BRAKE LT 2 HELM HELM HELM P IPA AMP CPT SPKRS B C D P V H DP AL SH2 BL2...

Page 200: ...200 PROPRIETARY RIGHTS HH1 HH2 HH3 HH4 HH 5 HH2 HH3 HH5 HH4...

Page 201: ...201...

Page 202: ...202...

Page 203: ...203...

Page 204: ...204...

Page 205: ...205...

Page 206: ...206...

Page 207: ...207...

Page 208: ...208...

Page 209: ...209...

Page 210: ...210...

Reviews: