background image


I1150 Regency Wood Insert


  |    

33

warranty

Revision Date: July 2019 

Regency Wood Products Warranty 


All warranty claims must be submitted by the dealer servicing the claim, including a copy of the Bill of Sale (proof of purchase 

by you). All claims must be complete and provide full details as requested by FPI to receive consideration for evaluation. 

Incomplete claims may be rejected. 


Replacement units are limited to one per warranty term. Airtube and baffle replacements are limited to one replacement per 

term. 


Unit must be installed according to all manufacturers’ instructions as per the manual. 


All Local and National required codes must be met. 


The installer is responsible to ensure the unit is operating as designed at the time of installation. 


The original purchaser is responsible for annual maintenance of the unit, as outlined in the owner’s manual.  As outlined below, 

the warranty may be voided due to problems caused by lack of maintenance.  


Repair/replacement parts purchased by the consumer from FPI after the original coverage has expired on the unit will carry a 

90 day warranty, valid with a receipt only. Any item shown to be defective will be repaired or replaced at our discretion. No 

labor coverage is included with these parts. 


Exclusions: 

This Limited Lifetime Warranty does not extend to rust or corrosion of any kind due to: a lack of maintenance or improper 

venting, lack of combustion air provision, or exposure to corrosive chemicals (i.e. chlorine, salt, air, etc.). 


This Limited Lifetime Warranty also does not extend to: paint, firebricks (rear, sides, or bottom), door gasketing, glass gasketing 

(or any other additional factory fitted gasketing), vermiculite floor bricks, andiron assemblies, and flue damper rods. 


Malfunction, damage or performance based issues as a result of environmental conditions, location, chemical damages, 

downdrafts, installation error, installation by an unqualified installer, incorrect chimney components (including but not limited 

to cap size or type), operator error, abuse, misuse, use of improper fuels (such as unseasoned cordwood, mill-ends, 

construction lumber or debris, off-cuts, treated or painted lumber, metal or foil, plastics, garbage, solvents, cardboard, coal or 

coal products, oil based products, waxed cartons, compressed pre-manufactured logs, kiln dried wood), lack of regular 

maintenance and upkeep, acts of God, weather related problems from hurricanes, tornados, earthquakes, floods, lightning 

strikes/bolts or acts of terrorism or war, which result in malfunction of the appliance are not covered under the terms of this 

Limited Lifetime Warranty.  


FPI has no obligation to enhance or modify any unit once manufactured (i.e. as products evolve, field modifications or upgrades 

will not be performed on existing appliances). 


This warranty does not cover dealer travel costs for diagnostic or service work. All labor rates paid to authorized dealers are 

subsidized, pre-determined rates. Dealers may charge homeowner for travel and additional time beyond their subsidy. 


Any unit showing signs of neglect or misuse will not be covered under the terms of this warranty policy and may void this 

warranty. This includes units with rusted or corroded fireboxes which have not been reported as rusted or corroded within 

three (3) months of installation/purchase. 


Units which show evidence of being operated while damaged, or with problems known to the purchaser and causing further 

damages will void this warranty. 


Units where the serial no. has been altered, deleted, removed or made illegible will void this warranty. 


Minor movement, expansion and contraction of the steel is normal and is not covered under the terms of this warranty. 


FPI is not liable for the removal or replacement of facings or finishing in order to repair or replace any appliance in the field. 


Freight damages for products or parts are not covered under the terms of the warranty. 


Products made or provided by other manufacturers and used in conjunction with the FPI appliance without prior authorization 

from FPI may void this warranty.


Summary of Contents for Cascades I1150

Page 1: ...G 1H4 920 132 Cascades I1150 Wood Insert 09 03 19 Owners Installation Manual Installer Please complete the details on the back cover and leave this manual with the homeowner Homeowner Please keep these instructions for future reference www regency fire com Tested by 0219WN027S ...

Page 2: ...n the building envelope It is against federal regulation to operate this wood heater in a manner inconsistent with operating instructions in this manual This heater is designed to burn natural wood only Higher efficiencies and lower emissions generally result when burning air dried seasoned hardwoods as compared to softwoods or to green or freshly cut hardwoods DO NOT BURN Treated wood Lawn clippi...

Page 3: ... a Masonry Fireplace 10 Installation Into a Factory Built Fireplace 10 Faceplate Trim Optional 11 Bottom Faceplate Fan Support Installation 11 Fan Blower 15 Brick Installation 16 Baffle installation 17 Glass Replacement 18 Wood door handle assembly 19 Stainless steel smoke deflector installation 20 Seasoned wood 21 Primary air operating handle 21 Operation Operating Instructions 22 Draft Control 2...

Page 4: ...IÈCES OBLIGATOIRES POUR L INSTALLATION GAINE DE CHEMINÉE HOMOLOGUÉE EN ACIER INOXYDABLE DE 5 5 PO 140mm ou 6 PO 152mm PIÈCE EN OPTION VENTILATEUR PIÈCE NO 172 917 CARACTÉRISTIQUES ÉLECTRIQUES 115 VOLTS 60 HZ 0 6 AMPS DANGER RISQUE D ÉLECTROCUTION DÉBRANCHER LE COURANT AVANT DE PROCÉDER À L EN TRETIEN DE L APPAREIL NE PAS RETIRER LES BRIQUES OU LE MORTIER DU FOYER EN MAÇONNERIE À UTILISER AVEC UN C...

Page 5: ...nsert 5 dimensions 1 1 2 38mm with standard flue adaptor 6 152mm Diameter STANDARD FLUE ADAPTOR Regency Inserts are designed to use either a 5 5 140mm or 6 152mm flue Measurement from back of faceplate to fuel door opening ...

Page 6: ... Insert dimensions 1 1 2 38mm 455 with offset flue adaptor 6 152mm Diameter OFFSET FLUE ADAPTOR Regency Inserts are designed to use either a 5 5 140mm or 6 152mm flue Measurement from back of faceplate to fuel door opening ...

Page 7: ...nufacturer s installation and operating instructions 2 Check your local building codes Building Inspection Department You may require a permit before installing your insert Be aware that local codes and regulations may override some items in the manual WARNING Careless installation is the major cause of safety hazard Check all local building and safety codes before installation of unit 3 Notify yo...

Page 8: ...ion and hearth will meet the standards for clear ance to combustibles Your hearth extension must be made from a non combustible material Extending 16 for US and 18 for Canada measured from the fuel loading door Unit I1150 Adjacent Side Wall to Side A Mantel to Top of Unit B Top Facing to Top of Unit C Side Facing D Minimum Hearth Extension E Minimum Hearth Side Extension F To Top of Unit G 15 381m...

Page 9: ...the rear of the unit into the fireplace See Diagram 3 En sure that the unit is centered in the existing fireplace and lined up with the flue adaptor 4 Slide the unit back until the flue adaptor is slightly engaged 5 At this point it is recommended to level the unit and ensure that the leveling bolts rest on the surface of the fireplace This will keep the adaptor from binding as the unit is slid in...

Page 10: ...pproximately the alignment of the flue liner with the position of the smoke outlet hole on the insert to check for possible offset If an offset is required use the appropriate offset adaptor in your installation 6 Oncetheaboveitemshavebeenchecked slide your insert into position after first positioning and securing the flue liner to the offset adaptor Attachtherodtotheadaptorandslidetheadap tor ont...

Page 11: ...d Reproductive Harm www P65Warnings ca gov FACEPLATE TRIM FAN OPTIONAL BOTTOM FACEPLATE FAN SUPPORT INSTALLATION Regular Faceplate Dimensions shown with bottom faceplate fan support attached Oversize Faceplate Dimensions shown with bottom faceplate fan support attached 38 965mm 44 1118mm 26 3 8 670mm 30 3 8 772mm 34 3 8 874mm 38 3 8 975mm 8 203mm maximum maximum 8 203mm 38 965mm 44 1118mm 26 3 8 6...

Page 12: ...older can then be slid into the tool bracket as shown Digital monitor operating door tool bracket Tool holder slid into tool bracket Tool holder Diagram 2A Rear View 4 Position the assembled faceplate side and top to the insert Ensure to align the draft rod into the opening of the faceplate as well as the side faceplate slots with the bolts in the mounting brackets as shown in Diagram 3 5 Measure ...

Page 13: ... completed faceplate trim assembly to the insert Ensure to align the side faceplate slots with the hex bolts in the mounting brackets and tighten to secure in place Secure the Regency logo plate to the bottom of the faceplate Diagram 5 Diagram 6 Shown with Optional Bottom Faceplate Regular Oversize Faceplate Trim Installation Black Trim included with Regular Oversize Faceplate or Bottom Faceplate ...

Page 14: ...g screws See Diagram 9 Diagram 9 Rear Bottom View Note Fan not exactly as shown 18 Secure the bottom faceplate to the 3 sided faceplate using the 4 supplied bolts washers 19 Discard both side trims that were included with the regular oversize faceplate and replace with the new extended trims supplied with the fan support bottom faceplate Cut to desired length 20 Fit the trim assembly over the face...

Page 15: ...l wires prior to disconnec tion when servicing controls Wiring errors can cause improper and dangerous operation WARNING Electrical Grounding Instructions This appliance is equipped with a three pronged grounding plug for your protection against shock hazard and should be plugged directly into a prop erly grounded three prong receptacle Do not cut or remove the grounding prong from this plug I1500...

Page 16: ...itions Do not use a grate LyTherm sheet Order of firebrick install a Rear Firebrick b Firebox floor install brick over LyTherm Sheet c Right and left side Firebricks Fire bricks Size 1 4 1 4 x 7 2 4 1 2 x 7 3 9 x 4 1 2 4 9 x 2 5 3 1 2 x 4 1 2 6 4 1 4 x 8 7 3 1 2 x 2 1 4 1 4 6 5 3 7 2 ITEM NO PART NUMBER QTY DESCRIPTION 7 RD 14287 2 3 500 x2 2500 BRICK 6 RD 14286 2 4 250 x 8 000 x 30 DEG BRICK 5 80...

Page 17: ...e stainless steel smoke deflector See instruc tions in this manual 2 Remove the front secondary air tube with pliers as shown below Note It will be easier to remove the air tubes by removing both the bottom right base brick and right side wall brick 5 Install left and right baffle brackets installation of left baffle bracket shown below Baffle installation 4 Install the right and left side baffles...

Page 18: ...your glass by impact purchase your replacement from an authorized Regency dealer only Remove the door from the stove and remove the screws securing the glass retainer Position the glass in the door make sure that the glass gasketing will properly seal your unit and replace the retainer it should rest on the gasket not the glass Tighten securely but do not wrench down on the glass as this may cause...

Page 19: ... a tight seal If door is too tight a washer can be removed Recheck door to ensure there is still a tight seal The handle should be approxi mately in the 8 o clock position when door is fully closed Diagram 3 2 Place the door onto the hinges and then place the door handle through the opening on the door as shown in Diagram 2 Diagram 1 Diagram 2 Diagram 3 Nuts Cam Door Handle Washers Spacer Re assem...

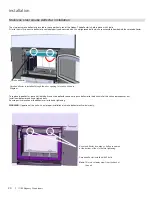
Page 20: ...off both bolts and slide deflector downward push deflector to the back wall of the unit and manoeuver out Install new deflector and hand tighten bolts Ensure positive location of the deflector prior to hand tightening WARNING Operation of the unit with out proper installation of smoke deflector will void warranty Smoke deflector installed with 2 bolts Note This is a cutaway view from the back of t...

Page 21: ...d may take a minimum of a full year to dry enough Drying may also take longer in damp climates There are a few ways to tell if wood is dry enough to burn efficiently Use as many indicators as possible to judge the dryness of the firewood your are considering Here are ways to judge firewood moisture Using a moisture meter select the species of fuel and then penetrate the pins into a split piece Ide...

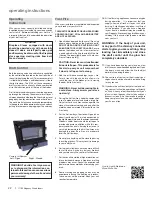
Page 22: ...G Never build a roaring fire in a cold stove Always warm your stove up slowly 3 During the first few fires keep the combustion rate at a moderate level and avoid a large fire Only after 5 or 6 such fires can you operate the stove at its maximum setting and only after the metal has been warmed Always build up the fire slowly 4 For the first few days the stove will give off an odour from the paint T...

Page 23: ...our stove 4 If you have smoke detectors prevent smoke spillage as this may set off a false alarm 5 Do not overfire heater If the chimney connector flue baffle or the stove top begin to glow you are over firing Stop adding fuel and close the draft control Over firing can cause extensive damage to your stove including warping and premature steel corrosion Over firing will void your warranty 6 Do not...

Page 24: ...ed before the burning season and as necessary during the season as creosote deposits may build up rapidly Moving parts of your stove require no lubrication 4 A small hot fire is preferable to a large smoul dering one that can deposit creosote within the system 5 The chimney and chimney connector should be inspectedatleastonceeverytwomonthsduring the heating season to determine is a creosote buildu...

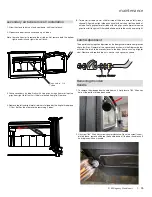
Page 25: ... into hole on left side air channel Align tab on right side air channel with notch on right hand end of air tube Firmly grip center of air tube with vise grips use hammer to tap vise grips from left to right until the tube bottoms out into the air channel on right Latch Adjustment Thedoorlatchmayrequireadjustmentasthedoorgasketmaterialcompresses after a few fires Removal of the spacer washer shown...

Page 26: ...ir tubes vermiculite baffles see manual for details 2 Loosen the two 7 16 bolts nuts to remove replace vertical baffle 3 Repeat steps to install new vertical deflector NOTE ENSURE BAFFLE IS PUSHED UP AS FAR AS POSSIBLE TIGHT TO TOP OF FIREBOX Vertical Deflector Remove 2 front air tubes Slide right down to remove Reverse to replace ...

Page 27: ...he paper should not pull out easily if it does try adjusting the door latch if that doesn t solve the problem replace the door gasket Check and lubricate door hinge latch Use only high temperature anti seize lube ie never seize Check glass for cracks Replace if required Clean blower motor Disconnect power supply Remove and clean blower DO NOT LUBRICATE Inspect and clean chimney Annual professional...

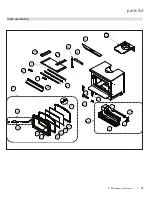
Page 28: ...el Accent 12 846 306 Replacement Glass Includes Gasket Size 9 1 8 X 15 5 8 13 936 241 Replacement Glass Gasket Sold per foot 4 Feet required 14 846 570 Door Gasket Repair Kit 15 075 077F Glass Retainer 16 948 920 Black Hinge Caps Set of 2 16 948 079BN Nickel Hinge Cap Each 17 650 084 Door Spacer Each 18 075 064 Andiron Bracket Each 19 075 063F Andiron Each 20 075 040 Side Baffle Cover Each 21 075 ...

Page 29: ...I1150 Regency Wood Insert 29 parts list main assembly 1 22 2 18 21 21 4 17 16 8 5 26 6 3 19 24 9 11 25 9 15 13 10 14 12 7 20 20 27 ...

Page 30: ...x 8 000 x 30 DEG BRICK 5 802 147 1 3 500 x 4 500 BRICK 4 802 152 2 2 000 x 9 000 BRICK 3 902 111 3 9 000 x 4 500 STANDARD BRICK 2 RD 14289 2 4 500 x 7 000 BRICK 1 RD 14288 2 4 250 x 7 000 BRICK brick panels 172 960 I1150 Brick Kit Complete Fire bricks Size 1 4 1 4 x 7 2 4 1 2 x 7 3 9 x 4 1 2 4 9 x 2 5 3 1 2 x 4 1 2 6 4 1 4 x 8 7 3 1 2 x 2 1 4 ...

Page 31: ... 64 65 60 62 61 64 65 60 62 58 59 60 Faceplate Right Side Regular Oversize 61 Faceplate Left Side Regular Oversize 62 Faceplate Top Regular Oversize 64 Bottom 1 Piece Faceplate 65 Fan Support N S 171 570 Black Perimeter Trim Black Regular Faceplate N S 171 572 Black Perimeter Trim Black Oversize Faceplate N S 948 223 Regency Logo Plate N S 171 526 Faceplate Mounting Brackets Each N S 171 546 Facep...

Page 32: ... 1 Catalyst Combustor 10 Years Prorated Venting Chimney 1 Screens 1 See specific warranty details in regards to the catalyst combustor in unit manual Conditions Warranty protects against defect in manufacture or FPI factory assembled components only unless herein specified otherwise Any part s found to be defective during the warranty period as outlined above will be repaired or replaced at FPI s ...

Page 33: ...ect chimney components including but not limited to cap size or type operator error abuse misuse use of improper fuels such as unseasoned cordwood mill ends construction lumber or debris off cuts treated or painted lumber metal or foil plastics garbage solvents cardboard coal or coal products oil based products waxed cartons compressed pre manufactured logs kiln dried wood lack of regular maintena...

Page 34: ...o the above limitations or exclusions may not apply to you Customers located outside the U S should consult their local provincial or national legal codes for additional terms which may be applicable to this warranty How to Obtain Warranty Service Customers should contact the authorized selling dealer to obtain all warranty and service In the event the authorized selling dealer is unable to provid...

Page 35: ... for us to serve you better Warranty Registration Form or Register online immediately at the above Web Site Warranty Details Serial Number required Purchase Date required mm dd yyyy Product Details Product Model required Dealer Details Dealer Name required Dealer Address Dealer Phone Installer Date Installed mm dd yyyy Your Contact Details required Name Address Phone Email For purchases made in CA...

Page 36: ...36 I1150 Regency Wood Insert ...

Page 37: ...I1150 Regency Wood Insert 37 notes ...

Page 38: ...38 I1150 Regency Wood Insert notes ...

Page 39: ...I1150 Regency Wood Insert 39 ...

Page 40: ..._____________________________________________ Phone ____________________________________________________________ Date Installed _______________________________________________________ Serial No ___________________________________________________________ Printed in Canada Regency is a trademark of FPI Fireplace Products International Ltd Copyright 2019 FPI Fireplace Products International Ltd All r...

Reviews: