8
|
F2450M Regency Freestanding Woodstove
installation
F2450
920-167
12.10.19
Shown with Classic door
1. For easier assembly, tip the stove on its back (onto a soft
surface to prevent scratching) and remove the front cover.
Hint:
If you have chosen the Ash Drawer option, remove
the ash dump cover plates before attaching the pedestal
(refer to the Ash drawer Kit Installation section).
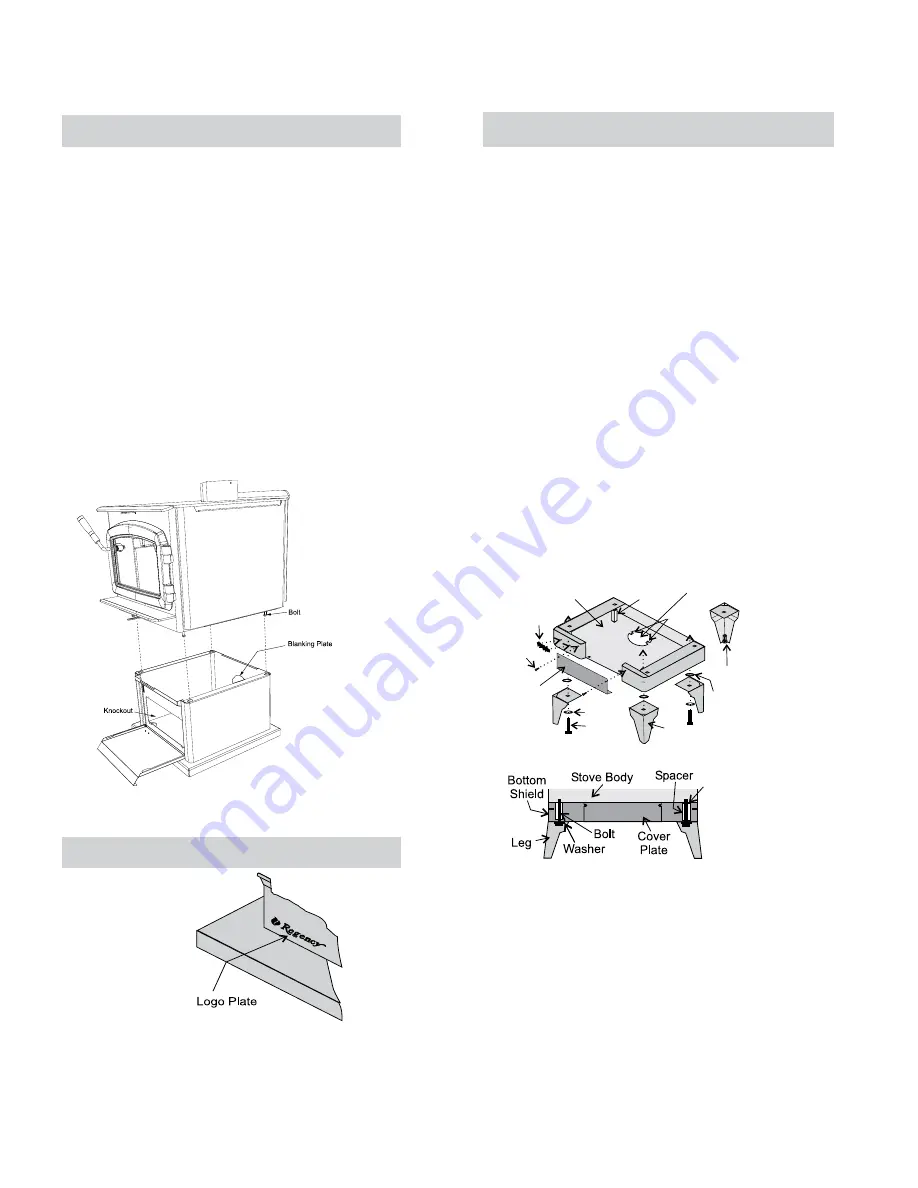
2. Important: Remove the blanking plate if:
a) you are not installing outside combustion air or
b) outside air is to be brought in from the rear of the stove
(see below).
3. Using the 4 supplied 5/16" bolts in the under-side of the
stove, insert the bolts loosely onto the threads located at
all 4 corners at the base of the unit. Align the holes in the
corners of the pedestal top with the corresponding bolts
in the base of the stove. Tighten each bolt from inside the
pedestal.
1. Push the Regency logo into
the two holes in the front
bottom left corner of
the pedestal cover
plate.
Note: Any paint touch up should be done prior to placing
logo on pedestal.
2.
If not using ash drawer, then the front cover must remain
in place. If using ash drawer, then remove the front cover.
The instructions below apply to the painted cast leg. It will be
easier to attach the legs to the stove if the stove is tipped on its
back (preferably on a soft surface to prevent scratching). Ensure
to be extremely careful when tipping stove.
Important: Prior to installing the bottom heat shield, remove
the 4 inch blanking plate. See below.
This must be removed for combustion air to enter the ap-
pliance.
1. Remove the 4 bolts from underside of the base of the pedestal
and discard. Also remove cover plate and put to the side.
2. Line up the heat shield with the bottom of the unit.
3. Add fibre washers and washers.
4. Start threading the bolt and washer (supplied with the bot-
tom shield) for about 1/4 of the way through the leg with the
washers being underneath the legs. Ensure that the legs
are properly aligned with heat shield and tighten the bolts.
5. Level the stove by adjusting the levelling bolts in the bottom
of each leg.
6. Reinstall cover plate if not using ash drawer option.
7. Install logo plate onto heat shield by placing in 2 holes as
shown in diagram.
If you are installing outside combustion air, bend the tabs out 90
degrees. Pipe fresh air into the bottom shield by using a minimum
4" duct pipe with a mesh grill at the outside termination. Attach
the pipe to the 2 tabs with screws.
Fibre
washer
Bottom Shield
Cover
Plate
Tabs
Spacer
Leg
Leveling Bolt
Washer
Logo
Plate
Bolt
Screw
Blanking Plate
Fibre washer
Pedestal Assembly Installation
Bottom Heat Shield and Legs Installation
Logo Installation


