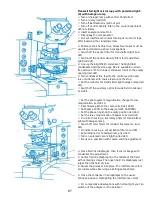
Assembly of the stage:
The stand has a dovetail mount and the stage support has a mating dovetail.
There are cutouts on each dovetail that allow the two to be fastened together.
First, unscrew the large screw with a coin slot, ➂, near the top of the stage
dovetail. Then, push the stage support onto the stand dovetail (you may have
to move the stage up and down to accomplish this using the recesses). Once
together, lower the stage support until the focusing lever (the end of which is
visible through the opening ➀) is centered behind the threaded hole for screw
➂. The table support is held in this position. Run the screw into the threaded
hole in the release lever.
Lower the stage support until the upper edge of the index ➁ is level with the
upper surface of the stand dovetail mount. Clamp the locking lever ➃. This is
the correct setting for the coarse-drive stop for regular transmitted-light
preparations on 1mm thick microscope slides.
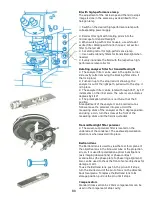
Assembly of the condenser holder:
Turn the condenser turret to the illustrated position; the screw-in condensers
should be oriented in a front-back direction. Run the condenser mount with the
condenser coarse-feed to the lower stop position. Hang the condenser turret
transverse pin into the v-shaped notch on top of the stand's condenser mount
by tilting it back slightly, hanging by the pin, and letting it down gently. Then
clamp the condenser carrier to the mount by tightening the knurled control
knob ➄ in a counter-clockwise direction a partial turn.
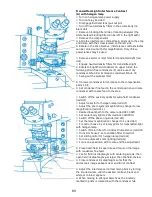
Assembling the nosepiece carrier and the objectives:
Screw in objectives into the optics carrier (the 10x lens is screwed into the
threaded hole marked with a dot.) The other lenses are installed so that the
objectives are higher magnification when the rotation of the objective
nosepiece is in a clockwise direction. With the stage in its lowest position (with
coarse focus), insert the optics carrier into the guide on the microscope stand
up to the stop and clamp with clamping screw ➅.
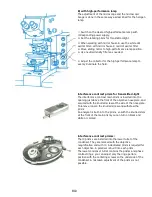
Magnification changer (if available):
Remove the cap from the opening on the stand. Turn the knob of the
magnification changer position to 2.5 (arrow). In this position you can slide in
the the magnification changer on its dovetail until it stops.
Phase-ring knob (if available):
Remove the cap from the opening of the stand. Insert the phase-ring assembly
by pressing on the adjustment knob to slide it onto the dovetail, and clamp
with the captive cap-head screw.
A2
Summary of Contents for Univar
Page 1: ...Reichert Univar Manual...
Page 2: ......
Page 48: ...D6 blank no content...
Page 58: ...E2 blank no content...


