background image

Videomatic

E

N

User manual

Please read this user  

manual carefully prior  

to installation, use  

and maintenance for

your own safety and in 

order to avoid damages 

on your system.

Summary of Contents for Videomatic

Page 1: ...Videomatic EN User manual Please read this user manual carefully prior to installation use and maintenance for your own safety and in order to avoid damages on your system ...

Page 2: ...2 ...

Page 3: ... EU Council directive 93 42 EEC of 14th June 1993 concerning medical devices risk class I according to Annex IX standard 12 CE conformity of Annex VII and RoHS II Council directive 2011 65 EEC Die CE Kennzeichnung auf dem Gerät dokumentiert diese Übereinstimmung The CE mark on the system points out this accordance Alsbach Hähnlein Ort und Datum der Ausstellung Place and date of issue M Reinecker G...

Page 4: ...mage 9 II Instructions for the reading system Videomatic 10 Delivery content 10 Camera 10 FullHD camera with optical zoom auto focus 10 Installation of the system 10 Connection of unit 11 Alignment of monitor 11 Alignment of the xy table 11 How to start the reading system 12 Operation with power supply and cables 12 Power ON 12 Power OFF 12 Automatic saving of device settings 12 Replacement of lig...

Page 5: ...owing 14 Description of the Videomatic menu 15 Menu selection 15 Navigate upwards the menu 15 Explanation of the menu content 16 Menu settings 16 Troubleshooting 18 Technical details 18 Warranty Information 19 Notes 20 ...

Page 6: ...ces has to be informed that it is necessary to observe the performance of the system to control the conventional use of the system in the chosen set up Electronic devices are sensitive towards electric discharge and towards high frequency electromagnetic fields Attention In order to avoid high frequency disturbances the operator should respect a mini mum distance of one meter to portable and mobil...

Page 7: ...fe span does not reflect the complete life span of the Videomatic It is rather an indication on when the product might be obsolete and substitution might be recommended due to new product developments Safety advice Videomatic has to be installed in closed and dry rooms only Do not plug Videomatic into an electrical circuit that is also being used for any life sustaining or support systems The devi...

Page 8: ...he system with a slightly damp cloth and a mild household detergent Interior of device must NOT come in contact with liquids Special advice for transport and storage For reasons of safety the unit must only be transported and stored in the original packing The unit must be stored in dry and closed rooms in the original packing The following conditions for transport and storage have to be respected...

Page 9: ...below 5 C or above 40 C 6 No liquids must reach the interior of the system Only operate the device in a dry environment 7 The device may not be operated next to medical devices patients environment 8 Do not lean on the screen touch the screen with any object or lay heavy objects on the device This may cause damage to the device 9 Do not try to repair or to dismantle the system by your own This wou...

Page 10: ...ally no picture noise Installation of the system Unpack your Videomatic carefully and place it on a solid horizontal surface If you have not purchased an optionally available stand that fits to the product you must provide a solid surface for the system with sufficient surface area Note DO NOT remove the CCTV unit by holding it by the xy table Please lift it by holding it at the chassis below the ...

Page 11: ...ible monitor arm enables the user to adjust the monitor according to the seating position Alignment of the xy table The xy table is equipped with a continuously adjustable friction brake The yellow locking lever can be moved continuously from zero to maximum and influences the braking intensity of the x and y axis This works by sliding the lever slowly from left to right By pushing the lever from ...

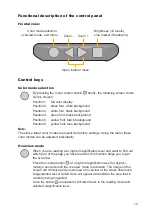
Page 12: ...lectronic magnifier is equipped with a high power LED Illumination If replace ment of the lamp is required it should only be done by a specialist or by Reinecker Vision GmbH Important note to the use of power supply Please only use the power supply included in the delivery Use of any other power supply will void the warranty Description of the control elements Power switch ON OFF By pressing the t...

Page 13: ...ted individually Overview mode When you are reading at a higher magnification level and want to find out which part of the page you have reached this function helps you to get the overview Press the central button at a higher magnification level for approxi mately 2 seconds until the overview mode is activated The image on the screen will minimise and you will see an overview of the whole document...

Page 14: ...the brightness of the screen can be changed from 5 up to 5 Line marker Shadowing Please keep the square control button pressed for over 2 seconds When you do it again you will get further options Line marker shadowing horizontal Column marker shadowing vertical Deactivate line marker column marker Line marker Shadowing horizontal Please keep the square control button pressed and move the line mark...

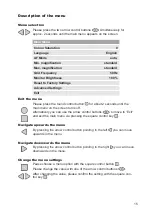
Page 15: ...essing the arrow control button pointing to the left you can move upwards in the menu Navigate downwards the menu By pressing the arrow control button pointing to the right you can move downwards in the menu Change the menu settings Pease choose a menu option with the square control button Please change the value with one of the arrow control buttons After changing the value please confirm the set...

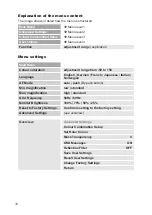
Page 16: ...ard Grid Frequency 50Hz 60Hz Monitor Brightness 100 75 50 25 Reset to Factory Settings Confirm resetting to the factory setting Advanced Settings see overview Overview Advanced Settings Colour Combination Setup Set Ruler Colour Mask Transparency 0 OSD Messages ON Reflection Filter OFF Save User Settings Recall User Settings Change Factory Settings Return Main Menu Menu level 1 Advanced Settings Me...

Page 17: ...nt range from 0 to 31 User colour 1 Blue adjustment range from 0 to 31 User colour 2 Red adjustment range from 0 to 31 User colour 2 Green adjustment range from 0 to 31 User colour 2 Blue adjustment range from 0 to 31 Return Main Menu Ruler Mask Settings Ruler Colour Red adjustment range from 0 to 31 Green adjustment range from 0 to 31 Blue adjustment range from 0 to 31 Return Main Menu Advanced S...

Page 18: ... Check the brightness and contrast settings of the camera monitor True colour is not dis played correctly Check your reading material colour mode setting brightness colour saturation and camera lighting Videomatic 19 class monitor LED flat screen monitor 19 class approx 48 cm 1366 x 768 pixel Weight approx 12 2 kg Measurements WxHxL approx 44x52x52 cm Colour modes True colours preset and individua...

Page 19: ...nvalidation of the warranty 4 Interventions from persons other than Reinecker Vision GmbH authorised specialists may lead to invalidity of warranty 5 Partial warranty is valid for light sources serving to illuminate the reading object batteries and other parts subject to wear and tear 6 If a warranty claim is necessary the system has to be returned to the manufac turer in Alsbach Hähnlein or to yo...

Page 20: ...Notes ...

Page 21: ......

Page 22: ......

Page 23: ...Type Videomatic VIDEOMA1 Serial number Manufacturer Reinecker Vision GmbH Final examination Power supply 100 VAC 240 VAC 50 60 Hz With plug in power supply 12V DC 5000mA Power consumption max 80 Watt ...

Page 24: ...all direkt an unser Hauptwerk in Alsbach Hähnlein oder an eine unserer Niederlassungen Bei im Ausland erworbenen Produkten kontaktieren Sie im Servicefall bitte Ihren dort ansässigen Händler Reinecker Vision GmbH International Contact sales department customer relations Sandwiesenstraße 19 DE 64665 Alsbach Hähnlein customer service Erlenweg 3 DE 64665 Alsbach Hähnlein Tel 49 6257 9311 0 Fax 49 625...

Reviews: