background image

2

©  2004  Ernst  Reiner  GmbH & Co. KG

All rights reserved.  Translations, reprints, or any other form of 
reproduction of this manual, in whole or in part, and in any form 
whatsoever require our expressed permission in writing. 
We reserve the right to alter the contents of this manual without notice.
This manual has been prepared with the greatest care, however, 
we accept no responsibility for possible errors or omissions, 
or for damage that may result from such errors or omissions.

Summary of Contents for 780

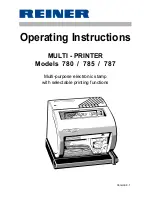
Page 1: ...Version 4 1 Operating Instructions MULTI PRINTER Models 780 785 787 Multi purpose electronic stamp with selectable printing functions ...

Page 2: ... in part and in any form whatsoever require our expressed permission in writing We reserve the right to alter the contents of this manual without notice This manual has been prepared with the greatest care however we accept no responsibility for possible errors or omissions or for damage that may result from such errors or omissions ...

Page 3: ...ed imprints Setting a pre text Functional description of the Numberer num Setting of Numberer Number Text Settings Changing the ink ribbon cassette Changing the ink ribbon protection mask Chip card functions Key function printing disable Operator s identification on the chip card Printing the first print line Line 1 from chip card Printing the second print line Line 2 Printing the second print lin...

Page 4: ...le The machine has no ON OFF switch To disconnect it from the mains you must pull out the plug Arrange the connection leads so that they do not create a hazard danger of tripping and cannot be damaged Take care that no objects e g necklaces paper clips etc or liquids fall into the machine danger of electric shock or a short circuit In an emergency e g in the event of damage to the machine casing c...

Page 5: ...e 1f 1 2 3 4 5 6 7 8 1 Keypad 2 Display 1a Key fkt 3 Trigger mode switch 1b Key n r 4 Print head 1c Key time 5 Side stop 1d Key mode 6 Feedplate table trigger 1e Key set 7 Front cover 1f Key line 8 Chip card for Model 785 787 ...

Page 6: ...n next to the print head 4 on the left Attention While taking out the carton don t pull out the ink ribbon Take out carton on the left between upper part of machine and document table The choice of location for a REINER MULTI PRINTER is not particularly critical However for safe correct operation please observe the following points Place the machine on a stable smooth and level surface in a room w...

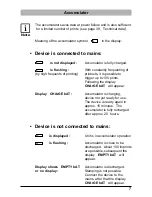
Page 7: ...wing the display CHArGE bAT will appear Display CHArGE bAT Accumulator is charging device not yet ready for use The device is ready again in approx 15 minutes The accumulator is fully recharged after approx 20 hours Device is not connected to mains is displayed Unit is in accumulator operation is flashing Accumulator is close to be discharged About 100 imprints are possible subsequent the display ...

Page 8: ...and the minutes are flashing in the display If PASS 0000 appears in the display then date and time setting is protected by a password Enter the password via the keys set and mode see also page 25 Password clock Press the key line to switch between Date 1 and Date 2 The display changes corresponding between MInUTE 1 and MInUTE 2 Press the key set repeatedly until desired minutes appear Press the ke...

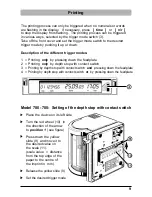
Page 9: ... triggered when no numerals or words are flashing in the display If necessary press time or n r to stop the display from flashing The printing process can be triggered in various ways selected by the trigger mode switch 3 Take off the front cover and set the trigger mode switch to the desired trigger mode by pushing it up or down Description of the different trigger modes 1 Printing only by pressi...

Page 10: ...may be hot When adjusting take care that the depth stop unit does not jam in its guide Touching the depth stop unit near its guide axis 18 helps to prevent jamming Retighten the clamping screw 15 Set the desired kind of triggering see page 9 Switching off the depth stop with contact switch Push the yellow slide 9 figure on page 9 to scale value 95 Turn the red setting wheel 10 in the opposite dire...

Page 11: ...mask marks the printing position The imprint commences at the left mark 13 on the foil mask Activating upside down imprint Keep the key fkt pressed and at the same time press the key set An upside down symbol appears at the top right of the display The imprint commences at the right mark 14 on the foil mask To switch off upside down imprint press the keys fkt and set again The symbol disappears fr...

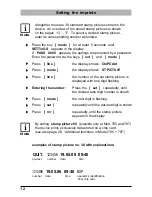
Page 12: ...ress line the number of the set stamp picture is displayed with one digit flashing Entering the number Press the set repeatedly until the desired tens digit number is shown Press mode the next digit is flashing Press set repeatedly until the desired digit is shown Press n r repeatedly until the stamp picture appears in the display By setting stamp picture 00 possible only at Mod 785 and 787 the de...

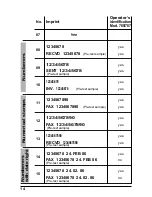
Page 13: ...No Imprint identification Mod 785 787 00 Reserved for use of chip cards with customized imprints and functions Mod 785 and 787 yes 01 08 JAN 2006 yes SENT 08 JAN 2006 yes 02 08 01 2006 yes RECVD 08 01 2006 yes 03 2006 01 26 yes INV 2006 01 26 yes 04 JAN 08 2006 yes FAX JAN 08 2006 yes 05 2006 001 yes RECVD 2006 001 yes 06 25 JAN 2006 yes PAID 25 JAN 2006 yes Daters pre text sample pre text sample ...

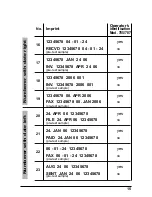
Page 14: ...1 FAX 1234567890 yes 1234567890 yes 12 FAX 1234567890 yes 1234567890 yes 13 RECVD 1234567890 yes 12345678 24 FEB 06 yes 14 FAX 12345678 24 FEB 06 no 12345678 24 02 06 yes 15 FAX 12345678 24 02 06 no Pre text sample Pre text sample Pre text sample Pre text sample Pre text sample Pre text sample Pre text sample Pre text sample Numberers Numberers with date right Numerical stamps ...

Page 15: ...006 yes 19 FAX 12345678 08 JAN 2006 no 24 APR 06 12345678 yes 20 FILE 24 APR 06 12345678 no 24 JAN 06 12345678 yes 21 PAID 24 JAN 06 12345678 no 06 01 24 12345678 yes 22 FAX 06 01 24 12345678 no AUG 24 06 12345678 yes 23 SENT JAN 24 06 12345678 no pre text sample pre text sample pre text sample pre text sample pre text sample pre text sample pre text sample pre text sample Numberer with date right...

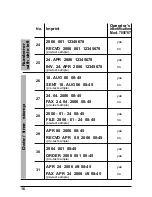
Page 16: ... 2006 08 45 yes 27 FAX 24 04 2006 08 45 no 2006 01 24 08 45 yes 28 FILE 2006 01 24 08 45 no APR 08 2006 08 45 yes 29 RECVD APR 08 2006 08 45 no 2004 001 08 45 yes 30 ORDER 2006 001 08 45 yes APR 24 2006 AM 08 45 yes 31 FAX APR 24 2006 AM 08 45 no pre text sample pre text sample pre text sample pre text sample pre text sample pre text sample pre text sample pre text sample Date time stamp Numberer ...

Page 17: ...2006 04 24 08 45 no 36 123456 AUG 24 06 08 45 no 37 000000 2006 001 08 45 yes 123456 08 04 06 08 45 yes 38 SENT 123456 08 04 06 08 45 no 39 123456 APR 24 06 AM 08 45 no Pre text not possible Pre text not possible Pre text not possible Pre text not possible Pre text not possible Pre text not possible Time stamp with number and date ...

Page 18: ...if the imprint does not take the complete print line see table on pages 13 17 The desired language must be set before selecting the pre text see also page 23 Press the key n r If PASS 0000 appears in the display the setting of pre text is protected by a password Enter the password via the keys set and mode Press the key line repeatetly until the display shows P TEXT Select the desired pre text wit...

Page 19: ...ÖNYV IKT BEV T KIAD ELL ORIG REND COPY SZLA Czech Rep 13 _ _ _ _ _ _ _ _ _ _ _ J Ú OBJ ZAK DAT ZN ORIG K P IJ VYD PLAC Croatia 14 _ _ _ _ _ _ _ _ _ _ IZLAZ ULAZ PLA PONIŠ TERE ISPOR Cyrillic 15 _ _ _ _ _ _ _ _ _ KOGBZ BX No BCX No BA HO BEPHO WEHA CXET 3AKA3 AAKC Spain 4 _ _ _ _ _ _ _ ENTR SAL TRAT ARCHI CAJA PGDO VENT RECIB M EXT REG ANOT CONF Portugal 5 _ _ _ _ _ _ _ _ _ ENTR SAÍDA ELABO ARQVO C...

Page 20: ...on factor 0 99 This is displayed at the left excepting the stamp pictures 11 13 Incremental printing of an adjustable minimal value up to a maximal value setting see page 23 Mode n1 n2 Decreasing printing of an adjustable maximal value to an adjustable minimal value setting see page 23 Mode n1 n2 Skip of numberer adjustable 0 99 setting see page 23 24 Skip n1 and Skip n2 Minimal value of numberer ...

Page 21: ...numberer 2 TExT 01 12 setting the contents of a text field 01 12 After selection of a menu right hand of it the actual value is displayed The flashing position can be set by pressing the key set The remaining input digits can be called by pressing mode and they can be set with the key set Note By setting the character the corresponding digit can be used as placeholder Press key n r to quit the inp...

Page 22: ...ting of numerical values mode setting of non numeric values If a numerical value is displayed the various digits will be called n r exit the menu Settings Keep mode pressed for at least 5 sec If necessary enter password line line mode line mode line mode see next page Settings Chip card on off on Multi Printer with chip card reader only selectable with 785 787 off Multi Printer without chip card r...

Page 23: ... off Splitting 100 time units per hour industrial time Mode numberer 1 adjustable 1 2 1 Numberer 1 increasing from minimum value up to maximum value 2 Numberer 1 decreasing from maximum value to minimum value description see also page 20 Skip numberer 1 adjustable adjustment range 01 99 description see also page 20 Mode numberer 2 adjustable 1 2 1 Numberer 2 increasing from minimum value up to max...

Page 24: ... time Online on off on 24 Interface active off V 24 Interface deactivated Print data transmission on off on Print data transmission via V 24 Interface active off Print data transmission via V 24 Interface deactivated With setting Record on data of stamp picture numberer time and date operator s identification and so on can be transmitted to a connected PC Delay time of contact switch adjustment ra...

Page 25: ...witch over at 787 to off by button line without line adjustment 2 automatic or manually pint line switchover by button line without line adjustment Password clock on off on Access to setting time and date is protected by a password Default password 2 4 6 8 off no password protection Password numberer repetition pre text on off on Access to set numberer repetition and pre text is protected by a pas...

Page 26: ...ile sliding in the cassette slightly turn the rotary button 22 in direction of arrow Position ribbon on right hand roller guide 23 push it between the guides of the print head 25 and the red foil mask 20 and position it on left hand roller guide 24 as you can see in figure below Use the rotary button 22 to tighten the ink ribbon The ink ribbon must lie completely behind the white plastic disks 23 ...

Page 27: ...he foil mask forwards off the right hand side of the frame and discard it Fit the new foil mask with the arrow marks 13 and 14 to the front see figure on Page 12 First push it on to the right hand side of the frame until it reaches the stop Tension it slightly and push it on to the left hand side of the frame until it reaches the stop Reset the trigger mode switch 3 to the required position Refit ...

Page 28: ...ve see page 22 Settings CHIPCArd on Key function printing disable see page 29 Printing a supplementary operator s identification see page 29 Individual stamp picture stored on the chip card see page 29 Additional second print line see page 30 Chip Insert the chip card vertically into the slot opening until it latches The chip must thereby face towards the operator The currently set stamp picture a...

Page 29: ...e chip card function must be active see page 22 and the desired number of a stamp picture must be entered After inserting the chip card the printing process can be triggered The maximum printing width is 60 mm so the operator s identification cannot be included with all stamp pictures see pages 13 17 Imprint example Printing the first print line Line 1 from chip card Before printing the Line1 stor...

Page 30: ...chip card function must be active and the chip card must be inserted in the machine see page 22 chip card Printing the second print line with Model 785 a Setting Switch line 0 Press the key line The Display shows TEXT LInE 2 If the line is pressed again before stamping was triggered this display is erased and line 1 of the the set stamp picture is shown again Move a document to required printing p...

Page 31: ...e next line Printing the second print line with Model 787 Model 787 contains a standard function for semiautomatic two line stamping A solenoid has been added to the depth stop to create a stop unit Using the standard setting Setting Switch line 0 the depth stop will be moved automatically to a predefined line spacing distance for stamping the second print line see also page 38 Technical data a Se...

Page 32: ...ger another stamping Line 2 will be printed The Display returns to the selected stamp picture and the depth stop returns to print line 1 position Using the line key it is also possible to switch manually to print line 2 In this case the feed unit does not change the position of the depth stop After stamping the machine automatically switches to print line 1 c Setting Switch line 2 With this settin...

Page 33: ...o the MULTIPRINTER which will print them An interface description to enable application programs to be written is available from REINER The interface connection is on the rear of the machine behind the round cover To avoid damage to the machine and malfunctions due to electrostatic discharge keep the cover over the interface socket whenever no cable is connected RS 232 interface i Note Caution ...

Page 34: ...iscontinued after 12 minutes and thereafter repeated hourly until a satisfactory signal has been received After activating the radio clock its symbol is shown above the stamp picture in the display with following status not flashing reception ok date time set correctly slowly flashing poor reception The attempt to receive will be discontinued after 40 seconds flashing once per second receiving a g...

Page 35: ...cess not executed completely Ribbon cassette blocked Connect device to mains Device is ready after approx 15 minutes Connect device to mains Device is ready after approx 15 minutes Accumulator is fully charged after 20 hours Insert chip card correctly Connect device to It is ready after approx 15 minutes accumulator is fully charged after 20 hours Call technical service or competent distributor En...

Page 36: ... chip card differs from key number stored in the device Data on chip card exceed the maximum range of imprint Number of stamp picture on chip card doesn t exist delete error indication by pressing set following set Skip n1 or Skip n2 to a value less than 10 see page 23 24 Insert a valid REINER chip card correctly Use REINER chip card Correct key no on chip card or change the setting of the device ...

Page 37: ...r clip there is a danger of damage to the switch and PCB if it is not used very carefully Carry out a Reset Remove the front cover 7 Press a thin pin shaped object about 4 cm long vertically into the small circular opening see arrow on the left below the display using for example a bent open paper clip until the display shows Test Close the front cover 7 The program is restarted If the program is ...

Page 38: ...a 20 hours Impression data Max size of impression 60 44 mm x 3 2 mm W x H Paper thickness multiple sheet with max 2 mm thickness Carbon copy performance 3 to 4 carbon copies on NCR paper Ink ribbon capacity min 40 000 impressions stamp picture no 38 with pre text Stamping time ca 0 5 seconds Stamping sequence 2 seconds Noise level max 74 dB A at print procedure workplace related emissions to ISO 7...

Page 39: ...This printer satifies the requirements of the EMV guideline 2004 108 EG with regard to Elektromagnetic compatibility in accordance with EN 55022 and EN 55024 As verification the scanner bears the CE label WEEE Registration number Disposal of electronic apparatus must not be in residual waste or domestic waste Our WEEE registration number is DE 58656748 ...

Page 40: ...784 230 001 c 11 2006 ERNST REINER GMBH CO KG PO Box 1351 D 78115 FURTWANGEN Phone No 49 7723 6570 Fax 49 7723 657200 E Mail reiner reiner de Internet www reiner de ...

Reviews: