background image

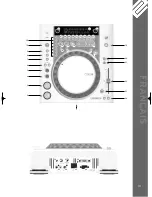
12. Loop IN button 

Activate the Loop IN button -12- to set the start point of a loop (endless loop)
and also to set a current Cue Point.  

13. Loop OUT button 

Activate the Loop Out button -13- to set the end point of a loop (endless loop).
If the Loop IN button was previously activated, the player goes into the Loop
mode (seamless loop) - the display reads "Reloop". To exit the loop, press the
Loop OUT button again. 

For more information about loops go to the chapter entitled "Sampling".

14. Reloop button 

Press the Reloop button -14- for the player to return to the last loop that was
played. To exit the loop, press the Loop OUT button again. 

For more information about loops go to the chapter entitled "Sampling".

15. CUE/Sample Banks 1-4

When in Play mode, the Cue/Sample banks 1 to 4 -15- can be used as Hot Cue
buttons. Once the Sampler mode has been activated by using the Sampler
button -17- the player will play samples from the banks simultaneously with
the playback. For every bank, a 5-second sample can be saved and played
back. Press one of the respective Bank buttons 1 to 4 to trigger the
previously stored Cue Points or samples. 

For more information about loops go to the chapter entitled "Sampling".

16. Memory button 

Use the Memory button -16- to assign and store loops in the four sample
banks. After creating a Loop with the help of the Loop IN and Loop OUT
buttons, press the Memory button -16-. The Memory LED goes on. Then
select one of the four sample banks to store the Loop on the very same. The
respective sample bank goes on. The Memory LED goes off. Repeat this
process to replace the respective sample or to record a new one. 

The memory function also makes it possible to lastingly store for up to

500 CDs four cue points or samples (altogether 2.000 cue points/samples).
Read more information in the chapter entitled "Sampling".

17. Sampler button 

To activate the sample mode, press the Sampler button -17-. 

NOTE:

There are two different sample play modes: An Endless mode and a One Shot
mode. The Endless mode is activated by pressing the Sampler button - 17 -
once; the sampler LED is continually illuminated. In Endless mode the
sample is played endlessly in a loop. The One Shot mode is activated by
pressing the Sampler button -17- twice. The sampler LED flashes. In One
Shot mode the sample is triggered once. 

If the Sample mode has been activated, the loops previously stored in the
sample banks 1 to 4 can be played simultaneously while playing back the CD.

18. Jog Wheel

Your CD player features an extra large Jog Wheel for a real vinyl-like
operation. This is generally divided into two sections for scratch applications.
The top section is touch sensitive and responds to the body's own electricity
- similar to a vinyl record on the turntable. The outer rubberised ring has
been designed for pitch bending - similar to the edge of a turntable's platter. 

If the Scratch function -27- has been deactivated, the entire Jog Wheel also
works as a Search and Pitch Bend wheel. By turning clockwise and counter-
clockwise while in Cue and Pause mode, you can precision-frame-search

28

ENGLISH

IM_RMP2_MK2.qxp  14.01.2009  15:23 Uhr  Seite 28

Summary of Contents for RMP-2 MK2

Page 1: ...ON Pour votre propre sécurité veuillez lire attentivement ce mode d emploi avant la première utilisation Toutes les personnes chargées de l installation de la mise en service de l utilisation de l entretien et la maintenance de cet appareil doivent posséder les qualifications nécessaires et respecter les instructions de ce mode d emploi Ce produit est conforme aux directives européennes et nationa...

Page 2: ...m Geräteinneren befinden sich keine zu wartenden Teile ausgenommen die von außen austauschbaren Verschleißteile Die Wartung darf nur von fachkundigem Personal durchgeführt werden ansonsten verfällt die Gewährleistung Stellen Sie sicher dass die Stromversorgung erst nach dem Aufbau des Gerätes erfolgt Den Netzstecker immer als letztes einstecken Vergewissern Sie sich dass der Netzschalter auf OFF s...

Page 3: ...n Zu Beginn müssen die Überblendregler und Lautstärkeregler Ihres Verstärkers auf Minimum eingestellt und die Lautsprecherschalter in OFF Position geschaltet sein Vor dem Lauterstellen 8 bis 10 Sekunden warten um den durch Einschwingung erzeugten Schroteffekt zu vermeiden welcher zu Lautsprecher und Frequenzweichenschäden führen könnte Achten Sie stets darauf dass Sie nur unverkratzte und nicht ve...

Page 4: ...etzstecker aus der Steckdose ziehen Es ist anzunehmen dass ein gefahrloser Betrieb nicht mehr möglich ist wenn das Gerät sichtbare Beschädigungen aufweist das Gerät nicht mehr funktioniert nach längerer Lagerung unter ungünstigen Verhältnissen oder nach schweren Transportbeanspruchungen VORSICHT LASERSTRAHLUNG Dieses Gerät enthält zwei Laserdioden der Klasse 1 Um einen sicheren Betrieb zu gewährle...

Page 5: ...der Bildfläche nach oben vorsichtig in den Ladeschlitz 1 Die CD wird automatisch eingezogen Sollten Sie CDs mit einem Durchmesser von unter 12 cm benutzen benutzen Sie bitte einen handelsüblichen Adapter Wenn Sie im Pause Cue Modus die Eject 19 Taste drücken wird die CD wieder ausgeworfen DEUTSCH 39 40 41 42 46 45 44 43 1 2 3 4 5 6 7 8 9 10 12 19 20 21 22 23 24 36 13 14 15 16 17 18 37 38 25 11 26 ...

Page 6: ...t im Wiedergabe Modus Mit ein wenig Übung lässt sich so der Cue Punkt schneller speichern Wenn Sie nun die Cue Taste 3 drücken kehrt der Player an den Cue Punkt zurück und befindet sich im Pause Modus Durch Gedrückthalten der Cue Taste kehren Sie solange in den Wiedergabe Modus zurück bis Sie die Taste loslassen danach kehrt der Player an den Cue Punkt zurück und befindet sich im Pause Modus Durch...

Page 7: ...and By Zeit von 0 120 Min 0 min Inaktiv 3 Stop Time Einstellung des Zeitintervalls von 0 5 20 Sek indem der Titel erneut durch das Display läuft 4 Run Time Einstellung der Titelanzeigen Laufgeschwindigkeit von 20 mSek 1000 mSek 5 Sensitivity Empfindlichkeitseinstellung der Topsektion des Jog Wheels von 20 bis 20 6 Defaults Yes Zurückstellen auf Werkseinstellung Exit Verlassen ohne auf Werkseinstel...

Page 8: ...r Sampler Taste 17 aktiviert die Sampler LED leuchtet konstant Im Endlos Modus wird die programmierte Abfolge endlos abgespielt Der One Shot Modus wird durch erneutes Betätigen der Sampler Taste 17 aktiviert die Sampler LED blinkt Im One Shot Modus wird die programmierte Abfolge einmalig abgespielt Zum Abspielen der eben programmierten Abfolge betätigen Sie die Sampler Taste 17 einmal für Endlos M...

Page 9: ...iv ist I BPM Anzeige Zeigt den aktuellen BPM Wert des Tracks an J Dot Matrix Informationsdisplay Zeigt beim Abspielen einer MP3 CD mit hinterlegten ID3 Tags oder einer Audio CD mit hinterlegten CD Text den Ordner Künstler und Titelnamen an Um bei einer MP3 CD zwischen Ordner und Künstler Titel Namen zu wechseln drücken Sie das Track Rad 4 Hinter dieser Informationsanzeige ist eine virtuelle Schall...

Page 10: ...onen zum Thema Loopen finden sie im Abschnitt Sampling 16 Memory Taste Mit Hilfe der Memory Taste 16 werden erstellte Loops den vier Sample Bänken zugewiesen und gespeichert Nachdem Sie mit Hilfe der Loop In und Loop Out Taste einen Loop erstellt haben drücken Sie die Memory Taste 16 die Memory LED leuchtet auf Danach wählen Sie eine der vier Sample Bänke aus um den eben erstellten Loop darauf zu ...

Page 11: ...gen Die Status LED oberhalb des Laufwerks blinkt beim Laden der CD Sobald die CD gelesen und erkannt wurde erlischt die Status LED Sollten Sie CDs mit einem Durchmesser von unter 12 cm benutzen benutzen Sie bitte einen handelsüblichen Adapter Wenn Sie die Eject 19 Taste drücken wird die CD wieder ausgeworfen 20 Pitch Range Taste Durch Drücken der Pitch Range Taste 20 können Sie zwischen einem Pitc...

Page 12: ...nn Sie nun das Jog Wheel berühren kehrt der Player sofort an den Cue Punkt zurück es wird nicht in den Pause bzw Wiedergabe Modus gewechselt So können Sie einen Track ab dem gewünschten Cue Punkt einscratchen Drücken Sie ein weiteres mal die Scratch Taste um den Scratch Modus zu deaktivieren Sie können nach Wunsch die Jog Wheel Empfindlichkeit einstellen Gehen Sie dafür wie in Punkt 7 Unterpunkt 5...

Page 13: ...p Effekt zu erzielen stellen Sie den Time Parameter Wert auf 0 mSek ein und aktivieren sie Hold Mittels der Parameter Ratio Taste und dem Jog Wheel können Sie nun vom Wert 0 High Pass Filter stufenlos bis zum Wert 255 Low Pass Filter Ihren Track frequenzfiltern 30 Phase Taste Mit der Phase Taste 30 aktivieren Sie den Phase Effekt Er ähnelt dem Flanger jedoch betont er die Obertöne weniger und klin...

Page 14: ... Scratch Modus ANWENDUNGSTIPP Am Besten hört sich der Echo Effekt an wenn er beatsynchron läuft Nutzen Sie also optimalerweise die Beatverknüpfungstasten 36 um die Effektlänge zu variieren 33 Flanger Taste Mit der Flanger Taste 33 aktivieren Sie Flanger Effekt Dieser oft eingesetzte Effekt ähnelt dem Phase Effekt ist jedoch etwas harmonischer betont die Obertöne mehr und erinnert an ein vorbei fli...

Page 15: ...aktivieren Sie einen Balance Effekt Dieser Effekt lässt das Signal je nach Taktfrequenz von der linken zur rechten Lautsprecherseite wechseln Ihr Gerät synchronisiert die Effekte automatisch zum aktuellen BPM Wert Mittels den Beatverknüpfungstasten 36 können Sie taktgenau die Frequenz ändern Um die Taktfrequenz des Effektes manuell zu verändern drücken Sie die Parameter Time Taste 25 und reguliere...

Page 16: ...lt danach geht der Player in den Pause Modus Daraufhin wird der zweite Track des ersten Players abgespielt usw HINWEIS Darüber hinaus unterstützt Ihr Player auch die Faderstart Funktion Verbinden Sie dazu das mitgelieferte 3 5mm Klinkenkabel an die Relay Faderstart Anschlussbuchse 39 mit der Faderstart Anschlussbuchse eines kompatiblen Mischpults beispielsweise den Reloop RMX 40 DSP So können Sie ...

Page 17: ...kunden zur Verfügung Um ein Sample aufzunehmen setzen Sie wie oben beschrieben einen Loop mit den Loop In und Loop Out Tasten Drücken Sie nun die Memory Taste 16 und danach eine der vier Speicher Tasten 15 Der soeben gesetzte Loop ist nun auf die gewählte Samplebank gespeichert und die Memory Taste erlischt Um ein Sample abzuspielen drücken Sie zunächst die Sampler Taste 17 Drücken Sie nun die gew...

Page 18: ...ereit Um den Cue Punkt Sample Bank Speicher komplett zu löschen schalten Sie das Gerät mit dem EIN AUS Schalter 45 zunächst aus Drehen Sie nun das Search Rad 5 bis zum Widerstand nach links und halten Sie es in dieser Position Schalten Sie nun das Gerät mit dem EIN AUS Schalter wieder ein lassen Sie das Search Rad wieder los sobald Clear all im Display erscheint HILFE ZUR FEHLERSUCHE Falls Schwier...

Page 19: ...keit geprüft Frequenzgang 20 Hz 20 kHz Kanaltrennung 81 dB Rauschabstand 90 dB D A Wandler 8fach 1 Bit MP3 Formate MPEG 1 Layer 3 standard MPEG 2 Layer 3 standard MPEG 2 5 Layer 3 standard Maximale MP3 Folder 255 Maximale MP3 Dateien 999 Maße 320 x 112 6 x 340 mm Gewicht 4 4 kg 19 DEUTSCH Reloop wünscht Ihnen nun viel Spaß ...

Page 20: ...sure that power is only supplied after the device has been fully set up Always plug in the mains plug last Ensure that the mains switch is in the OFF position when connecting the device to power Only use cables that comply with regulations Observe that all jacks and bushes are tightened and correctly hooked up Refer to your dealer if you have any questions Ensure that when setting up the product t...

Page 21: ...e created by transient effect which could cause damage to loudspeakers and the diplexer Always ensure that you place scratch free clean CDs into the player When placing the CD into the tray your hands should also be clean To keep the laser head clean always close the CD tray Devices supplied by voltage should not be left in the hands of children Please exercise particular care when in the presence...

Page 22: ...er functions following longer storage under unfavourable conditions or after major transport stress CAUTION LASER RADIATION This device is equipped with two Class 1 laser diodes To ensure a safe operation do not remove any covers or try to access the inside of the equipment The inside of the device does not contain any parts which are subject to maintenance Maintenance must only be carried out by ...

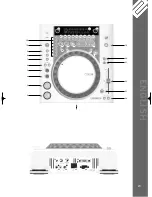
Page 23: ...23 ENGLISH 39 40 41 42 46 45 44 43 1 2 3 4 5 6 7 8 9 10 12 19 20 21 22 23 24 36 13 14 15 16 17 18 37 38 25 11 26 35 34 33 32 31 30 29 28 27 ...

Page 24: ...he player remains in Play mode With a little practice this is a faster way to set the desired Cue Point Press the Cue button 3 for the player to return to the Cue Point and go into Pause mode By pressing and holding the Cue button you will return to Play mode until you release the button again The player will then return to the Cue Point and go into Pause mode Press the Play Pause button to perman...

Page 25: ...ive 3 Stop Time Set the time interval from 0 5 20 sec when the track will pass the display again 4 Run Time Set the running speed of the tracks showing on the display from 20 mSec 1000 mSec 5 Sensitivity Sensitivity setting of the top section of the Jog Wheel from 20 to 20 6 Defaults Yes Reset factory settings Exit Exit without resetting to factory settings 7 Save Yes Save the settings made Exit E...

Page 26: ... 17 once the sampler LED is continually illuminated In Endless mode the programmed sequence is played endlessly The One Shot mode is activated by pressing the Sampler button 17 again The sampler LED flashes In One Shot mode the programmed sequence is played once only To play the above programmed sequence press the Sampler button 17 once for Endless mode twice for One Shot mode and press the Bank P...

Page 27: ...ds BPM only is activated I BPM Display Indicates the current BPM value of the track J Dot Matrix Information Display Indicates the name of the folder artist and title while playing an MP3 CD with ID3 tag or an audio CD with CD text To change between the name of a folder artist and title of an MP3 CD press the Track Wheel 4 This information display animates a virtual disk which shows the direction ...

Page 28: ...r sample banks to store the Loop on the very same The respective sample bank goes on The Memory LED goes off Repeat this process to replace the respective sample or to record a new one The memory function also makes it possible to lastingly store for up to 500 CDs four cue points or samples altogether 2 000 cue points samples Read more information in the chapter entitled Sampling 17 Sampler button...

Page 29: ...d time to deactivate the Key Lock function 22 Pitch Fader Use the Pitch Fader 22 to infinitely change the pitch of the track within the selected range The difference from the original pitch is shown on the display 11F in per cent Adjustments in the 4 and 8 pitch ranges are effected in steps of 0 05 in the 16 pitch range in steps of 0 1 and in the 100 pitch range in steps of 1 NOTE These steps can ...

Page 30: ...nd the Time Parameter button 25 to set the start time and in combination with the Ratio Parameter button 26 the stop time of the player each in steps of 0 9990 mSec NOTE To set the start or stop time to match the beat press the respective Beat link buttons 36 select between 1 8 1 4 1 2 3 4 1 1 2 1 und 4 1 beat s The respective LED is illuminated When pressing the Play Pause button 2 to change into...

Page 31: ... the volume with the Jog Wheel from 0 255 NOTE As soon as the Time or Ratio buttons have been activated the Scratch mode is temporarily deactivated 31 Hold button When activating the Hold function with the button 31 your player maintains the set effect frequency Otherwise the effect value always returns to the original value ATTENTION The original value can be independently defined For this activa...

Page 32: ...eter Ratio button 26 and set the volume with the Jog Wheel from 0 255 NOTE As soon as the Time or Ratio buttons have been activated the Scratch mode is temporarily deactivated TIP The Flanger effect is best when set to 4 1 beat with the beat link button 34 Trans button Use the Trans button 34 to activate a Cut effect This effect sounds as if cutting the signal quickly with the cross fader Your dev...

Page 33: ...e display reads Auto BPM Read the currently determined value on the display See also item 11 I 38 TAP button Press the TAP button 38 repeatedly to the beat of the music to manually determine the speed of the track The display currently reads the value in BPM beats per minute Press the BPM button 37 to activate the automatic beat counter again 39 Relay Fader Start Connection Hub When connecting you...

Page 34: ...tton 13 The player goes automatically into Loop mode and the Reloop display flashes The sequence thus chosen is seamlessly re played until the Loop OUT button 13 is pressed a second time The player seamlessly goes into Play mode To prompt the last played loop against press the Reloop button 14 The player goes automatically into Loop mode NOTES The player saves this loop for the current track only ...

Page 35: ...on of a sample bank without previously having activated the Memory button or the Sample button the Player returns while in Play mode as well as in Pause mode to the beginning of the respective sample This function is only available for CDs of samples or with sample banks that are illuminated in red NOTES If you wish to lastingly save the set Cue Points Samples press the Memory button 16 for two se...

Page 36: ...s 255 Maximum MP3 files 999 Dimensions 320 x 112 6 x 340 mm Weight 4 4 kg 36 ENGLISH Possible cause Poor mains plug connection The CD is upside in the tray down or is soiled Output cable is wrong or not correctly connected wrong amplifier or mixing console operation The CD player is continuously exposed to vibrations and shocks for longer than 30 seconds Loose cable connections Symptoms No power w...

Page 37: ...37 ENGLISH Have Fun with Reloop ...

Page 38: ...tuer le raccordement secteur qu une fois l installation terminée Branchez toujours la fiche secteur en dernier Vérifiez que l interrupteur principal soit sur OFF avant de brancher l appareil Utilisez uniquement des câbles conformes Veillez à ce que toutes les fiches et douilles soient bien vissées et correctement connectées Si vous avez des questions contactez votre revendeur Veillez à ne pas coin...

Page 39: ...éviter l effet de Schottky susceptible d endommager les enceintes et le diviseur de fréquence Veillez toujours à utiliser des CD propres et en parfait état De même vous devez avoir les mains propres Fermez toujours le tiroir du lecteur pour éviter de salir la tête laser Les appareils électriques ne sont pas des jouets Soyez particulièrement vigilants en présence d enfants Les directives de prévent...

Page 40: ...sport ATTENTION RAYON LASER Cet appareil est équipé de deux diodes laser de la classe 1 Afin de garantir une utilisation en toute sécurité il est interdit de retirer les couvercles ou d ouvrir le boîtier Le boîtier ne contient aucune pièce nécessitant un entretien Les réparations doivent exclusivement être effectuées par des professionnels qualifiés INSTRUCTIONS D INSTALLATION A Brancher les prise...

Page 41: ...41 FRANÇAIS 39 40 41 42 46 45 44 43 1 2 3 4 5 6 7 8 9 10 12 19 20 21 22 23 24 36 13 14 15 16 17 18 37 38 25 11 26 35 34 33 32 31 30 29 28 27 ...

Page 42: ...es essais cette méthode permet de mémoriser le point Cue plus rapidement Si à présent vous appuyez sur la touche Cue 3 le lecteur retourne au point Cue et passe en mode Pause Lorsque vous maintenez la touche Cue enfoncée le lecteur retourne en mode de lecture jusqu à ce que la touche soit relâchée le lecteur retourne ensuite au point Cue et passe en mode Pause Si vous appuyez sur la touche Play Pa...

Page 43: ... temps de veille entre 0 et 120 min 0 min éteint 3 Stop Time réglage d une durée entre 0 5 et 20 sec jusqu au prochain passage du titre dans l affichage 4 Run Time réglage de la vitesse de passage de l affichage des titres de 20 msec à 1000 msec 5 Sensitivity réglage de la sensibilité de la section supérieure de la molette Jog de 20 à 20 6 Defaults Yes réinitialiser aux réglages d usine Exit quitt...

Page 44: ...ns fin la DEL Sampler s allume Le mode sans fin reproduit la séquence programmée à l infini Appuyer une deuxième fois sur la touche Sampler 17 pour activer le mode One Shot la DEL Sampler clignote Le mode One Shot reproduit la séquence programmée une seule fois Pour reproduire une séquence en cours de programmation appuyer sur la touche Sampler 17 une fois pour le mode sans fin deux fois pour le m...

Page 45: ...ichage BPM Indique la valeur BPM actuelle de la piste J Affichage d informations par matrice de points Indique le classeur l artiste et le titre si le cédérom reproduit est en format MP3 avec balises ID3 ou en format audio avec les données respectives Sur un cédérom MP3 pour commuter entre classeur et artiste titre appuyer sur la molette Track 4 L arrière plan de cet affichage d information et un ...

Page 46: ... Touche Memory La touche Memory 16 sert à affecter et enregistrer les séquences créées aux quatre mémoires d échantillons Après la création d une séquence à l aide des touches Loop In et Loop Out appuyer sur la touche Memory 16 la DEL Memory s allume Sélectionner ensuite l une des quatre mémoires d échantillons pour l enregistrement de la séquence créée la mémoire d échantillons respective s allum...

Page 47: ...a fente 1 Le cédérom est inséré automatiquement La DEL d état au dessus du lecteur clignote pendant le chargement du cédérom La DEL d état s éteint dès que le cédérom a été lu et reconnu Si vous désirez insérer des CD d un diamètre inférieur à 12 cm veuillez utiliser un adaptateur adéquat vendu séparément Pour éjecter le cédérom appuyer sur la touche Eject 19 20 Touche Pitch Range Enfoncer la touc...

Page 48: ...ause ou en mode de lecture Vous pouvez ainsi enchaîner une piste à partir du point Cue désiré Appuyer une fois de plus sur la touche Scratch pour désactiver le mode Scratch Vous pouvez adapter la sensibilité de la Jog Wheel à vos préférences Procéder comme décrit au paragraphe 7 section 5 Sensitivity 28 Touche Skid Appuyer sur la touche Skid 28 pour sélectionner l effet Skid Appuyer à présent sur ...

Page 49: ...0 sert à activer l effet Phase Cet effet est similaire au Flanger mais il accentue moins les aigus et a un son moins harmonieux Votre appareil synchronise automatiquement les effets à la valeur de BPM actuelle Les touches de battement 36 permettent d ajuster exactement la fréquence au tempo Pour modifier manuellement le tempo d un effet appuyer sur la touche Parameter Time 25 et ajuster la fréquen...

Page 50: ...chronise automatiquement les effets à la valeur de BPM actuelle Les touches de battement 36 permettent d ajuster exactement la fréquence au tempo Pour modifier manuellement le tempo d un effet appuyer sur la touche Parameter Time 25 et ajuster la fréquence à l aide de la Jog Wheel entre 0 et 9990 msec Pour moduler l intensité de l effet appuyer sur la touche Parameter Ratio 26 et ajuster le volume...

Page 51: ... 4 1 temps la DEL respective s allume 37 Touche BPM Votre appareil dispose de deux compteurs de battements un manuel et un automatique Après l allumage de l appareil le compteur de battements automatique est activé par défaut L affichage indique Auto BPM Vous pouvez alors lire la valeur actuelle dans l affichage Voir aussi paragraphe 11 I 38 Touche TAP Appuyer plusieurs fois sur la touche TAP 38 a...

Page 52: ...ique La prise de sortie numérique 43 permet de connecter un équipement doté d une entrée numérique par exemple un graveur de cédéroms un enregistreur MD une console de mixage numérique ou une carte audio 45 Interrupteur marche arrêt Sert à l allumage et l extinction de votre appareil 46 Prise de raccord du câble secteur Relier la prise de raccord 46 au câble secteur et brancher celui ci sur une pr...

Page 53: ...tillon s effectue indépendamment de la lecture du cédérom En mode de lecture aussi bien la piste actuelle que l échantillon reproduit sont audibles Dans les modes Cue et Pause seul l échantillon est audible Dans le mode Sampler vous pouvez transformer les boucles mémorisées à l aide des touches Parameter Time et Ratio La touche Parameter Time permet de modifier le tempo de la boucle de 100 à 100 L...

Page 54: ...ÊT 45 Tourner ensuite la molette Search 5 à gauche jusqu à la butée et la maintenir dans cette position Appuyer sur l interrupteur MARCHE ARRÊT pour rallumer l appareil relâcher la molette Search lorsque Clear all apparaît dans l affichage AIDE DE DÉPANNAGE Si le Reloop RMP 1 ne fonctionne pas correctement recherchez le problème dans le tableau suivant et procédez aux mesures de dépannage indiquée...

Page 55: ...éponse en fréquence 20 Hz 20 kHz Pouvoir de séparation 81 dB Rapport signal bruit 90 dB Convertisseur D A Wandler 8x 1 bit Formats MP3 MPEG 1 Layer 3 MPEG 2 Layer 3 MPEG 2 5 Layer 3 Nombre maximum de dossiers MP3 255 Nombre maximum de fichiers MP3 999 Dimensions 320 x 112 6 x 340 mm Poids 4 4 kg 55 FRANÇAIS Reloop vous souhaite beaucoup de plaisir ...

Page 56: ...Reloop Distribution Global Distribution GmbH Schuckertstr 28 48153 Münster Germany Fax 49 251 6099368 COPYRIGHT Nachdruck verboten Reproduction prohibited Réproduction interdite ...

Reviews: