EN
Spark plug service
To ensure proper engine operation, the
spark plug must be properly gapped and free
of deposits.
1. Remove the spark plug cap (27).
2. Use a spark plug wrench to remove the spark
plug (28).
3. Visually inspect the spark plug. Discard it if the
insulator is cracked,chipped, or fouled. Clean
the spark plug with a wire brush if it is to be
reused.
4.
Measure the plug gap with a feeler gauge.
Correct as necessary by carefully bending the
side electrode. The gap should be:0.51 mm (29).
5.
Install the spark plug carefully by hand, to
avoid
crossthreading.
6. After a new spark plug has been seated by
hand, it should be tightened 1/2 turn with a
wrench to compress the sealing washer.
7. Reinstall the spark plug cap on the spark plug
securely.
1.
Turn the adjustment part on the Bowden cable
in the direction of the arrow (30).
2.
To check the adjustment, start the motor and
switch on the wheel drive (31).
3.
If the wheel drive still does not function, bring
the lawn mower to a service centre or an
authorized specialist firm.
Adjusting the Bowden cable
CAUTION!
Risk of injury!
Only adjust the Bowden cable when
the motor is switched off.
CAUTION!
Risk of explosion!
Do not store the unit near an open
flame or heat source!
STORAGE
–
Allow the motor to cool off.
–
Fold the upper handle bar to save space
during storage.
• Never start and run the engine with the air
cleaner assembly or the air filter removed.
1.
Loosen the fastener(s) (A, Figure
25
).
2.
Remove the cover (B, Figure
25
).
3.
Remove the fastener(s) (E, Figure
25
),
if equipped.
4.
To prevent debris from falling into the
carburetor,
carefully remove the pre-cleaner
if equipped
(D, Figure
25
) and the filter (C) from the air
filter
base.
5.
To loosen debris, gently tap the filter (C, Figure
25)
on a hard surface.
6.
Remove the pre-cleaner
if equipped
(D, Figure
25
) from
the
filter (C).
7.
Wash the pre-cleaner
if equipped
(D, Figure
25
)
in liquid
detergent and water. Allow
the pre-
cleaner
if equipped
to
throughly air dry. Do not oil
the pre-cleaner
if equipped
.
8.
Assemble the dry pre-cleaner
if equipped
(D,
Figure
25
)
to
the filter (C).
9.
Install the filter (C, Figure
25
) and the
pre-cleaner
if equipped
(D). Make sure the
filter
fits securely
on the air filter base.
10.
Install the cover (B, Figure
25
) and secure
with the fastener(s) (A). Make
sure the
fastener(s) is tight.
23
Air cleaner service
*
*
depending on version
Automatic cleaning of the mowing deck by
means of the hose connection (
35
)
Depending on model the mowing deck is fitted
with a hose connection (
35
) (suitable for
conventional garden hose couplings).
1.
Place the mower on a firm, level surface.
The mower must stand on 4 wheels as in
mowing mode. Take off the catch basket
(6*) and make sure that the mulching
adapter (7*) has been removed.
2.
Connect the water hose to the hose
connection (17*).
3.
Turn on the tap. Water will flow into the
inside of the mowing deck.
4.
Start the engine.
5.
Automatic cleaning will begin. The rotating
blades will cast the water against the
mowing deck and therefore clean it from
the inside. A cleaning period of 1-2 minutes
is enough when carried out regularly
.
Warning!
Switch off the engine before you do
any work on the mower. Risk of injury
from rotating blades.
To remove dried grass residues we
recommend carrying out several cleaning
cycles. Wait a few minutes between the
cleaning cycles so that the dried grass can
soak and soften up.
Important!
Never clean the mower using a high-pressure
cleaner. The engine must remain dry. Do not
use aggressive cleaning agents such as cold
cleaners or petroleum ether.
Та
ше
в
-
Га
лв
ин
г
ОО
Д
www.tashev-galving.com
Summary of Contents for LMEm 5602 BSB PLUS
Page 4: ...B E G H F D D C C 4 w w w t a s h e v g a l v i n g c o m...
Page 5: ...E F C D 5 w w w t a s h e v g a l v i n g c o m...
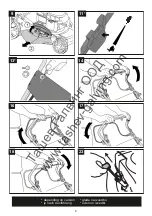
Page 11: ...33 34 32 11 FITTING HOSE 35 w w w t a s h e v g a l v i n g c o m...
Page 12: ...12 w w w t a s h e v g a l v i n g c o m...
Page 14: ...14 w w w t a s h e v g a l v i n g c o m...
Page 15: ...EN OWNER S MANUAL Petrol lawn mower 15 w w w t a s h e v g a l v i n g c o m...
Page 26: ...26 w w w t a s h e v g a l v i n g c o m...
Page 27: ...D BEDIENUNGSANLEITUNG Benzin Rasenm her 27 w w w t a s h e v g a l v i n g c o m...
Page 39: ...NAVODILA ZA UPORABO Bencinska kosilnica SLO 39 w w w t a s h e v g a l v i n g c o m...
Page 51: ...UPUTE ZA UPOTREBU Benzinska kosilica CRO 51 w w w t a s h e v g a l v i n g c o m...

