background image

1

4

2

3

6

7

MURO

WALL

FLUSSO IMPIANTO DOMESTICO

HOUSEHOLD SYSTEM FLOW

RUBINETTI SOTTOLAVABO

ANGLE VALVES

5

INSTALLATION INSTRUCTIONS

WARNING:

Before installing the automatic closing valves is essential to be sure that the water pipes are free from impurities, in order to avoid blockages 

that would compromise the operation. It is recommended to clean the filter in case of lack of flow during the first use.

*For pressures higher than 6 bar, we recommend to install a pressure reducer on the power supply.*

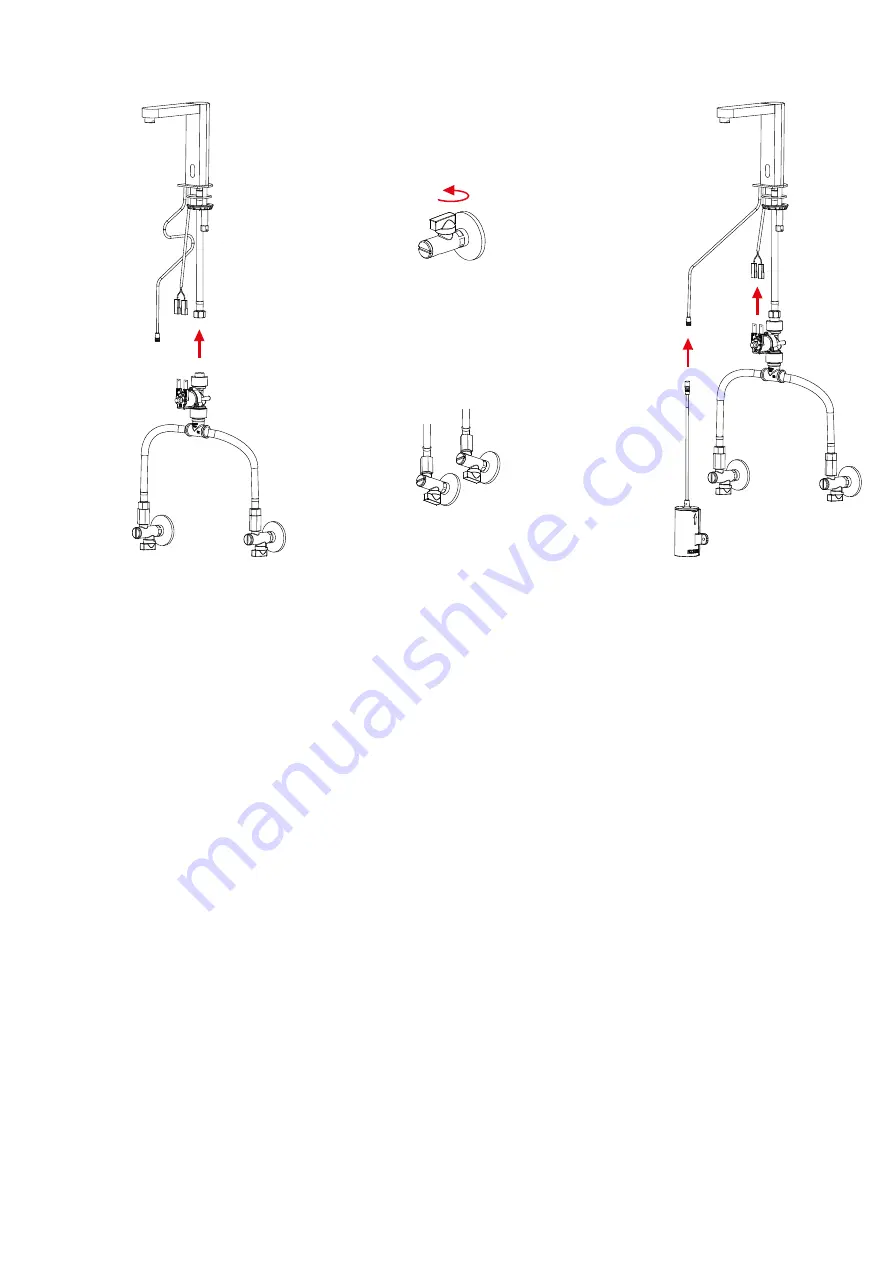
1.     Screw the flexible hose inside the tap.

2.     Set and fix the body of the automatic tap using the provided fixing set.

3.     Screw the two angle valves into the wall outlets and make sure to close them by turning the handle clockwise;then set and fix the battery holder under the   

        sink with the appropriate provided dowels.

4.     

Screw the two flexible hoses to the “T” fitting and to the angle valves. 

5.     

Screw the solenoid valve unit to the flexible hose connected to the mixer.

6.      Open the domestic system flow and open the 2 angle valves by turning the handles counter-clockwise. Verify that there are no leaks by the whole connections.

7.     Connect the batteries and the solenoid valve power supply cables to the cables coming out of the tap using the appropriate connectors at the ends and wait  

       15 seconds. In this way the tap is active.

NORMAL OPERATION:

1) Cover the sensor with the hand to activate the valve opening. Water will flow and the indicator light will emit a short single flashing during the valve opening.

2) Upon removal of the hand, the valve closing –and thus the water closing- will follow a few seconds later. The indicator light will emit a quick single flashing 

during the valve closing.

3) If hands or an obstacle cover the sensor continuously, the water will flow for a maximum time equal to the factory preset anti-vandal time.

Summary of Contents for SE 17

Page 1: ...ISTRUZIONI DI MONTAGGIO SE17 SE 17 INSTALLATION INSTRUCTIONS Remer Rubinetterie S p A Via Leonardo da Vinci 83 20062 Cassano d Adda MI Italy Tel 39 0363 364 211 info remer eu www remer eu ...

Page 2: ...o Remer I nostri prodotti sono costruiti in Italia con materiali di qualità per garantire maggiore funzionalità e maggiore durata nel tempo Prima di procedere all utilizzo dei rubinetti a chiusura automatica Vi preghiamo di leggere attentamente le istruzioni riportate in questo manuale La corretta installazione e la corretta manutenzione assicurano una migliore funzionalità dei prodotti Congratula...

Page 3: ...la valvola 5 Alla rimozione della mano seguira qualche secondo dopo la chiusura della valvola L indicatore luminoso emettera un breve singolo lampeggio indicando la chiusura della valvola 6 L indicazione di batteria scarica viene proposta con una serie di lampeggi all accecamento del sensore In questo caso eseguire il cambio batterie PRELIMINARY NOTES Make sure that the sensor protective film is r...

Page 4: ...5 Avvitare il gruppo elettrovalvola al flessibile collegato al miscelatore 6 Aprire il flusso dell impianto domestico e aprire i 2 rubinetti sottolavabo ruotando le manigliette in senso antiorario Verificare che non ci siano perdite in corrispondenza di tutti i raccordi e le connessioni 7 Collegare i cavi di alimentazione elettrica delle batterie e dell elettrovalvola ai cavi uscenti dal rubinetto...

Page 5: ...crew the two flexible hoses to the T fitting and to the angle valves 5 Screw the solenoid valve unit to the flexible hose connected to the mixer 6 Open the domestic system flow and open the 2 angle valves by turning the handles counter clockwise Verify that there are no leaks by the whole connections 7 Connect the batteries and the solenoid valve power supply cables to the cables coming out of the...

Page 6: ... flow direction into the valve then it must be connected to the faucet inlets furthermore it has to be cabled to the IR device carefully respecting the polarity G polarity connection connect RED cable fast on jointer H polarity connection connect BLACK cable fast on jointer I Water inlet including removable filter J Water outlet connect to faucet through non metallic and non conductive flexible ho...

Page 7: ...zando acqua e sapone o prodotti specifici per le superfici cromate Evitare l utilizzo di detergenti acidi o granulosi spugnette abrasive o in metallo Le parti di plastica non devono venire a contatto con detersivi a base d alcool o solventi Per una ottimale operativita del sensore e della relativa erogazione e necessario 1 Mantenere un getto aerato facendo costantemente pulizia dell aeratore puliz...

Page 8: ...espect and observe some simple indications Clean the limestone stains with water and soap or specific products for chrome plated surfaces Do not use acid or granular detergent as well as abrasive or metal sponge Plastic components must not be cleaned with alcohol base detergents or any other solvent For an optimal operation of the sensor and its water supply it is necessary to 1 Maintain an aerate...

Page 9: ...dell impianto soprattutto se ci sono rubinetti installati in serie Pulire l aeratore o sostituirlo Sostituire pulire i filtri ostruiti dal calcare o altro Aprire completamente i rubinetti d arresto PROBLEMS AND SOLUTIONS 1 The tap does not deliver water possible reasons Low battery Unplugged electric connections Closed angle valves Completely clogged aerator Completely clogged water filters Not su...

Page 10: ...Remer Rubinetterie S p A Via Leonardo da Vinci 83 20062 Cassano d Adda MI Italy Tel 39 0363 364 211 info remer eu www remer eu ...

Reviews: