background image


4 | 

P a g e


Step 7 

Position the four screws around the flashing. Two screws go on either side, and the remaining two go on the 
top and bottom. 
 

Step 8 

Lay a bead of Silicone Sealant along the edge of the shaft base to insure a waterproof seal 
 

Step 9           

Use the screws and nuts to fasten the angle of the panel (South or south west is typically the optimal angle, 
however, we prefer flat to the earth since you will need more power in summer months. 
 

110V Hybrid Adapter Installation (For running the fan when the sun sets and it’s still hot) 
 
NOTE: The 110V Hybrid Adapter can easily be installed any time after fan installation. 
 
Video installation guide at https://remingtonsolar.com/product-manuals/ 
 

1. Look underneath your fan and you’ll see the thick power cord that is plugged into itself. 
2. Unscrew that wire, and you will see two plug ends 
3. Plug the two “plug ends” of your adapter into these new wires you just unscrewed. (They only 
plug in one way) 
4. Attach your 110V adapter box to the nearest rafter using wood screws 
5. Plug your 110V plug into an outlet in your attic (you may need an extension cord) 
 

CURB MOUNT ADAPTER 

 
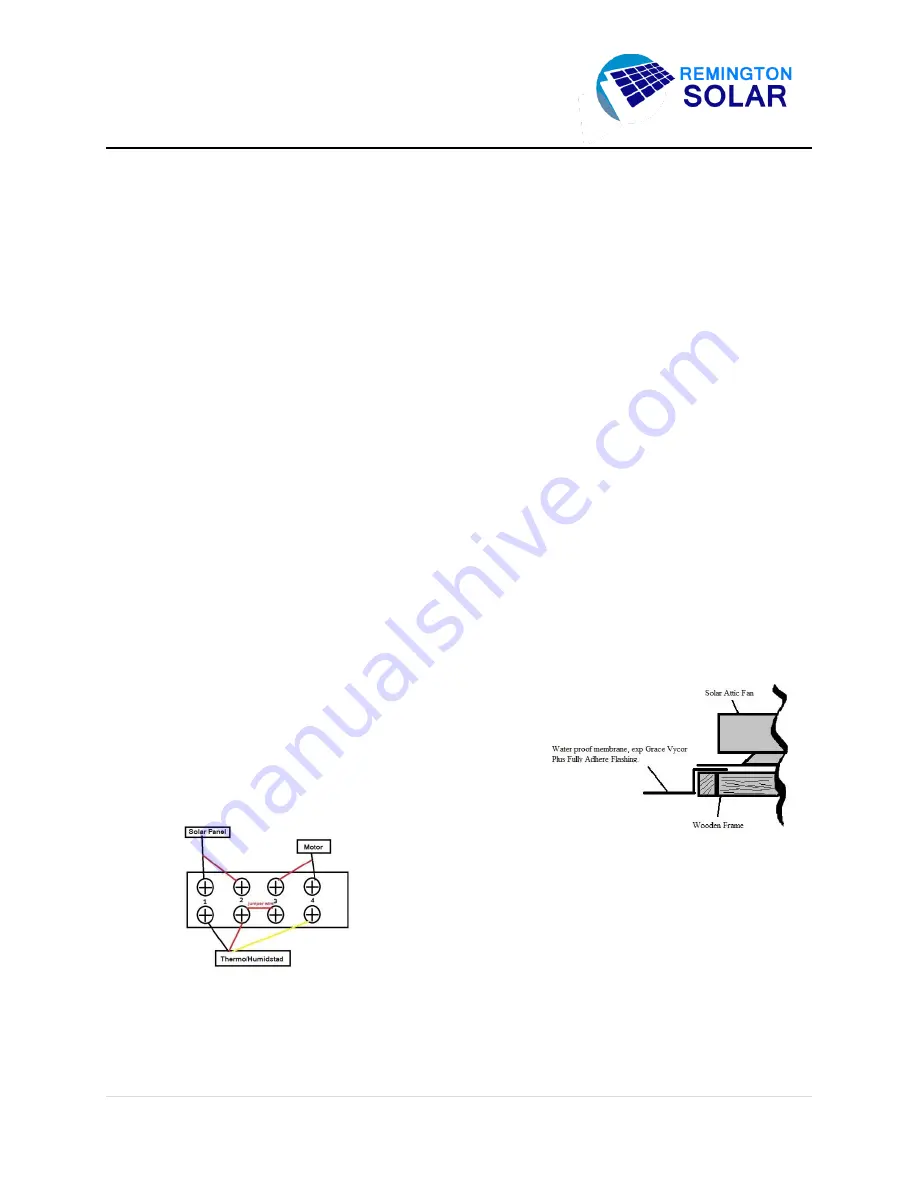
Curb mounts are good for flat roofs or tile roofs. You 
can build a frame out of 2x4’s, then flash over the 
2x4’s. Then put the Remington Solar curb mount 
adapter on top of the flashed frame. Then mount your 
Remington Solar attic fan on top of the curb mount 
adapter. Then you have a waterproof seal. 


You  may  not  simply  remove  the  thermostat  or  it  will  stop 
running. (Wiring diagram) 


Summary of Contents for SF20

Page 1: ...t over the years You made a great decision in your purchase so please don t hesitate to contact us if you need help in any way Murray Smith President Remington Solar 214 257 8300 Model SF20 Roof mount Model SGF20 Gable mount Model SF25 Roof mount Model SF 30 Roof mount Tools Required Reciprocating Saw Marking Pen Measuring Tape String Razor Knife Drill for screws Caulking Gun Silicone sealant 6 6 ...

Page 2: ...e vent that is not covered by a fan This will prevent backflow Run power cord either out the front or back into the attic and out the roof Drill a 7 8 hole through the decking but AFTER you remove a shingle You will want to position the solar panel directly above the hole While the solar panel will not protect from weather rather it is the shingle that you place back over the hole that will Be sur...

Page 3: ...e If a southern or western exposure is not possible the fan can be installed on any other exposure and the solar panel can be adjusted to capture maximum sunlight Note The Solar Attic Fan must be installed between roof rafters However if you want to retrofit an existing turbine Whirlybird or electric fan you may do so Just enlarge the hole if necessary being careful not to cut through a rafter Ste...

Page 4: ...at https remingtonsolar com product manuals 1 Look underneath your fan and you ll see the thick power cord that is plugged into itself 2 Unscrew that wire and you will see two plug ends 3 Plug the two plug ends of your adapter into these new wires you just unscrewed They only plug in one way 4 Attach your 110V adapter box to the nearest rafter using wood screws 5 Plug your 110V plug into an outlet...

Page 5: ...oduct storage or Acts of God Dealer will not honor any claims for damage to any products Note Hail damage is covered by your homeowners policy You must register your Remington Solar product within 30 days to activate warranty https remingtonsolar com register your product Remington Solar Inc Corporate Mailing Address 5706 E Mockingbird Ln Suite 115 189 Dallas TX 75206 Trouble Shooting Guide Fan wo...

Reviews: