background image

10

100273

OPERATING CHAIN SAW

Continued

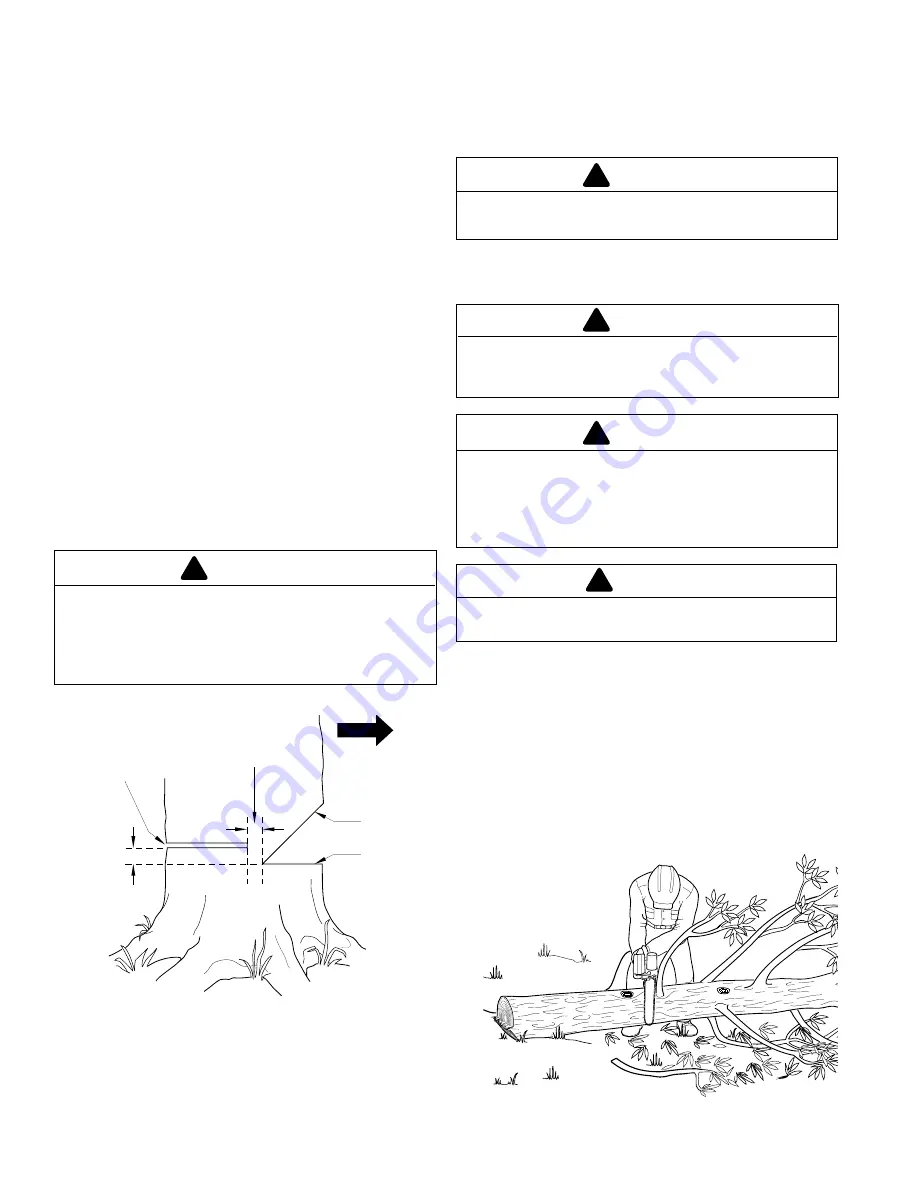
Figure 14 - Limbing A Tree

Limbing is removing branches from a fallen tree. Make sure
your footing is firm. Keep feet apart. Divide your weight
evenly on both feet. Do not remove larger limbs under tree that
support log off ground. Remove each limb with one cut (see
Figure 14). Clear cut limbs from work area often. This will
help maintain a safe work area.

Make sure you start your cut where limb will not pinch saw
during cutting. To avoid pinching, start cut on freely hanging
limbs from above limb. Start cut on limbs under tension from
under limb. If pinch occurs, turn saw off, lift limb, and remove
saw.

Felling Procedure

Felling Notch

A properly placed felling notch will determine direction tree
will fall. Place felling notch on side of tree in direction you
want tree to fall (see Figure 13). Follow directions below to
create a felling notch.
1. Make lower notch cut as close to ground as possible. Hold

saw so guide bar is horizontal. Cut 1/3 the diameter of tree
trunk (see Figure 13). 

Note:

 Always make this horizontal

lower notch cut first. If you make this cut second, tree can
pinch chain or guide bar.

2. Start upper notch cut the same distance above first cut as

first cut is deep.

Example:

 If lower notch cut is 20 centimeters deep, start

upper notch cut 20 centimeters above it. Cut downward at
45° angle. The upper notch cut should meet end of lower
notch cut (see Figure 13).

3. Remove tree trunk wedge created by notching cuts.

Felling Cut

1. Make felling cut five centimeters higher than lower notch

cut and on opposite side of tree (see Figure 13). Keep
felling cut parallel to lower notch cut.

2. Cut towards notch.

4. When tree begins to fall, quickly

• remove saw from felling cut
• release trigger to turn saw off
• put saw down
• exit area using retreat path

!

WARNING ICON

G 001

WARNING

Be alert for falling overhead limbs. Watch your
footing while exiting area.

LIMBING A TREE

!

WARNING ICON

G 001

WARNING

Do not cut all the way through tree. Leave about
five centimeters of tree diameter uncut directly
behind felling notch (see Figure 13). This uncut
portion acts as a hinge. The hinge helps keep
tree from twisting and falling in wrong direction.

Hinge

Direction of Fall

3rd Cut -
Felling Cut

2nd Cut -
Upper
Notch Cut

1st Cut -
Lower
Notch Cut

5 cm

5 cm

!

WARNING ICON

G 001

WARNING

Avoid kickback. Kickback can result in severe
injury or death. See 

Kickback, page 3 to avoid

risk of kickback.

!

WARNING ICON

G 001

WARNING

When cutting limb that is under tension, use
extreme caution. Be alert for wood springing
back. When wood tension is released, limb could
spring back and strike operator causing severe
injury or death.

!

WARNING ICON

G 001

CAUTION

Seek professional help if facing conditions
beyond your ability.

3. As felling cut nears hinge, tree should begin to fall. 

Note:

 If

needed, drive wedges into felling cut to control direction of
fall. If tree settles back and pinches chain, drive wedges into
felling cut to remove saw. Only use wedges made of wood,
plastic, or aluminum. Never use wedge made of steel. This
could cause kickback and damage to chain.

Figure 13 - Felling A Tree

Summary of Contents for 100271-01

Page 1: ... Chain 8 SECTION PAGE Cutting With the Chain Saw 8 Chain Brake 8 Trimming a Tree 9 Felling a Tree 9 Limbing a Tree 10 Bucking a Log 11 Cleaning and Maintenance 12 Cleaning Saw Body 12 Care of Guide Bar 12 Sharpening Your Saw Chain 12 Recycling 14 Storage 14 Replacement Parts 14 Troubleshooting 15 Warranty Information Back Cover EL 4 MODEL TYPE 100271 01 230V 50Hz 1450W 1995 OWNER S MANUAL IMPORTAN...

Page 2: ... Eye Protection Must Be Worn Safety Information Warnings Appears Throughout This Manual Pay close attention to them Below are definitions for the safety information listed throughout this manual WARNING indicates a hazard which can cause severe personal injury death or substantial property damage if you ignore warning CAUTION indicates a hazard which will or can cause minor personal injury or prop...

Page 3: ...7182 are Sound Pressure Level 95 DB A Sound Power Level 100 DB A 12 The typical hand arm vibration at full load while cutting wood when tested in accordance to ISO DIS 7205 is 23 8 M S2 WARNING ICON G 001 SAFETY WARNINGS ReadandunderstandallSafetyWarningsonpages 3 and 4 Improper use of this chain saw can cause severe injury or death from fire electrical shock body contact with moving chain or fall...

Page 4: ...vere injury SAFETY WARNINGS Continued saw and extension cord Only chain saw user should be in work area 5 Do not cut down a tree unless you are trained or have expert help 6 If two or more persons perform bucking and felling opera tions at the same time provide plenty of distance between operations Provide distance of at least twice the height of tree being felled 7 Secure wood you are cutting by ...

Page 5: ...Chain Loop of chain having cutting teeth for cutting wood The motor drives chain The guide bar supports chain Spiked Bumper Spike Pointed teeth at front of saw body besideguidebar Keepspikedbumperincontactwithwoodwhen fellingorbucking Ithelpsmaintainpositionofsawwhilecutting Sprocket Toothed wheel that drives chain Switch Device that completes or interrupts electrical circuit to motor of saw Switc...

Page 6: ...o saw body Place rear of guide bar between adjusting plate and sprocket support IMPORTANT Make sure to insert adjusting block into oval adjusting hole on guide bar 5 Attach guide bar nuts to guide bar bolts IMPORTANT Tighten guide bar nuts finger tight only Make sure adjusting block is in oval adjusting hole on guide bar 6 Place chain around drive sprocket then along top groove of guide bar and ar...

Page 7: ... This can also damage saw Note A new chain will stretch Check new chain after first few minutes of operation Allow chain to cool down Readjust chain tension Figure 5 Turning Adjusting Screw WARNING ICON G 001 WARNING Unplug chain saw from power source before adjusting saw chain tension WARNING ICON G 001 WARNING Cutting edges on chain are sharp Use protective gloves when handling chain WARNING ICO...

Page 8: ... using light pressure Do not force saw The motor will overload and can burn out 8 Remove saw from a cut with saw running at full speed Stop saw by releasing trigger Do not use the chain brake Make sure chain has stopped before setting saw down 9 Practice until you can maintain a steady even cutting rate OILING CHAIN Always check oil level before using saw To oil chain press oil cap Oil will feed o...

Page 9: ...ee Make sure there are no dead limbs or branches that may fall on you Study natural lean of tree location of larger branches and wind direction This will help you judge which way tree will fall 2 Clear work area around tree 3 Plan and clear a retreat path before felling Make retreat path opposite to planned direction of fall of tree and at 45 angle see Figure 12 4 Remove dirt stones loose bark nai...

Page 10: ...by notching cuts Felling Cut 1 Make felling cut five centimeters higher than lower notch cut and on opposite side of tree see Figure 13 Keep felling cut parallel to lower notch cut 2 Cut towards notch 4 When tree begins to fall quickly remove saw from felling cut release trigger to turn saw off put saw down exit area using retreat path WARNING ICON G 001 WARNING Be alert for falling overhead limbs...

Page 11: ...rect line with chain When possible raise log or section off ground Do this by using limbs logs chocks etc When cutting through log maintain control by reducing cutting pressure near end of cut Do not relax your grip on chain saw handles Do not let moving chain touch ground Ground will dull moving chain After cutting through log release trigger to turn saw off before moving saw Follow directions be...

Page 12: ...e guide bar from chain saw 2 Remove sawdust from guide bar groove periodically Use putty knife or wire 3 Clean oil slots after each day of use 4 Remove burrs from sides of guide bar Use flat file to make side edges square Replace guide bar when bar is bent or cracked inside groove of bar is badly worn Note When replacing guide bar see Replacement Parts page 14 for proper bar WARNING When cleaning ...

Page 13: ...k File Guide 4 mm Round File Note This illustration shows file guide place ment and filing direction for sharpening cutters on left side of chain Filing Direction Figure 20 File and File Guide Placement On Chain Top Plate left side of chain Groove Depth Gauge left side of chain Depth Gauge right side of chain Left Side of Chain Right Side of Chain Figure 21 Chain Part Locations Flat File Depth Gau...

Page 14: ...l tank 2 Remove and clean guide bar and chain Clean guide bar and chain by soaking in petroleum based solvent or mild soap and water mixture 3 Dry guide bar and chain 4 Place chain in container filled with oil This will prevent rust 5 Wipe a thin coating of oil over surface of guide bar 6 Wipe off outside of saw body Do this with soft cloth dampened with a mild soap and water mixture 7 Store chain...

Page 15: ...de bar and chain not assembled right Saw damaged Do not use saw Oil cap is not secure Brake failure WARNING ICON G 001 WARNING Unplug chain saw from power source before servicing Severe injury or death could occur from electrical shock or body contact with moving chain REMEDY See Assembly page 6 See Sharpening Your Saw Chain page 12 Extension cord wire size too small See Extension Cords page 8 Pre...

Page 16: ...ore this to proper operating condition Transportation and incidental costs associated with warranty repairs are not reimbursable under this warranty Warranty service is available only through authorized dealers or service centres This warranty does not cover commercial or rental usage nor defects resulting from misuse accidents lack of proper maintenance bar chain The warrantor assumes no responsi...

Reviews: