background image

32

SEGURIDAD

NOTA SOBRE EL AMORTIGUADOR DE CHISPAS 

NOTA: Para usuarios de los territorios de bosques de EE. UU. y 

de los estados de California, Maine, Oregon y Washington. 

Todos los territorios de bosques de EE. UU. y los estados de 

California (Códigos de Recursos Públicos 4442 y 4443), Oregon y 

Washington exigen por ley, que determinados motores de 

combustión interna que se operan en zonas cubiertas por malezas 

de bosque y/o hierbas cuenten con un amortiguador de chispas 

que se deberá mantener en condiciones de uso adecuadas o que el 

motor se diseñe, equipe y mantenga para prevenir incendios. 

Corrobore con las autoridades estatales o locales cuáles son las 

normativas correspondientes a dichas exigencias. El 

incumplimiento de dichos requerimientos podría generarle una 

responsabilidad o una multa. 

La presente unidad se equipa en la 

fábrica con un amortiguador de chispas. Si requiere reemplazo, 

póngase en contacto con su representante local de servicio para 

instalar el conjunto de silenciador adecuado.

Lea el manual del operador y siga todas las advertencias e 

instrucciones de seguridad. Si no lo hace, el operador y/o los 

observadores pueden sufrir lesiones graves.

 SÍMBOLOS SIGNIFICADO

ADVERTENCIA:

 Indica un peligro 

GRAVE. 
Si no se respeta un símbolo de 

ADVERTENCIA de 

seguridad usted mismo u otras personas 

PUEDEN sufrir 

lesiones graves. 

PRECAUCIÓN:

 Indica un peligro de 

GRAVEDAD MODERADA. 
Si no se respeta un símbolo de seguridad de 

PRECAUCIÓN usted mismo u otras personas PUEDEN 

sufrir lesiones o se 

PUEDEN producir daños materiales. 

El objetivo de los símbolos de seguridad es dirigir su atención hacia 

posibles peligros. Los símbolos de seguridad, así como sus 

explicaciones, necesitan su atención y comprensión completas. Las 

advertencias de seguridad no eliminan por sí mismas ningún 

peligro. Las instrucciones o advertencias que contienen no 

reemplazan a las medidas adecuadas de prevención de accidentes.

NOTA: Proporciona información o instrucciones de vital importancia 

para el funcionamiento o el mantenimiento del equipo.

PELIGRO:

 Indica un peligro EXTREMO. 

Si no se respeta un símbolo de seguridad de 

PELIGRO 

usted mismo u otras personas sufrirán lesiones graves o la 

muerte. 

ADVERTENCIA:

 Este producto puede 

exponerlo a productos químicos, incluidos gases de 

escape del motor, indicados por el estado de California 

como causantes de cáncer, y monóxido de carbono, 

indicado por el estado de California como causante de 

defectos de nacimiento u otros daños reproductivos. Para 

obtener más información, visite: www.P65Warnings.ca.gov.

TABLA DE CONTENIDO 

Servicio  . . . . . . . . . . . . . . . . . . . . . . . . . . . . . . . . . . . . . . . . . . . . .32 
Seguridad  . . . . . . . . . . . . . . . . . . . . . . . . . . . . . . . . . . . . . . . . . . .32 
Conozca su unidad  . . . . . . . . . . . . . . . . . . . . . . . . . . . . . . . . . . . .37 
Términos y definiciones fundamentales  . . . . . . . . . . . . . . . . . . . .38 
Especificaciones  . . . . . . . . . . . . . . . . . . . . . . . . . . . . . . . . . . . . . .39 
Ensamblaje  . . . . . . . . . . . . . . . . . . . . . . . . . . . . . . . . . . . . . . . . . .40 
Aceite y combustible . . . . . . . . . . . . . . . . . . . . . . . . . . . . . . . . . . .41 
Arranque y parada  . . . . . . . . . . . . . . . . . . . . . . . . . . . . . . . . . . . .42 
Operación  . . . . . . . . . . . . . . . . . . . . . . . . . . . . . . . . . . . . . . . . . . .44 
Mantenimiento  . . . . . . . . . . . . . . . . . . . . . . . . . . . . . . . . . . . . . . .50 
Limpieza y almacenamiento  . . . . . . . . . . . . . . . . . . . . . . . . . . . . .58 
Localización y solución de problemas  . . . . . . . . . . . . . . . . . . . . .59 
Garantía . . . . . . . . . . . . . . . . . . . . . . . . . . . . . . . . . . . . . . . . . . . . .60

NO DEVUELVA ESTA UNIDAD AL VENDEDOR. PARA 

SOLICITAR SERVICIO POR GARANTÍA, DEBERÁ 

PRESENTAR EL COMPROBANTE DE COMPRA. 

Para obtener ayuda en relación con el montaje, el funcionamiento o el 

mantenimiento de la unidad, llame al 

1-866-206-2707 (en los Estados 

Unidos) o al 

1-877- 696-5533 (en Canadá). Se puede encontrar 

información adicional en 

www.remingtonpowertools.com

El servicio de la garantía está disponible a través de su distribuidor 

local de servicio autorizado. Para ubicar un Centro de servicio de 

reparaciones en su zona, visite nuestro sitio web o llame al número que 

aparece arriba. La reparación y el mantenimiento de la presente 

unidad, tanto dentro del período de la garantía como después de él, 

sólo deben realizarlos un centro de servicio autorizado. Cuando vaya a 

dar mantenimiento al equipo, utilice solo piezas de repuesto idénticas.

SERVICIO

Toda la información, las ilustraciones y las especificaciones 

contenidas en este manual se basan en la información más reciente 

disponible en el momento de impresión del manual. Nos reservamos 

el derecho de hacer cambios en cualquier momento sin aviso previo. 
El producto puede variar ligeramente de las ilustraciones contenidas 

en este manual.  
Copyright © 2019 MTD SOUTHWEST INC. Todos los derechos 

reservados.

NOTA: Este manual del operador cubre múltiples modelos. Las 

características pueden variar según los modelos. No todas las 

características de este manual son aplicables a todos los 

modelos. El modelo descripto puede diferir del suyo.

Summary of Contents for RM4214CS

Page 1: ...53 00 02 19 Operator s Manual RM4214CS RM4216CS RM4218CS 2 Cycle Chain Saw IMPORTANT Read this manual thoroughly before using this product Follow all instructions SAVE THESE INSTRUCTIONS ORIGINAL INSTRUCTIONS ...

Page 2: ... the equipment DANGER Signals an EXTREME hazard Failure to obey a safety DANGER symbol WILL result in serious injury or death to yourself or to others WARNING This product can expose you to chemicals including engine exhaust which is known to the State of California to cause cancer and carbon monoxide which is known to the State of California to cause birth defects or other reproductive harm For m...

Page 3: ...luding long pants and a long sleeve shirt Do not wear loose clothing jewelry short pants sandals or go barefoot Secure hair above shoulder level Make sure the saw chain is not in contact with anything before starting the unit Use the unit only in daylight or good artificial light Avoid accidental starting Be in the starting position whenever pulling the starter rope The operator and unit must be i...

Page 4: ...This saw is classified by UL as a Class 1C saw in accordance with CSA Z62 1 03 It is intended for infrequent use by homeowners cottagers and campers and for general applications such as clearing pruning cutting firewood etc It is not intended for prolonged use If the intended use involves prolonged periods of operation this may cause circulatory problems in the user s hands due to vibration Never ...

Page 5: ...ot significantly reduced by using a low kickback saw chain Using a bow guide on this unit is extremely dangerous OTHER SAFETY WARNINGS Maintain the unit with care Follow all maintenance instructions in this manual Do not perform maintenance procedures other than those described in this manual All service other than the maintenance procedures described in this manual should be performed by an autho...

Page 6: ...ON START RUN ON OFF STOP CONTROL OFF or STOP PRIMER BULB Push primer bulb fully and slowly 10 times CHOKE CONTROL Pulled Out FULL choke position Pushed In RUN position KEEP BYSTANDERS AWAY WARNING Keep all bystanders especially children and pets at least 50 feet 15 m from the operating area USE BOTH HANDS WARNING Always use both hands while operating the unit Never use only one hand to operate the...

Page 7: ...nt Screw Throttle Lockout Rear Handle Boot Loop Chain Brake Lever Front Hand Guard Bar Retaining Nuts Chain Catcher Carrying Case Spiked Bumper Bucking Spike Air Filter Cover Spark Plug and Air Filter Not included with RM4214CS Rear Hand Guard 7 KNOW YOUR UNIT APPLICATIONS Felling and limbing trees Cutting logs bucking Pruning trees ASSEMBLY TOOLS REQUIRED Flat head screwdriver or multi purpose to...

Page 8: ...in a stable position while cutting CHAIN CATCHER A device designed to intercept a whipping chain The chain catcher reduces the chance of injury if the saw chain breaks or disengages from the guide bar during operation OILER CONTROL A system for oiling the saw chain and guide bar ON OFF SWITCH A device that immediately stops the engine when moved to the OFF position The saw chain will then coast to...

Page 9: ...pacity 6 5 oz 200 mL Approximate Unit Weight without fuel or chain oil 11 75 12 75 lbs 5 3 5 8 kg Guide Bar Length RM4214CS 14 in 35 6 cm Guide Bar Length RM4216CS 16 in 40 6 cm Guide Bar Length RM4218CS 18 in 45 7 cm Saw Chain Pitch 3 8 in 9 5 mm Saw Chain Gauge 0 050 in 1 3 mm REPLACEMENT PARTS Please contact the Customer Support Department to order replacement parts Part 713 05277 713 05276 713...

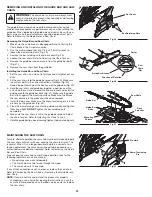
Page 10: ...ttle control to 1 3 throttle and then engage the chain brake by pushing the chain brake lever forward with the left hand Fig 1 The chain should stop moving abruptly IF If the chain stops moving the chain brake is working correctly IF If the chain does not stop moving have the unit serviced by an authorized service dealer 5 Stop the engine and return the chain brake to the disengaged position Refer...

Page 11: ...th a fuel additive such as STA BIL Fuel Stabilizer or an equivalent Add 0 8 oz 23 ml of fuel additive per gallon of fuel according to the instructions on the container NEVER add fuel additives directly to the unit s fuel tank Mixing the Fuel NOTE This unit comes with a 3 2 oz 95 ml container of 2 cycle oil To obtain the correct fuel mixture described below pour the entire container into one gallon...

Page 12: ...fuel is visible 3 Pull the choke knob out to Position 1 Fig 4 NOTE DO NOT touch the throttle control Fig 3 until step 10 4 Set the unit on a flat level surface Clear the area of any objects that could contact the saw chain 5 Crouch in the starting position Fig 5 Hold the front handle with the left hand Hold the starter rope grip with the right hand Insert the right foot into the boot loop to help ...

Page 13: ...n tension and adjust as necessary before beginning operation Refer to Adjusting the Chain Tension in the Maintenance section TIPS FOR BEST RESULTS Follow all safety instructions Refer to the Safety section Only cut wood and materials made of wood Do not attempt to cut sheet metal plastics masonry or any other non wood materials Practice cutting a few small logs before beginning a major cutting ope...

Page 14: ...ight pressure Forcing the cut could result in damage to the unit or personal injury 8 Release the throttle control as soon as the cut is completed Allow the saw chain to come to a complete stop The saw chain guide bar and engine may experience unnecessary wear if the unit is run without a cutting load Fig 8 Correct Stance Fig 9 Chain Line Incorrect Stance Chain Line PREPARING THE WORK AREA Clear t...

Page 15: ...m the tree it will most likely roll or slide after it falls FELLING PROCEDURE Small trees up to 6 7 inches 15 18 cm in diameter are usually felled in a single cut Larger trees require a sequence of two cutting operations a notched undercut followed by a felling back cut It may also be necessary to remove buttress roots Step 1 Removing Buttress Roots Buttress roots are large roots that extend above...

Page 16: ...fall When the tree begins to fall remove the chain saw from the cut stop the engine and set the unit down immediately Promptly exit the area along the retreat path but keep watching the tree as it falls WARNING Always recheck the area for bystanders animals and obstacles before making the felling back cut DANGER If the tree starts to fall in the wrong direction and binds the chain saw leave the un...

Page 17: ... from above overbucking BUCKING SAFETY Bucking is the process of cutting a fallen tree into logs of desired lengths Follow these safety precautions to reduce the risk of serious injury Clear the area of objects or obstructions that could contact the guide bar and result in kickback When bucking on a slope always stand on the uphill side of the fallen tree If possible the end of the tree to be cut ...

Page 18: ...t completely through the limb stub to meet the third cut Fig 22 This will remove the limb stub Third Cut First Cut Second Cut Fourth Cut WARNING Do not cut above shoulder height with a chain saw Use a pole saw to cut limbs above shoulder height or hire a professional Do not operate the unit in a tree or on a ladder unless specifically trained to do so WARNING Falling branches can cause serious inj...

Page 19: ...in brake Refer to Testing the Chain Brake Check the chain tension adjust as needed Refer to Adjusting the Chain Tension Fill the chain oil reservoir refill frequently Refer to Adding Bar and Chain Oil Fill the fuel tank with fresh properly mixed fuel Refer to the Oil and Fuel section Clean the air filter Refer to Maintaining the Air Filter After each use Clean the unit and inspect decals Refer to ...

Page 20: ...ervoir use a damp cloth to clean the chain oil cap and surrounding area 3 Unscrew the chain oil cap Fig 23 4 Carefully pour the oil into the chain oil reservoir DO NOT overfill 5 Reinstall the chain oil cap Tighten the cap firmly 6 Wipe up any oil that may have spilled DANGER Failure to fill the chain oil reservoir will cause irreparable damage to the unit Make sure the chain oil reservoir is alwa...

Page 21: ...move the saw chain back and forth along the guide bar Fig 28 Make sure the saw chain moves freely and is in proper mesh with the sprocket If the saw chain does not move easily slowly turn the chain tensioning screw counterclockwise to loosen the saw chain NOTE The saw chain will not move if the chain brake is engaged 5 Continue to hold the guide bar tip up and securely tighten the bar retaining nu...

Page 22: ... tensioning pin is in the pin hole on the guide bar Fig 32 5 Place the bar retaining nuts onto the guide bar bolts and tighten them hand tight DO NOT tighten the bar retaining nuts completely 6 Make sure the saw chain is still in the guide bar groove Adjust the chain tension Refer to Adjusting the Chain Tension 7 Hold the guide bar tip up and securely tighten the bar retaining nuts WARNING The saw...

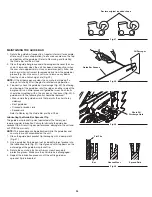
Page 23: ...Fig 34 Then move to the other side of the saw chain and file all of the right hand cutters in the opposite direction Fig 34 Occasionally remove filings with a wire brush 3 Use a depth gauge tool not included to measure the depth gauge clearance Fig 36 of each cutter The depth gauge clearance must be maintained at 1 32 inch 0 6 mm The depth gauge clearance determines the depth at which the cutter e...

Page 24: ...A guide bar with the following faults should be replaced Wear inside the guide bar rails that permits the chain to lay sideways Bent guide bar Cracked or broken rails Spread rails Refer to Replacing the Guide Bar and Saw Chain Lubricating the Guide Bar Sprocket Tip The guide bar sprocket tip was lubricated at the factory but requires regular lubrication Failure to lubricate the guide bar sprocket ...

Page 25: ...re to maintain the air filter can result in poor performance or can cause permanent damage to the engine Engine failure due to improper air filter maintenance is not covered by the product warranty Cleaning the Air Filter 1 Turn the knob on the air filter cover counterclockwise to loosen the air filter cover Fig 42 2 Remove the air filter cover Fig 42 3 Remove the air filter Fig 43 4 Wash the air ...

Page 26: ... 9 Reattach the spark plug boot 10 Place the air filter cover back onto the unit Insert the two tabs on the air filter cover into the two slots on the chain saw housing Fig 42 11 Turn the knob clockwise to tighten the air filter cover securely WARNING Do not sand blast scrape or clean spark plug electrodes Grit in the engine could damage the cylinder Fig 46 0 025 in 0 635 mm ADJUSTING THE IDLE SPE...

Page 27: ...he unit cools which could damage the unit if the chain is too tight Allow the engine to cool before storing Thoroughly clean the unit and inspect it for any loose or damaged parts Repair or replace damaged parts and tighten loose screws nuts or bolts Cover the guide bar and saw chain with the scabbard Never store a fueled unit where fumes may reach an open flame or spark Lock up the unit to preven...

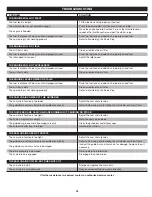
Page 28: ...el is visible The engine is flooded Move the choke knob to Position 2 press the throttle lockout squeeze the throttle control and pull the starter rope The fuel is old over 30 days and or improperly mixed Drain the fuel tank and add fresh properly mixed fuel The spark plug is not working properly Refer to Maintaining the Spark Plug TROUBLESHOOTING The fuel is old over 30 days and or improperly mix...

Page 29: ...ns and territories except those sold through Remington s authorized channels of export distribution Remington reserves the right to change or improve the design of any Remington Product without assuming any obligation to modify any product previously manufactured No implied warranty including any implied warranty of merchantability or fitness for a particular purpose applies after the applicable p...

Page 30: ...30 NOTES ...

Page 31: ...M4216CS RM4218CS Motosierra de 2 tiempos 769 20653 00 02 19 IMPORTANTE Lea este manual por completo antes de utilizar este producto Siga todas las instrucciones CONSERVE ESTAS INSTRUCCIONES TRADUCCIÓN DE LAS INSTRUCCIONES ORIGINALES ...

Page 32: ...XTREMO Si no se respeta un símbolo de seguridad de PELIGRO usted mismo u otras personas sufrirán lesiones graves o la muerte ADVERTENCIA Este producto puede exponerlo a productos químicos incluidos gases de escape del motor indicados por el estado de California como causantes de cáncer y monóxido de carbono indicado por el estado de California como causante de defectos de nacimiento u otros daños ...

Page 33: ...unidad antes de encenderla Mueva la unidad al menos 30 pies 9 1m de la fuente de combustible y del sitio antes de arrancar el motor NO fume Nunca arranque ni use la unidad dentro de una habitación o de una construcción cerrada La inhalación de humos de escape puede ser mortal Opere esta unidad únicamente en una zona bien ventilada al aire libre DURANTE LA OPERACIÓN Utilice anteojos o antiparras de...

Page 34: ...esiva de grasa o de carbono Si la unidad comienza a vibrar en forma anormal deténgala de inmediato Inspeccione la unidad para determinar la causa de la vibración La vibración por lo general indica que hay algún problema Mantenga limpia el área de trabajo Las áreas desordenadas se prestan a los accidentes No comience a cortar hasta que el área de trabajo esté despejada y libre de obstrucciones Comp...

Page 35: ...troceso bajo No hay otros componentes de repuesto para lograr protección contra el rebote de acuerdo con CSA Z62 3 Una cadena de sierra de retroceso bajo es una cadena que cumple con los requisitos de funcionamiento de retroceso bajo de ANSI OPEI B175 1 2012 cuando se la prueba según las normas establecidas en ANSI OPEI B175 1 2012 Una cadena de sierra de retroceso bajo es una cadena que también c...

Page 36: ...lentamente y por completo CONTROL DEL OBTURADOR Extraído posición FULL máxima del cebador Presionado posición RUN funcionamiento MANTENGA ALEJADOS A LOS PRESENTES ADVERTENCIA Mantenga a todos los presentes especialmente a los niños y animales domésticos a una distancia de al menos 50 pies 15 m UTILICE AMBAS MANOS ADVERTENCIA Utilice siempre ambas manos mientras opera la unidad Nunca opere la unida...

Page 37: ...ite de la cadena Bloqueo del acelerador Manija trasera Lazo de la bota Palanca del freno de cadena Protección delantera de la mano Tuercas de retención de barra Dispositivo de seguridad de la cadena Caja de transporte Tope dentado Diente de tronzar Tapa del filtro de aire Bujía y filtro de aire No incluida con RM4214CS Protección posterior para la mano 37 CONOZCA SU UNIDAD USOS Tala y desramado de...

Page 38: ... FIJACIÓN Es el diente o los dientes protuberante que está en la parte delantera de la sierra de cadena que se usa al talar o trozar para ayudar a girar la sierra y mantener una posición estable durante el corte GANCHO RETENEDOR DE LA CADENA Es un dispositivo que está diseñado para interceptar la cadena si se suelta El gancho retenedor de la cadena reduce las probabilidades de que se produzcan les...

Page 39: ...ena 11 75 12 75 libras 5 3 5 8 kg Longitud de la barra guía RM4214CS 14 pulgadas 35 6 cm Longitud de la barra guía RM4216CS 16 pulgadas 40 6 cm Longitud de la barra guía RM4218CS 18 pulgadas 45 7 cm Paso de la cadena de la sierra 3 8 pulgadas 9 5 mm Calibre de la cadena de la sierra 0 050 pulgadas 1 3 mm REPUESTOS Para solicitar repuestos póngase en contacto con el Departamento de Asistencia al Cl...

Page 40: ... la cadena empujando la palanca del freno de la cadena hacia adelante con la mano izquierda Fig 1 La cadena debe detener su movimiento repentinamente SI Si la cadena detiene su movimiento el freno de la cadena está funcionando correctamente SI Si la cadena no detiene su movimiento haga que el distribuidor de servicio autorizado realice el mantenimiento a la unidad 5 Detenga el motor y lleve nuevam...

Page 41: ...ra combustible como el estabilizador de combustible STA BIL u otro equivalente Agregue 0 8 onzas 23 ml de aditivo para combustible por galón de combustible según las instrucciones del recipiente NUNCA agregue aditivos para el combustible directamente al depósito de combustible de la unidad Mezcla del combustible NOTA La presente unidad viene con un recipiente de 3 2 onzas 95 ml de aceite de 2 cicl...

Page 42: ...Consulte Prueba del freno de la cadena en la sección Montaje Arranque de la unidad 1 Mueva el interruptor de encendido apagado a la posición On encendido Fig 3 2 Oprima y suelte despacio la pera del cebador 10 veces Fig 4 Si no se ve combustible en la pera del cebador oprima y suelte la pera hasta que se vea el combustible 3 Tire de la perilla del cebador hacia afuera hasta la Posición 1 Fig 4 NOT...

Page 43: ...senganche el freno de la cadena Luego oprima el bloqueo del acelerador y apriete el control del acelerador para acelerar el motor según sea necesario NOTA Cuando el motor acelera sin fallar la unidad ya se calentó como es debido SI el motor no funciona de manera uniforme continúe calentándolo SI el motor no arranca repita el procedimiento de arranque SI el motor no arranca al cabo de unos pocos in...

Page 44: ...rvadores que usen protección ocular Si alguien se le aproxima detenga la unidad de inmediato Al talar la distancia segura es por lo menos dos veces la altura del árbol más alto en el área de trabajo Al tronzar mantenga alejados a los operarios por lo menos 15 pies 4 6 m Mantenga limpia el área de trabajo Las áreas desordenadas se prestan a los accidentes No comience a cortar hasta que el área de t...

Page 45: ...ontrol de la unidad en caso de que se produzca un retroceso Cualquier sujeción con los pulgares y dedos de la mano en el mismo lado de las manijas es peligroso Fig 7 Agarre siempre la unidad firmemente con ambas manos cuando esté funcionando Sostenga la manija delantera con la mano izquierda Mantenga el brazo izquierdo derecho para soportar un retroceso potencial Sujete la manija trasera con la ma...

Page 46: ... delante de un árbol que tenga el corte inferior de la muesca 90 Fig 10 Línea de caída planificada 135º de la línea de caída planificada Senda segura de retirada 135º de la línea de caída planificada Fig 11 Primer corte Segundo corte Fig 12 Corte inferior de la muesca Primer corte Segundo corte 1 3 del diámetro Dirección de caída Raíz de apoyo No corte árboles cerca de edificios o cables de electr...

Page 47: ...agra el árbol debería comenzar a caer Cuando esto sucede retire la sierra de cadena del corte detenga el motor y apoye de inmediato la unidad Salga rápidamente del área por la senda de retirada pero siga observando el árbol mientras cae ADVERTENCIA Antes de hacer el corte final de tala siempre verifique que no haya personas animales y obstáculos PELIGRO Si el árbol comienza a caer en la dirección ...

Page 48: ...sde arriba TRONZADO SEGURIDAD El tronzado bucking es el proceso de cortar un árbol talado en leños de longitudes deseadas Siga las siguientes medidas de seguridad para reducir el riesgo de lesiones graves Mantenga el área despejada de objetos u obstrucciones que podrían entrar en contacto con la barra guía y resultar en retroceso Cuando efectúe el tronzado sobre una pendiente párese siempre en el ...

Page 49: ...sí se retira el muñón de rama ADVERTENCIA No corte a una altura superior a la del hombro con una sierra de cadena Utilice una sierra de pértiga para cortar ramas por encima de la altura del hombro o contrate a un profesional No opere la unidad en un árbol o sobre una escalera a menos que esté específicamente entrenado para hacerlo ADVERTENCIA Las ramas que caen pueden causar lesiones graves Utilic...

Page 50: ...o de la cadena Consulte Prueba del freno de la cadena Verifique la tensión de la cadena ajuste según sea necesario Consulte Ajuste de tensión de la cadena Llene el depósito de aceite de la cadena recargue con frecuencia Consulte Agregado de aceite de la cadena y barra Llene el depósito de combustible con combustible nuevo mezclado adecuadamente Consulte la sección Aceite y combustible Limpie el fi...

Page 51: ...sque la tapa de aceite de la cadena Fig 23 4 Vierta el aceite dentro del depósito con cuidado NO llene el depósito en exceso 5 Vuelva a colocar la tapa de aceite de la cadena Ajuste firmemente la tapa 6 Limpie el aceite que se pueda haber derramado AJUSTE DEL FLUJO DE ACEITE DE LA CADENA Y BARRA El aceite de la cadena y barra fluirá lentamente desde el depósito de aceite de la cadena sobre la cade...

Page 52: ...acia atrás y hacia adelante a lo largo de la barra guía Fig 28 Compruebe que la cadena de la sierra se mueve libremente y está en el engrane apropiado con la rueda dentada Si la cadena de la sierra no se mueve con facilidad gire lentamente el tornillo tensor de la cadena en el sentido contrario a las agujas del reloj para aflojar la cadena de la sierra NOTA La cadena de la sierra no se moverá si e...

Page 53: ...barra guía y la cadena de la sierra 1 Coloque la cadena de la sierra sobre una superficie plana y limpia y enderece cualquier deformación 2 Coloque la cadena de la sierra en el surco de la barra guía Fig 30 Compruebe que los cortadores están en la dirección correcta de rotación Fig 30 Mantenga un lazo de la cadena de la sierra en el extremo trasero de la barra guía Fig 30 3 Mantenga la cadena de l...

Page 54: ...tos producirá automáticamente los ángulos correctos Lime todos los cortadores izquierdos en una dirección Fig 34 Después lleve la lima al otro lado de la cadena y lime todos los cortadores del lado derecho en la dirección opuesta Fig 34 Cada tanto limpie las limaduras con un cepillo de alambre ADVERTENCIA La cadena de la sierra es muy filosa Cuando manipule o efectúe el mantenimiento en la cadena ...

Page 55: ...ca pero necesita una lubricación periódica Si la punta de rueda dentada de la barra guía no se lubrica el desempeño será deficiente se dañará la unidad y se ANULARÁ la garantía NOTA Este procedimiento se puede efectuar mientras la barra guía y la cadena de la sierra todavía están montadas en la unidad 1 Limpie profundamente la punta de la rueda dentada de la barra guía con un paño húmedo Fig 41 2 ...

Page 56: ...l filtro de aire en sentido contrario a las agujas del reloj para aflojar la cubierta del filtro Fig 42 2 Extraiga la cubierta del filtro de aire Fig 42 3 Extraiga el filtro de aire Fig 43 4 Lave el filtro de aire en agua y detergente suave Enjuague bien el filtro y déjelo secar 5 Reinstale el filtro de aire sobre el poste de montaje Fig 43 Compruebe que la abertura del filtro de aire se asiente d...

Page 57: ... unidad Inserte las dos lengüetas de la cubierta del filtro de aire dentro de las dos ranuras del alojamiento de la sierra de cadena Fig 42 11 Gire la perilla en el sentido de la agujas del reloj para ajustar de manera segura la cubierta del filtro de aire ADVERTENCIA No sople raspe ni limpie los electrodos con arena La arenisca en el motor podría dañar el cilindro AJUSTE DE LA VELOCIDAD DE RALENT...

Page 58: ...ía utilice un cepillo firme que no sea de alambre Vuelva a realizar el montaje de la unidad 3 Seque la humedad con un paño suave 4 Utilice aire comprimido hasta 40 PSI para extraer los desechos de las aletas del cilindro Fig 47 Las aletas del cilindro deben limpiarse en forma regular para reducir el riesgo de lesiones personales o daños a la unidad ocasionados por el fuego Utilice siempre antiparr...

Page 59: ...l cebador no se oprimió lo suficiente Oprima la pera del cebador 10 veces o hasta que se vea el combustible El motor está rebosado Mueva la perilla del cebador a la Posición 2 apriete el bloqueo del acelerador apriete el control del acelerador y tire de la cuerda de arranque El combustible está viejo tiene más de 30 días y o mal mezclado Vacíe el tanque de combustible y eche combustible nuevo bien...

Page 60: ... canales de distribución para exportación autorizados por Remington Remington se reserva el derecho a cambiar o mejorar el diseño de cualquier producto Remington sin adoptar ninguna obligación para modificar cualquier producto fabricado con anterioridad Ninguna garantía implícita es aplicable después del período de aplicabilidad de la garantía expresa escrita con anterioridad incluyendo cualquier ...

Page 61: ...61 NOTAS ...

Page 62: ...62 NOTAS ...

Page 63: ...63 NOTAS ...

Page 64: ......

Reviews: