background image

Starting 

The unit is automatically switched on if the humidity rate 
in the room is higher than the previously set valve. 

The unit operates fully automatically until the prese-
lected relative air humidity has been reached or until the 
unit has been switched off by the floater in the conden-
sate tank. 

In such a case the yellow control lamp “condensate tank 
full” is lit up. 

Operation with Hygrostat 

The REMKO hygrostat (accessory) is supplied with a 
special intermediate plug. 

1. Insert intermediate plug  into a properly protected 

plug socket. 

2. Position hygrostat in an adequate place within the 

room to be dehumidified. 

Not directly near the unit. 

Installation 


Install the unit in a horizontal position to ensure the 
trouble-free drainage of condensate. 

Install the unit in the middle of the room, if possible, 
to ensure optimal air circulation. 

If this is not possible due to the conditions in the 
building make sure that the air can be easily sucked 
in at the front of the unit and blown off from its rear 
part.  

Make sure to observe a minimum distance of 50 cm 

Do not install the unit directly near radiators  
or other heat sources. 

Make sure to keep the room to be dried and 
dehumidified closed, so that air from outside cannot 
penetrate into it. 

Entering into and going out of the room should be 
avoided if possible. 

You can obtain better air circulation if you place the 
unit at a height of approx. 1 m. 

1.   Introduce the main plug into a prop-

erly protected plug socket. 

230V/1~ 50 Hz / fuse 16 A 

2. Put main switch into position „I”. 

Green control lamp “operation” is lit 
up. 

Important Hints for the installation:


Connection cable extensions may only be used 
when they have been completely unrolled. 

The lock cover in front of the condensate tank have 
to be closed correctly (tender spot). 

G


The filter of the unit is to be controlled and 
cleaned thoroughly before every use. If the air 
suction grille is dirty, please cleaned it up like 
shown in chapter ”Maintenance and Service”.


3. Connect the unit plug with the 

intermediate plug. 

4. Put main switch of the unit into 

position “I”. 

5. Preselect the desired humidity 

by setting the hygrostat. 

Important Hints! 

Make sure that appropriate measures for mainte-
nance and care are taken when the unit is installed 
in dusty surroundings as well as in stables with am-
moniacal atmosphere  

See chapter “Maintenance and Care”. 

The electrical connection of the unit is to be carried 
out according to DIN VDE 0100, part 704. It is to be 
connected to service entrances with residual current 
operated device. 

If the unit is installed in washhouses, showers or 
similar wet areas the user has to protect it by an ade-
quate residual current operated device according to 
the relevant regulations. 

Summary of Contents for ETF 300

Page 1: ...REMKO ETF 300 550 Mobile Dehumidifier Operation Technology Spare Parts Edition GB M02 REMKO powerful like a bear...

Page 2: ......

Page 3: ...ating Instructions Mobile Dehumidifier REMKO ETF 300 550 G Always keep these operating instructions near or on the unit G Contents page Air Dehumidification 4 Safety Instructions 6 Unit Description 6...

Page 4: ...kg of dry air absolute water content 1 m of air weighs approx 1 2 kg at 20 C Depending on the temperature each kg of air can only absorb a defined quantity of water vapour When this quantity has been...

Page 5: ...n the other hand energy is re leased when gas is liquefied and this energy is called condensation heat The energy rate of evaporation and condensation heat is identical For water this is 2250 kJ kg 4...

Page 6: ...the unit Do not cover the unit during operation Make sure not to transport the unit during operation Avoid strong vibrations on the unit as soon as there is condensate in the condensate tank Make sure...

Page 7: ...h a feeler which has been mounted between the evapora tor lamellas When the formation of hair frost on the evaporator increases its heat absorption capacity is re duced due to the insulating character...

Page 8: ...ng into and going out of the room should be avoided if possible You can obtain better air circulation if you place the unit at a height of approx 1 m 1 Introduce the main plug into a prop erly protect...

Page 9: ...e slightly and remove it pulling towards and downwards Then remove the dust filter Slight o insignificant dirt is to be cleaned by blowing out or vacuum cleaning the dust filter carefully If the dust...

Page 10: ...from 3 C to 32 C Control air humidity Min 40 relative humidity Check hygrostat setting and set a lower value if nec essary Check whether dust filter is dirty if so clean it Check whether the evaporat...

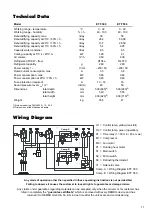
Page 11: ...30 50 Rated current consumption max A 3 8 Power consumption max kW 0 82 Power consumption at 20 C 70 r h kW 0 60 Fuse protection required A 16 Sound pressure level LpA 1m 1 dB A 59 Dimensions total de...

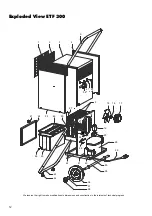
Page 12: ...e reserve the right to make modifications in dimensions and construction in the interests of technical progress 18 08 02 1 2 3 4 5 6 7 8 56 15 16 17 19 20 25 26 27 28 29 40 35 36 37 38 41 30 42 43 44...

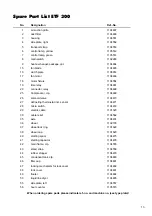
Page 13: ...26 solenoid valve 1104470 27 defrosting thermostat incl sensor 1104471 28 micro switch 1104472 29 electric cable 1101320 30 cable relief 1104562 35 axle 1104474 36 wheel 1102155 37 wheel lock ring 11...

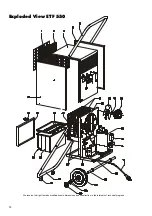
Page 14: ...14 We reserve the right to make modifications in dimensions and construction in the interests of technical progress Exploded View ETF 550...

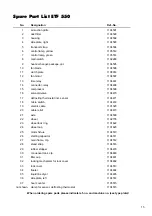
Page 15: ...hermostat incl sensor 1104471 18 micro switch 1104472 19 electric cable 1101320 20 cable relief 1104473 21 axle 1104509 22 wheel 1102155 23 wheel lock ring 1101622 24 wheel cap 1101623 26 starting cap...

Page 16: ...REMKO GmbH Co KG Klima und W rmetechnik D 32791 Lage Im Seelenkamp 12 D 32777 Lage PO Box 1827 Phone 49 5232 606 0 Fax 49 5232 606260...

Reviews: