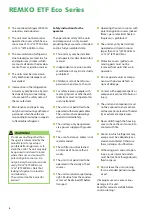
6. Switch the unit back on using
the operating switch [2].
Unit operation with
hose connection
The condensate container has
been provided with a connection
port (11 mm ø).
After removing the condensate
container, a water hose
(not provided) may be connected
to this connection port.
The following procedure must be
followed when connecting a water
hose:
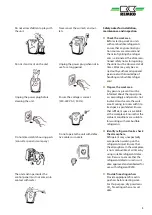
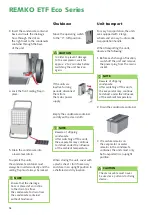
1. Open the front sealing flap and
remove the sealing plug.
2. Insert the customer-provided
drainage hose into the
connection port (secure and seal
with a clamp if necessary).
Condensate
Depending on the air temperature
and the relative humidity,
condensed water will drip into
the condensate trap and into
the condensate container below
either continuously or only during
the defrosting phases.
A float is located inside
the condensate container.
In the event that the container
is full, the float will activate a
microswitch which will switch off
dehumidification mode.
The unit will switch off and
the yellow indicator light will
illuminate.
To empty the condensate
container, the following procedure
must be followed:
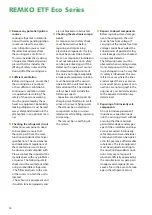
1. Move the operating switch [2]
to the "0" (off) position.
2. Open the front sealing flap [K].
3. Remove the filled condensate
container [B].
By carefully pulling the container
forwards out of the guide rails.
NOTE
The units are only fully
functional if the condensate
container is inserted properly.
NOTE
After being emptied,
the condensate container incl.
float must be checked for
damage, contamination etc.
NOTE
Beware of dripping
condensate.
After switching off the units,
the evaporator may continue
to defrost under the influence
of the ambient temperature.
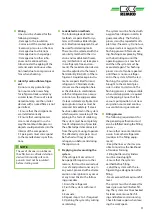
4. Open the valve on the pouring
opening sideways.
4. Pour the condensate into a drain
or similar receptacle.
5. Close the pouring opening and
carefully insert the condensate
container back into the unit.
NOTE
Ensure that the small black
sealing plug is always inserted
into a fixed connection port.
Missing stoppers will give
rise to uncontrolled water
discharge.
Valve
B
K
17

