background image

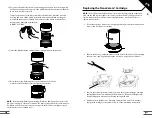
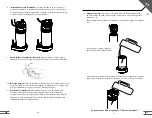
10. To remove the media insert from the housing, grab the base of the housing with 

both hands and push the end cap of the media insert forward using your thumbs. 
Once loose discard or rinse off. 


Temporarily reconnect the inlet assembly to the filter base. Wash the reusable 
housing and rinse off the media insert with water and dry. When washing the 
media mild rubbing is acceptable. If the exterior of the media is scrubbed too 
hard it can be damaged permanently. 


DO NOT USE SOAP.

11. Insert the Media with the outlet nipple pointing down and the punt up.

12. Close the housing by turning the top clockwise until the arrows  


marked on the housing are almost aligned and reinstall.

NOTE:  Note that back-flushing and rinsing will improve flow but will not restore the 

Pre-Filter cartridge to “like new” condition. The improvement will be less each time you 

back-flush and rinse, until it is necessary to replace the Pre-Filter cartridge to restore 

the flow rate to an acceptable level.

1.  For the NanoCeram® remove the cartridge by turning it counterclockwise until it 

releases and discard used cartridge.

2.  Remove the battery compartment door in the bottom of the base by unscrewing 

the two screws and by gently prying the door open using a flat screwdriver.  

3.  Remove the old batteries, wait 20 seconds, and then replace with two new high 

quality AA batteries. This will reset the flow meter to “0” and the LED lights will 

start flashing again when water is flowing through the filter.

4.  Unpack the new NanoCeram®  Cartridge and install, run water for 2 minutes, 

charge both cartridges as detailed in step 12 of the installation instructions.

NOTE: The Pre-Filter and the NanoCeram

®

 are not necessarily replaced at the same 

time and the LED indicator lights refer only to the NanoCeram

®

cartridge, therefore, 

replace it when the flow meter’s red warning light flashes. It will also be time to 

replace your batteries.

Replacing the NanoCeram® Cartridge

21

20

EN

Summary of Contents for Aqua Nano UCU LX-200 CAL

Page 1: ...Water Filter UCU LX 200 CAL USE CARE USO Y MANTENIMIENTO...

Page 2: ...y su familia Nuestra meta en Rena Ware es ofrecer productos de la m s alta calidad respaldados por un excelente servicio al cliente Por eso estamos seguros de que puede contar con la calidad de su fil...

Page 3: ...The Aqua Nano UCU LX 200 CAL is designed to fit under your counter great for those with limited counter space A visual flow meter indicates when it is time to replace the NanoCeram Cartridge to ensur...

Page 4: ...utlet tube Spout inlet tube INSTALLATION ASSEMBLY BOX 9 Inlet Assembly including Inlet Tube and Outlet Tube 10 Back Flush Adapter for use on the Pre Filter Cartridge only 11 Filter Base 12 Locking Pla...

Page 5: ...e the faucet from the sink and clean the sink surface thoroughly 3 Tools recommended PTFE plumber s tape or thread sealant slotted screwdriver pliers adjustable wrench flashlight and cloth Your instal...

Page 6: ...et of the Side Faucet Line to your wall outlet To the Side Faucet Braided water source tube Braided water source tube 6 Attaching installation assembly a Install two new high quality AA batteries not...

Page 7: ...f the Outlet Extension Tube 3 into one end of the Outlet Extension Tube Connector 4 g Insert the Outlet Line of the Filter Base 11 into the other end of the Outlet Extension Tube Connector 4 7 Install...

Page 8: ...f the existing faucet on Both should work the same way they did before Check for leaks Also turn the Side Faucet on and off both with the main faucet on or off The Side Faucet should work independentl...

Page 9: ...ket You may place the entire under the counter assembled filter on a bracket mounted to the wall to raise if off the floor of your sink cabinet Replacement Indicator Lights Your Aqua Nano UCU LX 200 C...

Page 10: ...by turning it counterclockwise until it releases 4 Remove the Pre Filter Cartridge from the NanoCeram Cartridge by turning it counterclockwise until it releases 5 Invert the Pre Filter cartridge and...

Page 11: ...until it is necessary to replace the Pre Filter cartridge to restore the flow rate to an acceptable level 1 For the NanoCeram remove the cartridge by turning it counterclockwise until it releases and...

Page 12: ...rce Water Tube are in place and properly seated 4 Water continues to flow out of the Spout after water is turned off Water may continue to flow from the Spout for a short time due to a build up of pre...

Page 13: ...btain Warranty Service To obtain warranty service send a detailed written description of the claimed defect to the closest Rena Ware Service Center You may be required to return the Product at your ex...

Page 14: ...ua NanoUCU LX 200 CAL est dise ado para instalarse debajo del mueble del fregadero de la cocina ideal para cocinas peque as Un medidor de flujo indica cu ndo debe reemplazar el cartucho NanoCeram para...

Page 15: ...rifo Tubo de entrada del grifo CAJA CON PIEZAS PARA INSTALAR 9 Caja de entrada incluye manguera de entrada y manguera de salida 10 Adaptador de flujo invertido solo para usar con el cartucho del prefi...

Page 16: ...oscas masilla de plomero destornillador punta plana alicates llave ajustable linterna y pa o Es posible que la instalaci n requiera nuevas l neas de suministro y o llaves de cierre o herramientas adic...

Page 17: ...trenzada para agua 6 Instalaci n del utillaje a Instale dos bater as AA nuevas de buena calidad no incluidas en la base del filtro Conecte el cable de datos al puerto del cable de datos que se encuen...

Page 18: ...de la manguera de extensi n de salida del filtro 3 en uno de los extremos del conector de manguera de extensi n de salida del filtroa 4 g Introduzca la l nea de salida de la base del fltro 11 en el o...

Page 19: ...alaci n Abra las llaves de agua caliente y fr a del grifo existente Ambas deber a funcionar de igual que antes de la instalaci n y aseg rese de que no haya fuga de agua Abra y cierre la llave de agua...

Page 20: ...al mismo tiempo Soporte Puede colocar todo el filtro debajo del fregadero sobre un soporte instalado en la pared para separarlo del piso del gabinete del fregadero 39 Luces Indicadoras de reemplazo S...

Page 21: ...reloj hasta que se afloje 4 Retire el cartucho del prefiltro del cartucho NanoCeram gir ndolo en sentido contrario a las manecillas del reloj hasta que se afloje 41 5 Voltee el cartucho del prefiltro...

Page 22: ...quede como nuevo Esto funcionar cada vez menos hasta que sea necesario reemplazar el cartucho del prefiltro para restaurar el flujo a un nivel aceptable 1 Para cambiar el cartucho NanoCeram s quelo gi...

Page 23: ...v lvula desviadora de tres salidas y la manguera trenzada para agua est n bien instalados 4 Sigue saliendo agua por el grifo despu s de cerrar la llave de agua Puede seguir saliendo agua por el cabez...

Page 24: ...ado como defectuoso Si se efect a el reemplazo el Producto por el que se hizo el reemplazo pasar a ser propiedad de Rena Ware Este recurso ser el nico disponible Modo de efectuar la Garant a Para obte...

Page 25: ...esentative for more information on starting your own Rena Ware business Rena Ware International ofrece muchos otros beneficios como nuestros fabulosos utensilios de cocina para cocinar con un m nimo d...

Reviews: