Final Checks
Your Air Mag M.W. II is now assembled. Please make the following checks before you use it for the first time.
•
Make sure all screws, bolts & nuts are tighten securely.
•
The Air Mag M.W. II must be securely and reliably fastened to a solid wall.
10
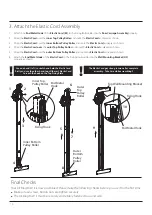
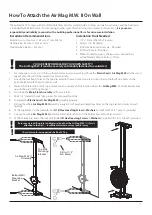
3. Attach the Elastic Cord Assembly
1. Attach one
End Metal Hook
of the
Elastic Cord (B1)
to the Fixing Bolt welded on the
Rear Carriage Assembly
properly.
2. Wrap the
Elastic Cord
over the
inner Top Pulley Roller
and route the
Elastic Cord
as diagrams shown.
3. Wrap the
Elastic Cord
over the
inner Bottom Pulley Roller
and route the
Elastic Cord
as diagrams shown.
4. Wrap the
Elastic Cord over
the
outer Top Pulley Roller
and route the
Elastic Cord
as diagrams shown.
5. Wrap the
Elastic Cord
over the
outer Bottom Pulley Roller
and route the
Elastic Cord
as diagrams shown.
6. Attach the
End Metal Hook
of the
Elastic Cord
to the Fixing Hook welded on the
Wall Mounting Bracket (H2)
properly as shown.
1
2
3
4
Inner Bottom
Pulley Roller
Inner Top
Pulley Roller
Fixing Hook
End Metal
Hook
6
5
Outer
Top
Pulley
Roller
7
Outer
Bottom
Pulley
Roller
8
9
End Metal Hook
Top Wall Mounting Bracket
10
Fixing Hook
Use one hand ( left ) to stretch and hold the Elastic Cord
firstly and use the other hand to pull the rest Elastic Cord
to reach the hook on the Top Fixing Plate
!
The Elastic Cord got strong tension after complete
assembly - Take Care while assembling!!
!


