background image


R20UT3282ED0101 Rev. 1.1 

2015-06-10 

3.2 

Voltage distribution 

The table shows the required device power supply pins. For detailed explanation 
of their function, please refer to the user documentation of the corresponding 
device: 

Device Supply Pin 

SYSVCC 

VCC 

EnVCC (n = 0, 1) 

AnVCC (n = 0, 1) 

AnVREFH (n = 0, 1) 

VDD (VCL) 


Additional one power supply for the MainBoard can be selected: 

Supply voltage 

Function 

VDDIOF 

IO supply voltage for components located on a 
connected mainboard.  


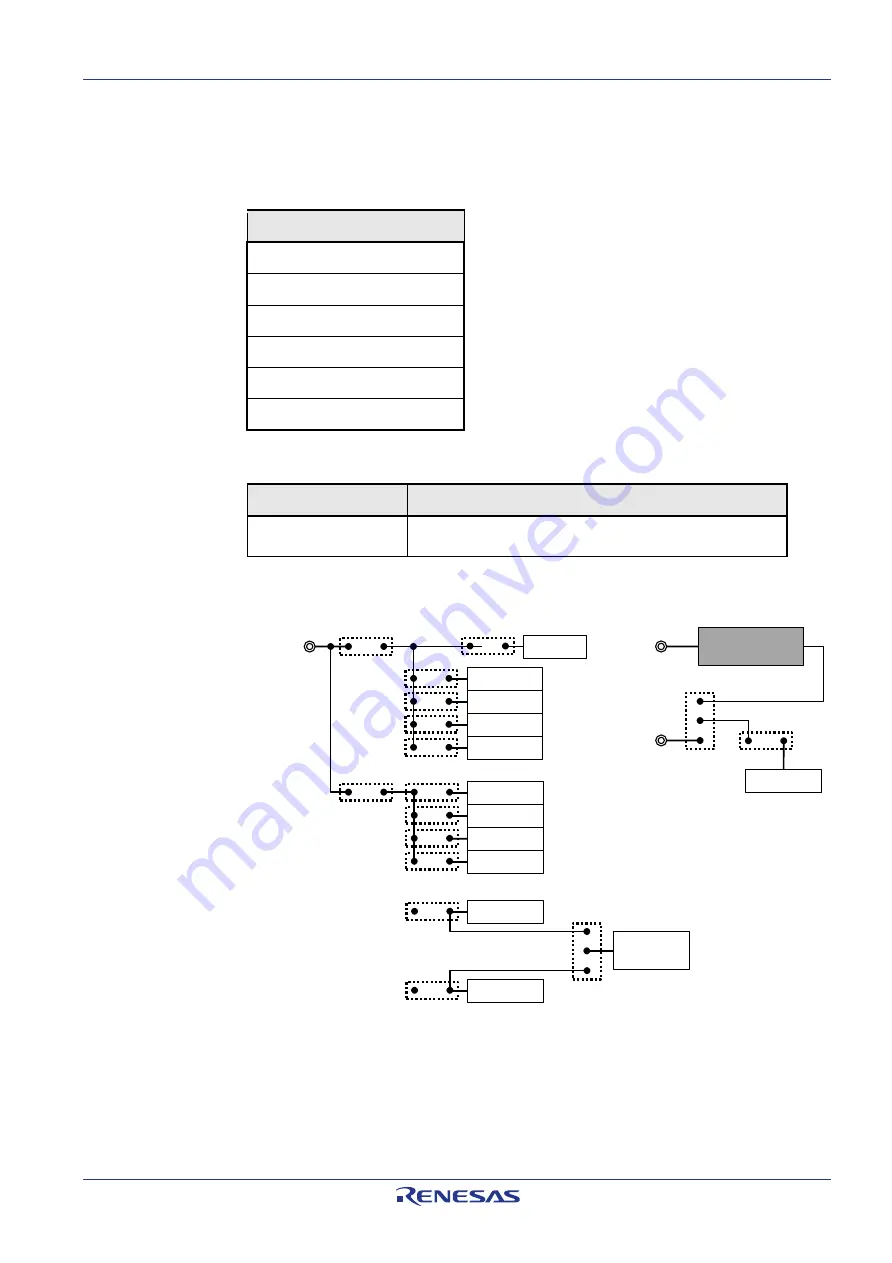
The following figure shows the configurable voltage distribution on the PiggyBack 
board. 


Figure 3 Voltage Distribution on the PiggyBack Board 


All power supply lines can be interrupted by jumpers. This provides the 
possibility to measure the current consumption of each individual power 
domain of the device. 


The IO supply voltage for the Mainboard (VDDIOF) can be connected via  
jumper JP1 to 

Voltage1

, if the PiggyBack board is mounted on a MainBoard. 

VCC

A0VCC

Voltage regulator 
for VDD

VDDIOF

E0VCC

JP0

SYSVCC

A0VREFH

E1VCC

A1VCC

A1VREFH

JP2

JP3

JP4

JP5

JP7

JP8

JP9

JP10

JP1

JP11

VCL/VDD

JP12

JP6

Voltage1

Voltage1

Voltage2

VCC

JP3

VCL/VDD

JP12

JP19

Pin 142
VCC/VDD

Summary of Contents for PiggyBack 144QFP

Page 1: ...he product at the time of publication and is subject to change by Renesas Electronics Corp without notice Please review the latest information published by Renesas Electronics Corp through various means including the Renesas Technology Corp website http www renesas com The newest version of this document can be obtained from the following web location http www renesas eu updates oc Y RH850 P1XC 14...

Page 2: ...ace 10 Chapter 6 Connectors for ports of device 11 6 1 Connectors for ADC voltage supply 11 6 2 Push button for RESET 11 6 3 Mode Selection 11 6 4 Connectors to MainBoard 12 6 4 1 Connector CN1 12 6 4 2 Connector CN2 13 Chapter 7 Other circuitry 16 7 1 Signalling for CVMOUTZ and ERROROUTZ 16 7 2 Pin Headers for Pull Down and Pull Up 16 Chapter 8 Precautions 17 8 1 Missing function of signalling LE...

Page 3: ... Y RH850 X1X MB T1 V1 for extended functionality Main features Socket for mounting of device Standalone operation of the board Direct supply of device voltage typ 3 3V and 1 25V enabling single power supply eVR and dual power supply DPS Device programming capability Device debugging capability Pin headers for direct access to each device pin Reset switch MainOSC circuitry Connectors to MainBoard O...

Page 4: ...Chapter 2 Overview 2 1 Overview Figures 1 and 2 provide a schematic view of the PiggyBack board Figure 1 PiggyBack Board Schematic Top View The black arrow denotes the position of socket pin 1 Figure 2 PiggyBack Board Schematic Bottom View ...

Page 5: ... with the following device RH850 P1M C in 144pin QFP package with 0 4mm pin pitch The device must be placed inside the socket IC1 To insert the device press down the lid of the socket align the 1 pin of the device to the 1 pin of the socket insert the device into the socket and release the lid ...

Page 6: ...he board but not assembled For details about voltage distribution refer to Chapter 3 2 Voltage distribution Supply by E1 emulator The E1 emulator that is used for debug purposes and flash programming can also supply a single operating voltage Dbg_Voltage This voltage is connected to Voltage1 See the documentation of the E1 and Chapter 5 Debug and Programming interface for details Supply by MainBoa...

Page 7: ... The following figure shows the configurable voltage distribution on the PiggyBack board Figure 3 Voltage Distribution on the PiggyBack Board All power supply lines can be interrupted by jumpers This provides the possibility to measure the current consumption of each individual power domain of the device The IO supply voltage for the Mainboard VDDIOF can be connected via jumper JP1 to Voltage1 if ...

Page 8: ...lator Thereby even a DPS device can be operated with one single voltage supply Voltage1 The source for VDD is selectable by the jumper JP11 The jumper JP12 connects the voltage configured by JP11 with the VDD pins CAUTION Jumper JP12 must not be connected in case of an eVR device In this case the connected pins function as VCL pins and must not be supplied with a voltage ...

Page 9: ...ible to mount a programmable crystal oscillator on the PiggyBack board at OSC1 The available footprint and circuitry is designed for a SG 8002CE programmable crystal oscillator from Epson Toyocom The output from this oscillator can be connected to port X1 of the device via jumper JP13 The SG 8002CE is neither mounted nor provided with the board For details about the available circuitry refer to Ch...

Page 10: ...CN15 with fourteen pins is provided The signal connection of the connector CN25 is shown in the table below CN25 Pin Device Port Device Signal 1 JP0_2 TCK LPDCLK FLSCI3SCKI 2 GND GND 3 JP0_4 TRSTZ 4 FLMD0 FLMD0 5 JP0_1 TDO LPDO FLSCI3TXD 6 7 JP0_0 TDI LPDI FLSCI3RXD FLSCI3TXD 8 Dbg_Voltage Voltage1 9 JP0_3 TMS 10 11 JP0_5 RDYZ LPDCLKOUT 12 GND 13 RESET RESETZ 14 GND ...

Page 11: ... of the device Device Port ADC0I0 A0VREFH ADC1I0 A1VREFH The SMA connectors are not mounted on nor provided with the boards SMA connectors that fit to the following mounting holes available on the board can be mounted on the board Figure 4 Mounting Holes for SMA Connectors 6 2 Push button for RESET In order to issue a RESET to the device the push button SW1 is available For a correct start up of t...

Page 12: ...upported MainBoards Pin Function on MainBoard Device Port Pin Function on MainBoard Device Port 1 2 3 4 5 RESET RESETZ 6 NMI P5_7 7 8 9 INT0 P4_7 10 INT1 P4_12 11 INT2 P5_13 12 INT3 P0_5 13 14 15 UART0TX P5_14 16 UART1TX P5_5 17 UART0RX P5_13 18 UART1RX P5_4 19 LIN0TX P5_14 20 LIN1TX P5_5 21 LIN0RX P5_13 22 LIN1RX P5_4 23 24 25 26 27 CAN0TX P5_1 28 CAN1TX P5_14 29 CAN0RX P5_0 30 CAN1RX P5_15 31 SE...

Page 13: ...6 92 DIGIO_7 P2_7 93 DIGIO_8 P2_8 94 DIGIO_9 P2_9 95 DIGIO_10 P2_10 96 DIGIO_11 P2_11 97 DIGIO_12 P2_12 98 DIGIO_13 P2_13 99 DIGIO_14 P2_14 100 DIGIO_15 P2_15 101 102 103 MUX0 P2_0 104 MUX1 P2_1 105 MUX2 P2_2 106 107 ADC0 ADC0I0 108 ADC1 ADC0I1 109 ADC2 ADC0I2 110 ADC3 ADC0I3 111 ADC4 ADC0I4 112 ADC5 ADC0I5 113 ADC6 ADC0I6 114 ADC7 ADC0I7 115 VDDIOF 116 VDDIOF 117 Voltage1 118 Voltage1 119 Voltage...

Page 14: ...ion on MainBoard Device Port 11 12 13 14 15 16 17 18 19 20 21 22 23 24 25 26 27 28 29 30 31 32 33 34 35 36 37 38 39 40 41 42 43 44 45 46 47 48 49 50 51 52 53 54 55 56 57 58 59 60 61 62 63 64 65 66 67 68 69 70 71 72 73 74 75 76 77 78 79 80 81 82 83 84 85 86 87 88 89 90 91 92 93 94 95 96 ...

Page 15: ...0UT3282ED0101 Rev 1 1 15 2015 06 10 Pin Function on MainBoard Device Port Pin Function on MainBoard Device Port 97 98 99 100 101 102 103 104 105 106 107 108 109 110 111 112 113 114 115 116 117 118 119 120 ...

Page 16: ...ers for Pull Down and Pull Up A connector CN4 is available to enable easy connection to Voltage1 3 3V or GND via pull up or pull down resistances respectively Hereby uneven pins from 1 to 19 in total ten are configured as pull up pin headers while the even numbers from 2 to 20 in total ten can be used for pull down By connecting device port pins from CN5 8 to CN9 it is therefore possible to pull a...

Page 17: ...e connection from device pins CVMOUTZ and ERROROUTZ to LED1 and LED2 respectively is missing on the PiggyBack board Due to this the LED1 and LED2 have no function Workaround The picture below shows the required modifications The two missing connections can be realized by soldering two cables on the bottom side of the board ...

Page 18: ...ing Description The labelling of JP11 is wrong on the PiggyBack board As depicted in the figure above the label at pin 3 is wrong The connector of Voltage2 is CN14 Workaround None Pin 2 and pin 3 of JP11 must be connected via jumper to supply VDD with Voltage2 CN14 ...

Page 19: ...R20UT3282ED0101 Rev 1 1 19 2015 06 10 Chapter 9 Mechanical dimensions 160 00mm CN2 CN1 24 00mm 24 00mm 80 00mm 50 00mm 100 00mm ...

Page 20: ...esign is in sole responsibility of the customer The following components described in the schematic are not provided with the board SMA connectors o CN3 o CN9 o CN10 o CN11 Diode D1 Jumper JP13 Oscillator OSC1 Resistances o R29 o R30 o R31 o R47 The following components described in the schematic are provided with but not mounted on the board Standard 4mm power lab sockets o CN12 o CN13 o CN14 ...

Page 21: ...R20UT3282ED0101 Rev 1 1 21 2015 06 10 ...

Page 22: ...R20UT3282ED0101 Rev 1 1 22 2015 06 10 ...

Page 23: ...R20UT3282ED0101 Rev 1 1 23 2015 06 10 ...

Page 24: ...on 2014 12 08 1 0 Initial release 2015 06 10 1 1 Added link to download page to the cover page Sec 3 1 Corrected names of power connectors o GND CN22 corrected to CN12 o Voltage1 CN23 corrected to CN13 o Voltage2 CN24 corrected to CN14 Ch 4 Changed numbering of the sub chapters o Sec 4 1 1 changed to 4 1 o Sec 4 1 2 changed to 4 2 Added precaution sec 8 1 and sec 8 2 ...

Page 25: ...on is error free Renesas Electronics assumes no liability whatsoever for any damages incurred by you resulting from errors in or omissions from the information included herein 7 Renesas Electronics products are classified according to the following three quality grades Standard High Quality and Specific The recommended applications for each Renesas Electronics product depends on the product s qual...

Page 26: ...u 10 Please contact a Renesas Electronics sales office for details as to environmental matters such as the environmental compatibility of each Renesas Electronics product Please use Renesas Electronics products in compliance with all applicable laws and regulations that regulate the inclusion or use of controlled substances including without limitation the EU RoHS Directive Renesas Electronics ass...

Reviews: