• Menu Option “Language”
Here the language can be changed between “English”, “French” and “Chinese”. By using
“Cancel”, the function will be exited without making a change.
• Menu Option “Exit”
After confirming with the “MENU” button, the main menu is exited.
Resetting the Device
If the device does not react any longer (even though the rechargeable battery is not flat), press
the “RESET” key, which is located in the countersunk hole on the rear, using a sharp object (e. g.
toothpick).
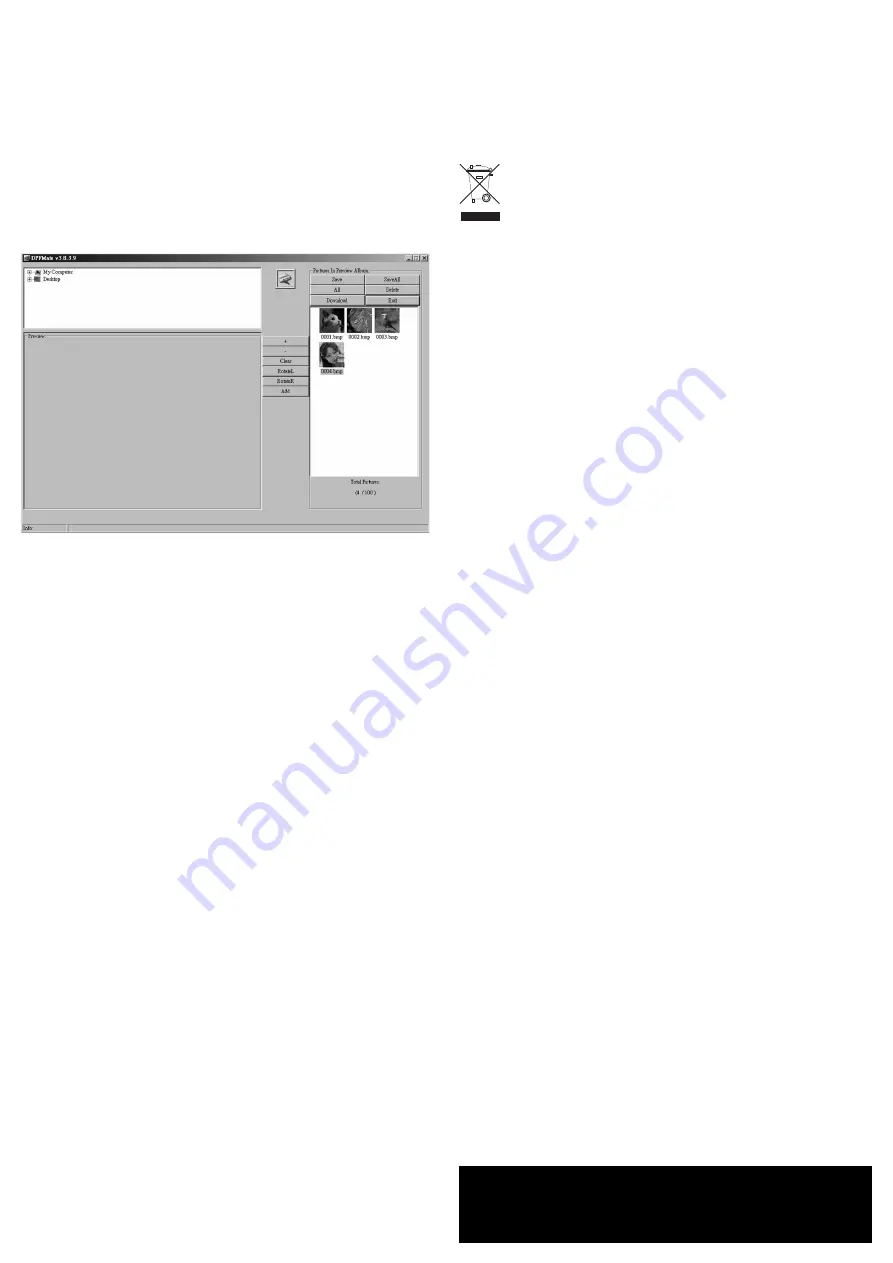
Using the PC Software
☞
When using newer versions of the software, the display may appear slightly different
than the following image. The description of the software may also differ slightly.
☞
If the software does not start automatically in the main menu after activating the USB
connection, start the program “DPFMate.exe” from the drive added to Window’s file
manager.
First, select and confirm “USB Connect” in the main menu, so Windows recognizes
the digital key fob as a drive, see chapter “Selecting and using the Main menu”.
• As usual, in the Windows file manager you can search your hard disk for images in the top-left
window, which then can be transferred to the digital key fob.
• The image is displayed in the “Preview” area below.
• In the right window you will see the “Preview Album”, which is a type of cache memory. All
images on the digital key fob will be read and displayed.
When new images are added, they are also shown in the “Preview Album”.
Only after clicking on “Download” are all of the images transferred from the “Preview Album”
to digital key fob’s memory!
Button function
„+“ / „-“
Zooming in/out of the image
“Clear”
Switching between “Clear” and “Rect”; with “Rect” the format of the selected
image, on the digital key fob, will be adjusted (scaled up/down). However, by
doing this the aspect ratio of the original image will be lost.
With “Clear”, the frame displayed in the left preview window can be moved
around the image and thus, a certain section of the image can be transferred
to the “Preview Album”.
“RotateL”
Rotates the image in the preview window to the left
“RotateR”
Rotates the image in the preview window to the right
“Add”
Transfers the image to the “Preview Album”
“Save”
Transfers and saves an individual, selected image from the “Preview Album”
to the computer
“SaveAll”
Transfers all the images from the “Preview Album” to the computer and
saves them
“All”
Selects all the images in the “Preview Album”
“Delete”
Deletes the selected images in the “Preview Album”
“Download”
Transfers all the images from the “Preview Album” to the computer.
☞
Only after clicking on “Download” are all of the images saved from the “Preview
Album” to digital key fob’s memory. Depending on the number of images, this may
take several seconds (in the window below a progress bar is displayed).
After this, the USB connection can be disconnected.
Never disconnect the USB connection during read or write processes. If the digital
key fob stops reacting (even when the rechargeable battery is charged), press the
“RESET” key on the rear, see chapter “Reset”.
Disposal
Please dispose of the device when it is no longer of use, according to the current
statutory requirements.
Technical Data
Picture diagonal: ..................................Approx 3.8 cm (1.5“)
Resolution:............................................128 x 128 pixels
Max. number of images: ......................Depending on the image content, approx. 70 images
Image format: ......................................JPG, BMP, GIF
Battery type: ........................................LiIon, 3.7 V, 180 mAh, non-replaceable
Charging time: ......................................3 h (when using for the first time 5 h)
These operating instructions are a publication by Conrad Electronic SE, Klaus-Conrad-Str. 1, D-92240 Hirschau (www.conrad.com).
All rights including translation reserved. Reproduction by any method, e.g. photocopy, microfilming, or the capture in electronic data pro-
cessing systems require the prior written approval by the editor. Reprinting, also in part, is prohibited.
These operating instructions represent the technical status at the time of printing. Changes in technology and equipment reserved.
© Copyright 2011 by Conrad Electronic SE.


