This is a publication by Conrad Electronic SE, Klaus-Conrad-Str. 1, D-92240 Hirschau (www.conrad.com).
All rights including translation reserved. Reproduction by any method, e.g. photocopy, microfilming, or the capture in electronic data
processing systems require the prior written approval by the editor. Reprinting, also in part, is prohibited. This publication represent
the technical status at the time of printing.
© Copyright 2015 by Conrad Electronic SE.
Installation
When setting it up with other equipment, make sure that the appliance is well venti-
lated. Keep a sufficient distance from heat sources.
The device’s heat dissipation must not be obstructed. Do not cover it. The air circula-
tion must not be obstructed by objects such as magazines, tablecloths, curtains or
similar. This prevents heat dissipation from the device and can lead to overheating
(risk of fire).
Do not drill any additional holes or screw any additional screws into the housing,
since this could make contact with dangerous voltages possible.
Always lay the cables so that nobody can trip over or become entangled in them.
There is a risk of injury.
The cables must be sufficiently long. Avoid mechanical strain on the cables. This may
damage the cables or the device. There is a danger of fatal electric shock.
Do not place the PA box in the immediate vicinity of screens such as TV sets or com-
puter monitors. The magnetic field from the loudspeakers might distort the image on
such devices.
Only operate the PA box on a stable surface which is not sensitive to heat.
When setting up the device, make sure that it has a stable base and that the set-up
location is suitably stable.
If you install the PA box in an elevated position or stack boxes on top of one another,
the boxes must be secured with suitable securing devices. When doing so, ensure
that the fastening material and the anchoring area are sufficiently dimensioned.
Serious injury to persons can be caused if the loudspeaker box falls down. Therefore,
the loudspeaker must be secured by experienced and trained personnel.
It is not permitted to suspend the PA box from handles or similar devices.
If the PA box is set up on a stand, it must be suitably robust and appropriate for the
weight of the loudspeaker.
• Set up the PA box in the desired location.
• If necessary, a loudspeaker stand can be inserted in the loudspeaker flange on the box bottom.
• Align the sound outlet as desired.
Connecting the signal inputs and outputs
The input should only be connected to low-level audio outputs on audio devices.
The PA box and the device it is connected to must both be switched off during connec-
tion.
Always use suitably shielded audio cables to connect the inputs and outputs. The use
of incorrect cables may lead to interference.
In order to prevent distortion and mismatching, which could cause damage to the PA
box, only connect audio devices with appropriate outputs.
Lay the connection cables so that they do not present a tripping hazard.
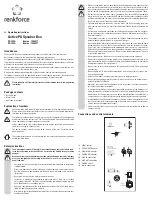
• Connect LINE IN (5) to the pre-amplifier of the upstream audio device (e.g. mixer). A 6.3 mm TRS
connector or an XLR connector can be connected to this port.
• Connect LINE OUT (6) with the input of another device that will receive the same signal as the
PA box.
Mains connection
The mains outlets which the PA system is connected to must be easily accessible to
quickly disconnect the device from the mains voltage in case of an error.
The PA box and all connected devices must be turned off when connecting the voltage
supply.
Ensure that all the electrical connections and connection cables between the differ-
ent devices and any extension cables comply with the regulations and comply with the operating
instructions.
Before you plug in the mains plug, make sure first that the voltage data indicated on
the PA speaker box is compatible with the mains voltage available. Do not connect
the PA speaker box if the data doesn’t comply with the available mains voltage. An
incorrect supply voltage will cause serious damage.
• Insert the IEC connector on the mains cable into the mains connection (8).
• Plug the mains plug of the power supply cable into a wall socket.
• The POWER switch (7) is used to switch the power supply to the PA box on and off.
“O” position: the power supply is turned off.
“I” position: the power supply is turned on.
• When the device is switched on, the POWER ON indicator (4) lights up.
Getting started and operation
Start using the device only after you have familiarized yourself with the instructions in
this manual. Check again that all the connections are correct.
Do not use the product, if it is damaged.
The PA box should always be the last to be turned on and the first to be turned off. In
this way you prevent any undesired noises, which can typically occur when swit-
ching off a mixer, from damaging the PA box.
The device may only be operated by persons familiar with the operating instructions.
Keep other persons and children away from the device.
• Turn the control LEVEL (1) all the way down (to the left).
• Switch on the connected mixer and start the playback.
• Turn the PA box on with the POWER switch (7).
• The POWER (4) indicator is lit.
• As soon as the PA speaker box detects a signal at the input the SIGNAL OK indicator (3) lights up.
• Adjust the volume on the mixer to about 75% of the maximum volume or to the maximum undis-
torted level (visible on devices with recording level displays and the “0 dB” marking).
• Adjust the volume of the PA box with the LEVEL control (1) to the maximum desired volume.
• This setting enables a high signal-to-noise ratio and provides the best audio quality.
• After this basic setting, the volume is set using only the volume control on the mixer. The set-up
procedure needs to be repeated with every change to the circuit.
• If the PA speaker box switches off during volume peaks, it is overloaded. The PEAK/LIMIT in-
dicator (2) lights up and the built-in amplifier is switched off to prevent damage. Turn down the
volume, in this case. Switch the PA box on when the overloading no longer occurs.
• To switch off the entire system, first switch off the active PA speaker with the POWER switch (7)
and only then switch off the mixer.
Maintenance
The PA box does not require any maintenance.
Only wipe the outside with a dry or slightly moistened cloth. Make sure not to touch the sensitive
speaker membranes.
Never use aggressive cleaning agents or chemical solutions as the housing’s surfaces or the loud-
speaker membrane could be damaged.
Fuse replacement
If fuses have to be changed, make sure that they are only replaced with fuses of the same type and
rated current (refer to the “Technical Data”).
It is improper to fix fuses or bridge the fuse holder.
• Only after disconnecting from the mains (unplug at the socket) should the low-power main con-
nector be unplugged from the mains connection (8) on the device. Pry out the fuse holder in the
mains connection (8) with the defective fuse.
• Remove the defective fuse and replace it with a fuse of the same type.
• Now, carefully replace the fuse holder with the new fuse.
• Afterwards, reconnect the mains cable to the device and plug into a socket.
Disposal
Electronic devices are recyclable waste materials and must not be disposed of in the
household waste!
Please dispose of the product, when it is no longer of use, according to the current
statutory requirements.
Technical data
PA122A
PA152A
Operational voltage .....................................220-240 V/50/60 Hz
220-240 V/50/60 Hz
Fuse ................................................................T1,6AL/250 V (5x20 mm)
T3,15AL/250 V (5x20 mm)
Frequency range ..........................................40-20000 Hz
30-20000 Hz
Power output (RMS/max.) ..........................200/300 W
300/400 W
Max. sound pressure...................................120 dB
125 dB
Subwoofer .....................................................30 cm (12“)
38 cm (15“)
Tweeter ..........................................................25 mm (1“)
25 mm (1“)
Dimensions....................................................360 x 620 x 360 mm
440 x 800 x 440 mm
Weight ............................................................21 kg
31 kg

