Intended use
The product can be connected to a computer’s USB port. It is intended for reading and writing
to 8.89 cm/3.5” floppy disks.
The power is supplied via the USB.
This product complies with the applicable national and European requirements. All names of
companies and products are the trademarks of the respective owner. All rights reserved.
Delivery content
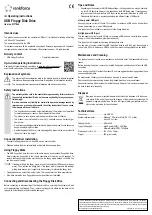
• USB Floppy Disk Drive
• Operating Instructions
Up-to-date operating instructions
Download the latest operating instructions at www.conrad.com/downloads or
scan the QR code shown. Follow the instructions on the website.
Explanation of symbols
The symbol with the exclamation mark in the triangle is used to indicate important
information in these operating instructions. Always read this information carefully.
The arrow symbol indicates special information and advice on operation.
Safety Instructions
The warranty will be void in the event of damage caused by failure to observe
these safety instructions! We do not assume any liability for any consequen-
tial damage!
Nor do we assume any liability for material and personal damage caused by
improper use or non-compliance with the safety instructions! In such cases,
the warranty will be null and void.
•
The unauthorised conversion and/or modification of the product is not permitted
for safety and approval reasons. Never dismantle the product.
• The product is not a toy and must be kept out of the reach of children.
• The product is only intended for use in dry, enclosed spaces, it must not get
damp or wet.
• Do not leave packaging material carelessly lying around, since it could become a
dangerous plaything for children.
• Handle the product with care, it can be damaged by impacts, blows, or accidental
falls, even from a low height.
Connection/Driver Installation
•
Connect the floppy disk drive to a free USB port on your computer.
• Windows detects the drive automatically and installs the necessary driver
Using Floppy Disks
•
The USB floppy disk drive functions in the same way as a conventional floppy disk drive.
Simply insert the floppy disk in the correct orientation into the drive, until it engages. To
remove the floppy disk, press the eject button, so the floppy disk is pushed out a little. You
can then remove it easily.
If reading/writing to the floppy disk, wait until it has finished (LED does not blink any
more). Then, remove the floppy disk. If the floppy disk is removed while reading/
writing, data may be lost. It might also be necessary to reformat the floppy disk.
• Floppy disks have a small slider on their side. This is used to turn on the write protection.
•
If the write protection is on, floppy disks cannot be written to or formatted.
Connecting and Disconnecting the Floppy Disk Drive
Before connecting or disconnecting of the floppy disk drive, or turning the computer off, wait
until reading/writing has finished. Then, remove the floppy disk; otherwise, the data on the
floppy disk or the floppy disk itself could be damaged.
Tips and Notes
•
Depending on the computer’s BIOS/Setup settings, the floppy disk drive may be bootable,
e.g. for a DOS boot disk. However, this depends on the BIOS/Setup used. It may be neces-
sary to connect the drive directly to a USB port on the computer rather than to a USB hub.
• Please note that there are, generally speaking, two different types of USB ports:
a) Low power USB port
Can supply a max. current of 100 mA. This could be, for instance, a USB port on a hub without
its own power supply, e.g. on a USB keyboard.
This type of port is not suitable for connection to the floppy disk drive.
b) High power USB port
This can supply a current of up to 500 mA, for example a USB port on a hub with its own power
supply, or on a motherboard/computer (front and back).
This type of port is required for operating the floppy disk drive.
You can also, of course, connect the USB floppy disk drive to a USB3.0 port; these supply a
current up to 900 mA. However, a USB3.0 port will not make the floppy disk drive any faster.
Maintenance and Cleaning
The product does not require any maintenance and should never be disassembled for any
reason.
Before cleaning the device, remove the inserted floppy disk and disconnect it from the USB
connection.
Use a clean, dry soft cloth to clean the product. Do not use aggressive cleaning agents as these
can cause discolouration.
Do not press too strongly on the surface when cleaning, to prevent scratch marks.
Dust can easily be removed using a clean, long-haired brush and a vacuum cleaner.
Use special cleaning disks to clean the read/write head. However, this is only necessary when
the drive is used very frequently.
Disposal
Electronic devices are recyclable waste and must not be disposed of in the house-
hold waste. At the end of its service life, dispose of the product in accordance with
applicable regulatory guidelines. You thus fulfill your statutory obligations and con
-
tribute to the protection of the environment.
Technical Data
Connection ................................... min. USB2.0
System requirements .................... Windows
®
XP or later, MacOS X 10.7 or later,
Linux 3.5.3 or later
Floppy disk size ............................ 8.89 cm/3.5”
Type of floppy disk
........................ High Density (2HD) 1.44 MByte
Normal Density (2DD), 720 kByte
Dimensions (L x W x H) ................ 143 x 104 x 19 mm
Weight .......................................... 255 g (incl. cable)
Operating instructions
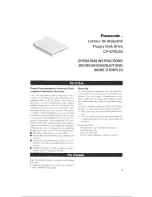
USB Floppy Disk Drive
Item no. 2377866
This is a publication by Conrad Electronic SE, Klaus-Conrad-Str. 1, D-92240 Hirschau (www.conrad.com). All rights in-
cluding translation reserved. Reproduction by any method, e.g. photocopy, microfilming, or the capture in electronic data
processing systems require the prior written approval by the editor. Reprinting, also in part, is prohibited. This publication
represents the technical status at the time of printing.
Copyright 2021 by Conrad Electronic SE. *2377866_v2_1121_02_dm_mh_en