08
Charging
z
LYCAN supports both AC charging and solar charging, which can be combined for a faster
charging speed.
z
The solar inverter charger is preset to operate with the batteries. While no additional programming is
required, some parameters can be modified for specific applications. Please note that modifying the
parameters outside the specified range can lead to irreversible damage to LYCAN and voids the warranty.
Please refer to the full user manual of LYCAN on renogy.com for more information.
AC Charging
STEP-3.1
AC OUTPUT
20A
SURCE
PROTECTION
AC INPUT
SOLAR INPUT
2
SOLAR INPUT
1
+
+
EXPANSION
20A AC Input
(Wall Outlet or Generator)
AC INPUT
20A
AC O
UTPUT
20A
AC/INV
SET
UP
DOWN
ENT
CHARGE
FAULT
AC O
UTPUT
30A
SOLAR 1
SOLAR 2
BATTER
Y
SURCE
AC OUTP
UT 20A
AC OUTPUT
30A
AC OUTPUT
30A
PROTECTIO
N
BLUETO
OTH
POWER
LINK
BT-2
Bluetooth Mo
dule
STEP-3.2
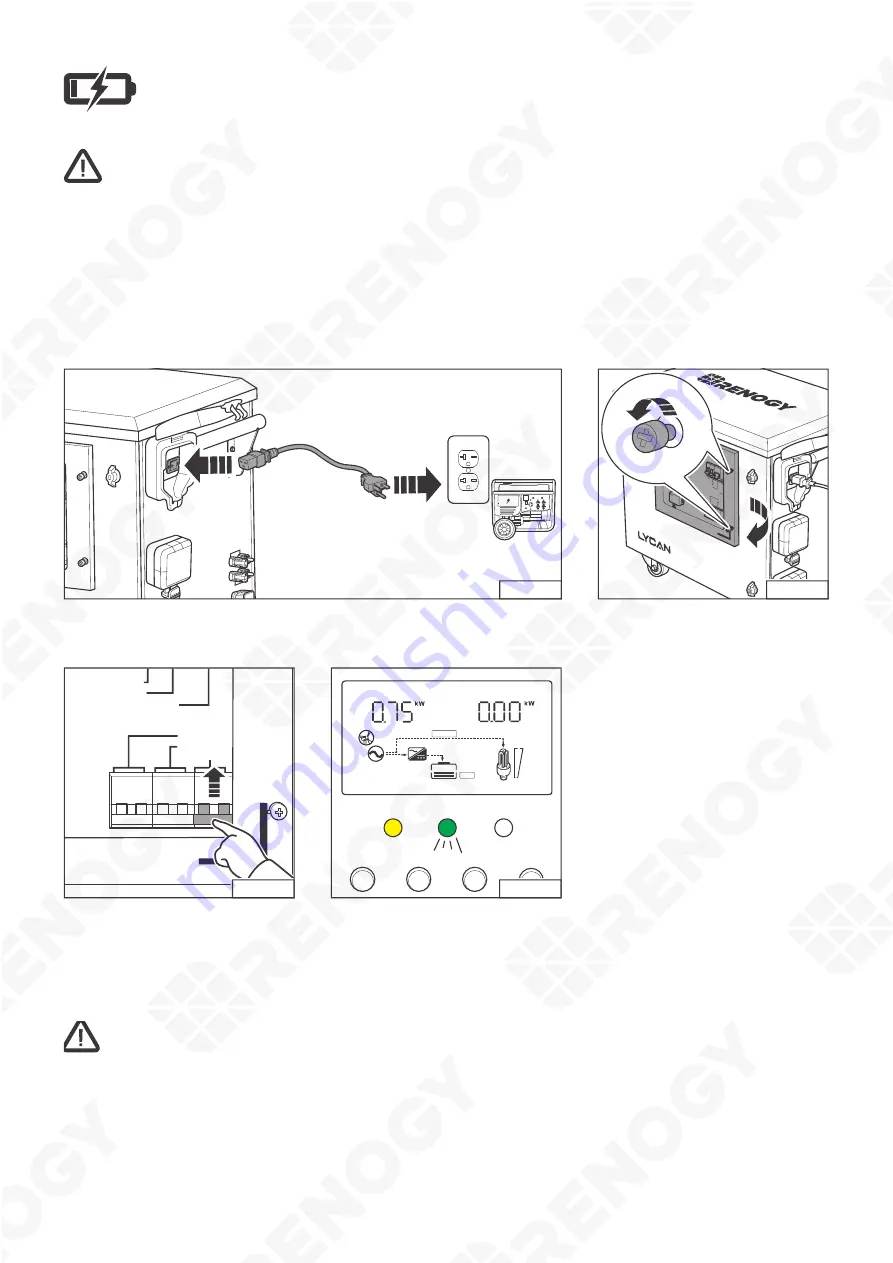
Connect LYCAN to a wall outlet or a generator (not included) with
the included IEC C19 to NEMA 5-20P Power Cable.
Loosen the captive screws to
open the Viewing Window.
SOLAR 1
SOLAR 2
BATTERY
SURCE PROTECTION
AC OUTPUT 20A
AC OUTPUT 30A
AC INPUT
STEP-3.3
CHARGE
FAULT
ENT
DOWN
UP
SET
AC/INV
CHARGING
LI
OUTPUTBATT
INPUTBATT
STEP-3.4
100%
25%
BYPASS
Push the switch up to close
the AC Input Circuit Breaker.
The Solar Inverter Charger Display
shows that the battery is being charged
by AC, and the Solar Inverter Charger
CHARGE Indicator flashes green.
z
The wall outlet and the outlet on the generator MUST be rated at 20A or greater.
z
Please close the Viewing Window and tighten the captive screws after completing the steps above.
z
Press the Solar Inverter Charger UP and DOWN Buttons to turn the page and view detailed
charging status. Please refer to the full user manual of 48V 3500W Solar Inverter Charger on
renogy.com for more instructions.


