background image

08

Note:

a. Please remove the isolation strip


from the battery when you use the 

remote control for the first time.

b. To prolong the battery life, remove the battery from the remote 

control when not in use for a long time.

c. The remote control can be magnetically attached to the device when 

not in use.

d. The LED light can only be controlled by the Heat button on the 

control panel of the calf massager.

Heated Area

Foot Bottom
Foot Bottom 
Foot Instep 

Indicator

The corresponding indicator


will be on.

Heat

Full
Bottom
Instep

See the tables below for details of the heat function of the foot 

massager, and air modes and battery level indicator of the calf 

massager.

Air Mode

Mode 1
Mode 2
Mode 3

Massage Area

Side+Rear
Side+Rear    Rear    Side+Rear    Side
Side

Indicator

The corresponding 

indicator will be on.

Battery 

Level 

Indicator 

Status

Working

In low battery

Charging
Fully charged 

Indicator

Solid white (the remaining battery level)
Flash white (the lowest battery level)

Flash white in sequence

Solid white, and will be off after 1 minute 

One white light on: battery ≤ 25%

Two white lights on: 25% 

 battery ≤ 50%

Three white lights on: 50% 

 battery ≤ 75%

Four white lights on: 75% 

 battery ≤ 100%

*Once the calf massager is well placed on the charging port on the 

foot massager and the power cord is connected to the power supply, 

the calf massager will be charged if not switched on. 

Summary of Contents for R-D002RS

Page 1: ...User Manual Model R D002RS Smart 2 in 1 Foot and Calf Massager...

Page 2: ...1 Important Safety Instructions 2 About the Product 3 Using the Product 4 App Guide 5 Charging 6 Maintenance and Cleaning 7 Troubleshooting Guide 8 Warranty Policy 9 Customer Service 01 04 09 11 18 19...

Page 3: ...ive capabilities or lack of experience and knowledge only if they have been given supervision or instruction concerning the use of the device in a safe way and understood the hazards involved DANGER T...

Page 4: ...culation on the feet 9 Persons with open wounds discolored areas or any part of the body that is swollen burned inflamed or where skin eruptions or sores are present 10 Persons had received cardiac or...

Page 5: ...Keep away from sharp objects to avoid scratching 12 Do not stand on or in the device Use only while being seated 13 Do not place excessively heavy objects on the device to avoid damage 14 Do not allow...

Page 6: ...he risk of blistering SAVE THESE INSTRUCTIONS 04 1 What s in the Box 1 RENPHO 2 in 1 Foot and Calf Massager 1 Remote Control 1 User Manual 2 Product Parameters Model R D002RS Input AC 100 240V 50 60Hz...

Page 7: ...ith Zipper Foot Massager Control Panel Charging Port Type C Charging Port Detachable Foot Cover with Zipper Tap to turn on off the foot massager only OR both the foot massager and calf massager if the...

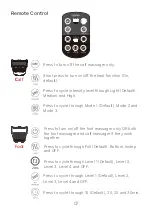
Page 8: ...ty level through Light Default Medium and High Press to cycle through Mode 1 Default Mode 2 and Mode 3 Once the pairing is successful its indicator will be on Charge the calf massager once the lowest...

Page 9: ...ead Intensity Heat OFF Intensity Mode Calf C Foot OFF Remote Control Knead Intensity Press to cycle through Level 1 Default Level 2 Level 3 Level 4 and OFF Press to cycle through 15 Default 20 25 and...

Page 10: ...on of the foot massager and air modes and battery level indicator of the calf massager Air Mode Mode 1 Mode 2 Mode 3 Massage Area Side Rear Side Rear Rear Side Rear Side Side Indicator The correspondi...

Page 11: ...oth the foot massager and calf massager 3 Select massage options pressing the corresponding buttons on the control panel or remote control according to your preference If the calf massager and foot ma...

Page 12: ...er 3 Select massage options pressing the corresponding buttons on the control panel or remote control according to your preference 4 Tap the Power button on the control panel of the foot massager or p...

Page 13: ...turn it on or it is in DIY mode before switching off 2 Calf massager The calf massager will recall the last settings once turned on again However the calf massager will go back to the default settings...

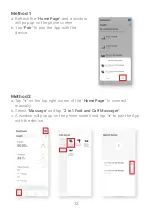
Page 14: ...hone screen b Tap Pair to pair the App with the device Method 2 a Tap on the top right corner of the Home Page to connect manually b Select Massage and tap 2 in 1 Foot and Calf Massager c A window wil...

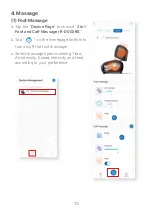
Page 15: ...in 1 Foot and Calf Massager R D002RS b Tap on the homepage bottom to turn on off the foot massager c Select massage options among Time Air Intensity Knead Intensity and Heat according to your prefere...

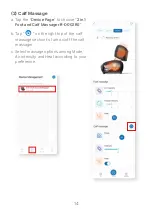
Page 16: ...oose 2 in 1 Foot and Calf Massager R D002RS b Tap on the right top of the calf massage section to turn on off the calf massager c Select massage options among Mode Air Intensity and Heat according to...

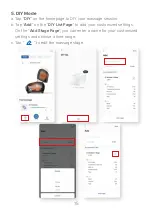
Page 17: ...to DIY your massage session b Tap Add on the DIY List Page to add your customized settings On the Add Stage Page you can enter a name for your customized settings and choose a time range c Tap to edit...

Page 18: ...dited stage e Tap Apply to experience the DIY mode f If you want to exit the DIY mode tap Exit the current mode Edit the massage stage Note a If both the foot massager and calf massager are connected...

Page 19: ...er of the homepage to enter a name for your favorite settings and confirm c Tap Favorites on the homepage to view your favorite list and tap Apply to start your favorite massage session 6 Favorite Set...

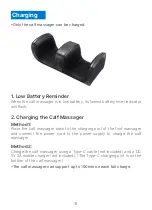
Page 20: ...rging port of the foot massager and connect the power cord to the power supply to charge the calf massager Method 2 Charge the calf massager using a Type C cable not included and a DC 5V 2A mobile cha...

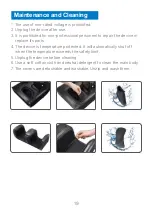
Page 21: ...he device or replace its parts 4 The device is temperature protected It will automatically shut off when the temperature exceeds the safety limit 5 Unplug the device before cleaning 6 Use a soft cotto...

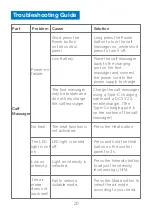
Page 22: ...ton The LED light is not on LED light is turned off Press and hold the Heat button on the control panel for 3s The foot massager may be broken and do not help charge the calf massager Charge the calf...

Page 23: ...work well Fail to adjust the kneading intensity to a suitable level Press the Kneading Intensity button to select an intensity level according to your need Bluetooth connection failure App operation...

Page 24: ...the App in an environment with good Internet access Slow app loading Tap too quickly Re tap later Page bounce Describe the problem in detail Write down the problem in the Feedback on the App or conta...

Page 25: ...h the product warranty Please feel free to contact us if you have any questions or concerns RENPHO Customer Service Team guarantees a quick response and hassle free solutions to any issue you may have...

Page 26: ...wever there is no guarantee that interference will not occur in a particular installation If this equipment does cause harmful interfer ence to radio or television reception which can be determined by...

Page 27: ...deux conditions suivantes 1 l appareil ne doit pas produire de brouillage et 2 l utilisateur de l appareil doit accepter tout brouillage radio lec trique subi m me si le brouillage est susceptible d...

Page 28: ...ORATION 14129 The Merge Street Building 3 Unit A Eastvale CA 92880 Manufacturer Shenzhen Ruiyi Business Technology Co Ltd Qianhai Complex A201 Qianwan Road 1 Qianhai Shenzhen Hong Kong Cooperation Zon...

Page 29: ...98 135mm 128g...

Reviews: