background image

20

en

Fixscreen

® 

100


EVO

 Solar

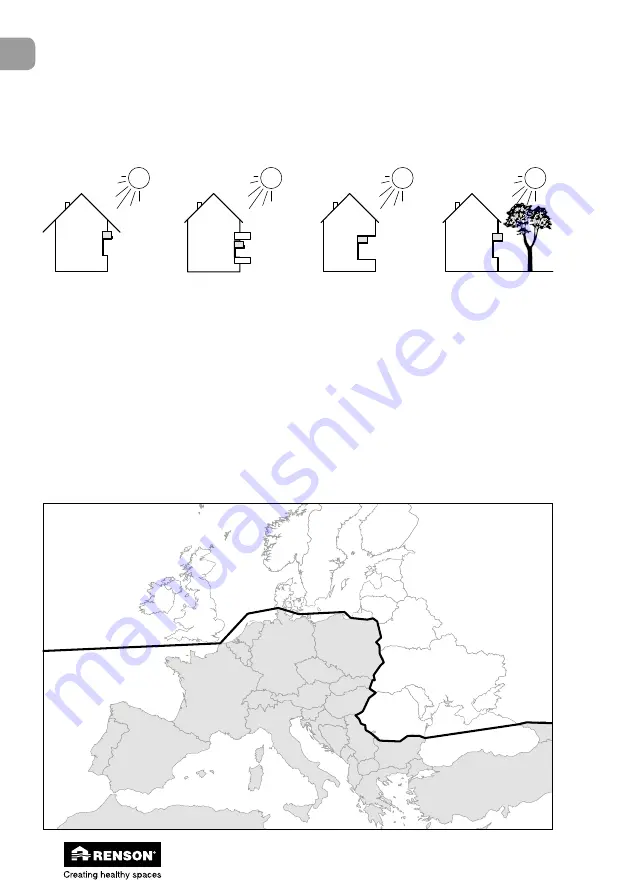
Caution:

Never install the solar panel behind glass, or in the shade. Always leave the photovoltaic cells 

unobstructed, do not put anything in front of them. Make sure never to let snow accumulate on the 

solar panel, and that its photovoltaic cells are not covered by snow, leaves, overhangs, etc.
Caution for:

Specific safety advice for the solar panel

1)  Never pierce the solar panel or its bracket.

2)  Never put anything onto the solar panel (risk of scratching or breakage), especially during 

installation.

3)  Never apply any product that might filter the sun’s rays (such as paint) to the solar panel’s 

photovoltaic cells.

Using zone

Any usage outside of applications defined by Renson constitutes non-compliance, and is therefore 

not covered by the guarantee. In this event, as for all usage not consistent with the instructions 

in the installation manual, Renson accepts no responsibility for harm or damage and the optimal 

functioning cannot be guaranteed.

MOLDOVA

PORTUGAL

S  P  A  I  N

F R A N C E

UNITED

KINGDOM

IRELAND

G E R M A N Y

I  T  A  L  Y

AUSTRIA

HUNGARY

C R O A T I A

BOSNIA and

HERZEGOVINA

R O M A N I A

B U L G A R I A

GREECE

U K R A I N E

P O L A N D

B E L A R U S

LITHUANIA

L A T V I A

ESTONIA

F I N L A N D

S W E D E N

N O R W A Y

DENMARK

SLOVAKIA

SERBIA

BELGIUM

CZECH 

REPUBLIC

NETHERLANDS

SWITZERLAND

SLOVENIA

MONTENEGRO

MACEDONIA

ALBANIA

T  U  R  K  E  Y

ICELAND

R  U  S  S  I  A

POSSIBLE

NOT POSSIBLE

Large roof 

overhangs

Balconies

Deep 

overhangs

Coverage by 

vegetation

Summary of Contents for Fixscreen 100EVO Solar

Page 1: ...Fixscreen 100EVO Solar Montagerichtlinien Installation instructions ...

Page 2: ...Montage bei Einbauweise 1 5 5 Technische Merkmale 9 5 1 Technische Merkmale des Motors 9 5 2 Technische Merkmale des Solarpanels 9 5 3 Technische Merkmale der Batterie 9 6 Endabstellung 10 6 1 Somfymotor 10 7 Endkontrolle der Screen 11 8 Wartung 12 9 Einstellung Produkt 13 Inhaltsverzeichnis ...

Page 3: ...nd einer patentierten verschleißfesten PVC Seitenführung Endschiene mit zusätzlicher Last die eine reibungslose Führung des Tuchs beim Auf und Abrollen gewährleistet Kontrollieren Sie die Verpackung 2 Montageart Es gibt 1 Einbauweise fur die Fixscreen 100EVO Solar Richtung der Entnahme der Tuchwelle Einbauweise 1 Vorbauzeichnung Mauerwerk Square design Vorbau vor dem Fenster mit vollständig fertig...

Page 4: ...hiene demontiert werden 3 Befestigung des Kastens Für eine sichere Montage Wartung und Benützung Ihrer Senkrechtmarkise sollen die Sicherheitsvorschriften nicht auf Leitern arbeiten Sicherheitskleidung und Sicherheitsschuhe trägen berücksichtigt werden Achtung Entfernen Sie beim Fixscreen 100EVO Solar EW1 erst nach der Montage die Schutzhülle von der Solarzelle Nehmen Sie den Kasten und legen Sie ...

Page 5: ...en sitzen Verwenden Sie einen Sechskantschlüssel 3 um die Vorderseite der Seitenführung zu demontieren Unten an den Führungen vermeidet eine Kunststoff Abdeckplatte dass die Kunststoff Führung nach unten fällt Steht die Führung unten auf einer horizontalen Oberfläche dann darf diese Abdeckplatte entfernt werden Beim Fixscreen 100EVO Solar EW1 ist ein Anschluss ans Stromnetz nicht erforderlich 1 2 ...

Page 6: ...e darauf dass die so nah wie möglich in der Ecke Oberseite des Kastens geschraubt wird um jeden Kontakt zwischen dem Tuch und dem Schraubenknopf zu vermeiden Bei einer Breite 3 m ist eine zusätzliche Befestigung des Kastens in der Mitte notwendig Die Sicherung erfolgt an den Enden der Kassette so dicht wie möglich an den Seitenkonsolen und in der Mitte der Breite Verwenden Sie Unterlegscheiben für...

Page 7: ...5 Schieben Sie das Tuch in die innere Seitenführung Überprüfen Sie ob das Tuch ungehindert und ohne jegliche Spannung in die Kunststoffseitenführungen gleitet Achten Sie darauf dass Sie die gute Richtung der Seitenführungen respektieren Die V Aussparung in der PVC Seitenführung muss sich auf der Oberseite befinden die Stanzung für den Klicker auf der Unterseite 6 Verbinden Sie das Motorkabel mit d...

Page 8: ...lung filtern können z B Farbe Geografischer Einsatzbereich Jede Verwendung die nicht dem von Renson bestimmten Anwendungsbereich entspricht gilt als nicht bestimmungsgemäß Im Falle einer nicht bestimmungsgemäßen Verwendung wie auch bei Nichtbefolgung der Hinweise in unserer Anleitung entfällt die Haftung und Gewährleistungspflicht von Renson und kann das optimales Funktionieren nicht gewährleistet...

Page 9: ... max Anzahl Drähte des Kabels 2 Drähte 1 Konnektor Temperaturbereich Wirkung Lagerhaltung 20 70 C extreme Temperaturen verursachen eine schnellere Entladung und Verbrauch der Batterie Maximale Ladedauer 3 Std 30 Min Schutzart IP X4 außerhalb Konnektor IPX1 Maximale Lagerungsdauer vor dem ersten Laden 6 Monate bei 20 C Nach dieser Lagerungszeit ist die Batterie tiefentladen 5 2 Technische Merkmale ...

Page 10: ...unkt Wurde von Renson eingestellt wobei die Endschiene inkl Abdichtungslippe nicht mehr sichtbar ist Eine Endabschaltung muss aber vom Installateur noch eingestellt werden Abschaltung unterer Endpunkt Der untere Endpunkt wurde eingestellt bis zu 400 mm von der Kassettenunterseite Stellen Sie siese Position aufs Neue ab bis zur Unterseite der Screen beachten Sie hierzu 10 mm Spiel für die Abdichtun...

Page 11: ...terlagen zur Einstellung des Motors Achten Sie darauf die untere Position so einzustellen dass sie 10 mm vor dem Ende der Seitenführung liegt damit das Tuch richtig unter Spannung bleibt Kontrollieren Sie ob alle Schrauben Bolzen und Muttern richtig festgezogen sind Rollen Sie das Tuch mehrmals auf und ab um eine einwandfreie Funktion sicherzustellen H1 H2 D1 D2 Bevor Sie den Motor anschalten bitt...

Page 12: ...l Veidec Dry Lube G6002790 Nach der Reinigung entfernen Sie Zweige und Blätter können Schiebehülsen mit einem Trockenschmiermittel geschmiert werden Überprüfen Sie regelmäßig ob das Produkt nicht durch Gegenstände wie Zweige Blätter Vogelnester usw verschmutzt ist entfernen Sie diese Halten Sie das Produkt in einem guten Zustand Als Hersteller empfehlen wir Ihnen das Produkt regelmäßig von Ihrem I...

Page 13: ...sollen Sie die Installation spannungslos machen Materialien sollen getrennt werden bei der Vernichtung des Produktes Brennbare Materialien sollen von nicht brennbaren Materialien getrennt werden bei der Vernichtung des Produktes Das Solarpanel unter keinen Umständen zum Hausmüll geben Entsorgen Sie das Solarpanel über eine Sammelstelle oder eine entsprechend zugelassene Stelle damit es ordnungsgem...

Page 14: ...17 5 Technical specifications 21 5 1 Technical specifications of the motor 21 5 2 Technical specifications of the solar cell 21 5 3 Technical specifications of the battery 21 6 Motor adjustment upper lower limits 22 6 1 Somfymotor 22 7 Final check of the screen 23 8 Maintenance 24 9 Discard of the product 25 Table of contents ...

Page 15: ...il A bottom bar with extra load which guarantees a fluent guidance of the fabric during rolling up and rolling down Please check if all parts are included in the packaging 2 Installation method There is 1 installation method for the Fixscreen 100EVO Solar Direction removable fabric roller Installation method 1 Surface mounted drawing masonry Square design Surface mounted in front of the window wit...

Page 16: ...lace the box on a mobile workbench Demount the cover plate from the box by unscrewing 2 screws on both ends of the box Detach the connector from the motor cable Remove the shield plate for the cable by unscrewing the screws In the box you will find 2 guiding pieces at each end of the fabric roller fixed with a couple of screws Unscrew them at both ends Pull the slides out of the box without twisti...

Page 17: ...Use an Allen key type 3 for unscrewing the front part of the side channel type G A plastic end cap at the base of the side channel type G prevents the HPVC side channel from sliding down This end cap can be removed if the rail is resting on a horizontal surface With the Fixscreen 100EVO Solar IM1 no connection to the mains power supply is required 1 2 ...

Page 18: ...ecure the box as close as possible at the groove In case of a width 3 m extra fixation of the box in the middle is obligatory The fixation needs to be done on the extremities of the box as close as possible towards the side brackets of the box and in the middle of the width of the screen Use counter sunk screws to seal the box 4 The holes are pre drilled sequential over a distance of 250mm Allow a...

Page 19: ...er left and right into the slides simultaneously 5 Slide the fabric into the internal HPVC channel Check if the side channels are facing the right direction The V cut out is positioned at the top of the side channel and the clicker is positioned at the bottom of the side channel Connect the cable from the motor to the connector in the front cover Make sure the hook is attached correctly Close the ...

Page 20: ... zone Any usage outside of applications defined by Renson constitutes non compliance and is therefore not covered by the guarantee In this event as for all usage not consistent with the instructions in the installation manual Renson accepts no responsibility for harm or damage and the optimal functioning cannot be guaranteed MOLDOVA PORTUGAL S P A I N F R A N C E UNITED KINGDOM IRELAND G E R M A N...

Page 21: ...Number of wires of the cable 2 wires 1 connector Temperature range working storage 20 70 C extreme temperature may lead to a faster battery discharge and use Charging time with Oximo WF charger 3 5 hours System of protection IP X4 except connector IPX1 Max storage time before first charge 6 months at 20 C After storage for this period there is a risk that the battery may be completely discharged 5...

Page 22: ...t The upper end point is adjusted in the factory of Renson The bottom bar including sealing strip will no longer be visible Adjust the upper end point for end use Adjusting lower end point The lower end point is adjusted at 400 mm from the bottom of the box Adjust the lower end point completely until the bottom of the screen with a margin of 10 mm for the sealing strip The adjustment depends of th...

Page 23: ...sition see documents on motor adjustment Make sure to set the lower end point at a 10 mm from the end of the side channels so the fabric remains at the correct tension Check if all screws bolts and nuts are firmly tightened Roll the screen up and down several times to ensure proper operation H1 H2 D1 D2 Before starting the motor check if the set up is square The diagonals D1 and D2 and parallels H...

Page 24: ...can be lubricated with a dry lubricant Veidec Dry Lube G6002790 Frequently control your product on twigs leaves bird nests ets and remove them Maintain the product as a good keeper As the manufacturer we recommend having a regular technical inspection by your installer Annually at public utility building and at your private home Always use original parts from the manufacturer Important to know The...

Page 25: ... station If you demount your screen it should be tensionless The materials should be separated by the product s destruction Combustible materials should be separated from non combustible materials by the product s destruction Never throw out the solar panel with domestic waste Please take the solar panel to a collection point or an approved centre to ensure that it is recycled ...

Page 26: ...26 Fixscreen 100 EVO Solar ...

Page 27: ...27 Fixscreen 100 EVO Solar ...

Page 28: ...otection Renson headquartered in Waregem Belgium is a trendsetter in Europe in natural ventilation and sun protection Creating healthy spaces From 1909 we ve been developing energy efficient solutions assuring a healthy and comfortable indoor climate Our remarkable headquarters built according to the Healthy Building Concept is a beautiful example portraying our corporate mission No speed limit on...

Reviews: