background image

Anchoring Procedure - Unit must be staked down securely. 

IMPORTANT INFORMATION TO CONSIDER 

PRIOR TO BEGINNING ANCHORING PROCESS. 

- Use only grass or soft surfaces for setup. Inflatable unit shall not be set-up over concrete,

carpet, asphalt, packed earth or any other hard surfaces.

- Have all underground utility lines properly located in order to avoid coming into contact

with them when driving stakes. You may contact the utility companies for assistance

in locating the utility lines.

- Communicate with the property owner and ensure that there are no underground

irrigation pipes or other utilities that have been recently installed or modified.

EACH ANCHOR POINT REQUIRES A MINIMUM HOLDING CAPACITY OF 100 LBS 

..  OFWEIGHT.

- The inflatable unit must be securely anchored to the ground before use.

- Locate the Tie Down Straps and Anchor Point at the bottom of the unit.

- Extend Anchor Straps to the ground and using the 18

11 

stakes provided by the manufacturer

secure the unit.

- Drive the stakes down in a 90 degree angle through the D-Rings at the end of the straps.

- Before driving-in stakes, be sure that no utilities and/or irrigation lines are located near the area.

SANDBAGS AND/OR WATERBAGS MAY BE USED INSTEAD OF STAKES AS LONG AS 

..  EACH ANCHORPOINT MAINTAINS A MINIMUM HOLDING CAPACITY OF 100 LBS.

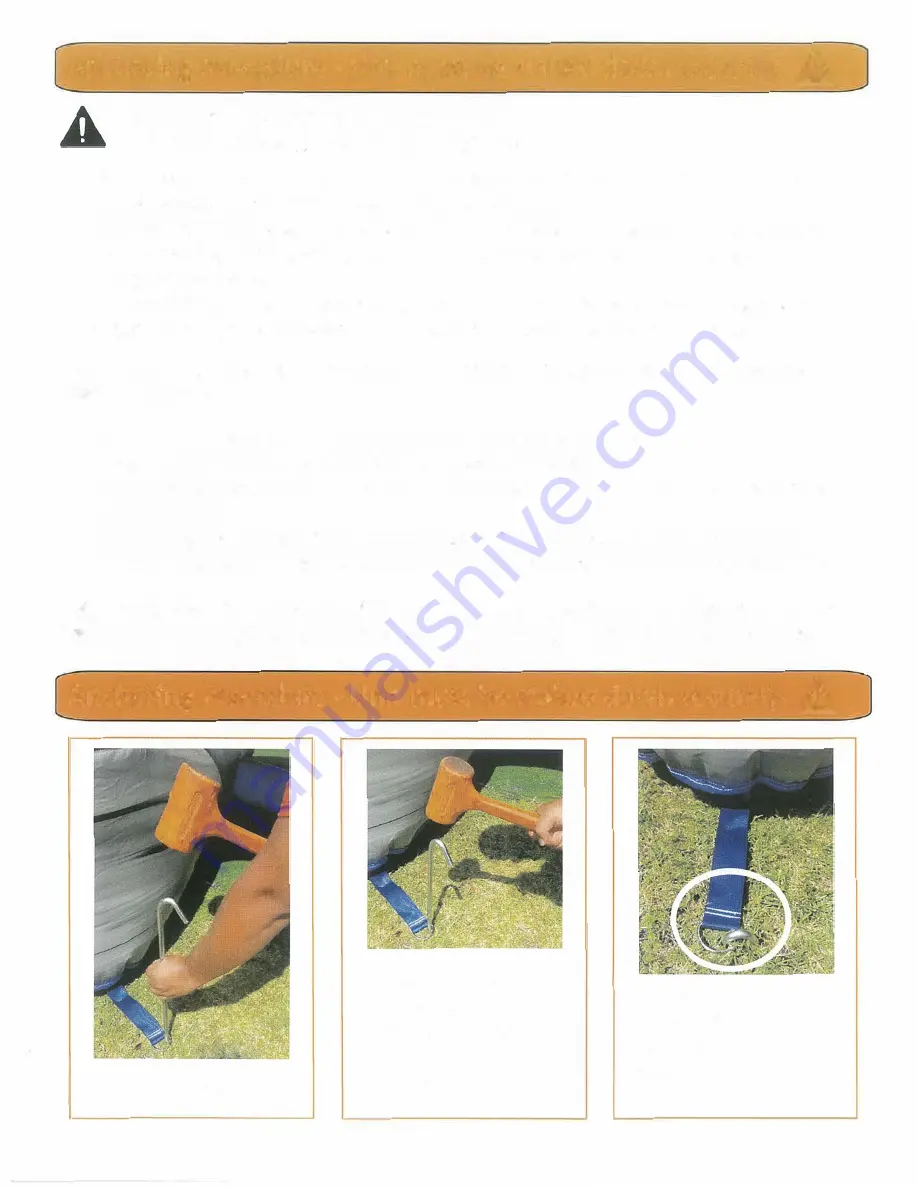
Anchoring Procedure - Unit must be staked down securely. 

1. Locate Anchor Point.

2. Drive the stakes down

in a 90 degree angle

through the D-Rings.

Be sure not to hit any

utility lines.

3. Drive stake all the way

as shown in the figure

above. This is the most

effective way to anchor

the unit.

Summary of Contents for 6514-0001

Page 1: ... LED SIDE GAME TIC TAC TOE DRINKING GAME JC GMlOSD Size t9 L X 9 w X lO H RC 6514 0001 0002 Multiplex Round Soccer Dart Inflatable Game Multi Use Inflatable Game Soccer Darts Baseball Banner Toss Tic Tac Toe and Drinking Game Side Games Tic Tac Toe Drinking ...

Page 2: ...Beaufort Wind Speed Seaman sTerm Number mph Under 1 Calm 1 1 3 Light Air 2 4 7 Light Breeze 3 8 12 Gentle Breeze 4 13 18 Moderate Breeze 5 19 24 Fresh Breeze 6 25 31 Strong Breeze 7 32 38 Moderate Gale 8 39 46 Fresh Gale 9 47 54 Strong Gale 10 55 63 Whole Gale 11 64 72 Storm 12 73 or higher Hurricane Force Graphic Description fh Fl R h l g Pr c c 2 E _ ii c _ c _ c c _ c _ Effects on Land Calm smo...

Page 3: ... no underground irrigation pipes or other utilities that have been recently installed or modified It is recommended that locations immediately adjacent to all areas of access egress of the inflatable device shall have use zones which are free of obstacles and covered with impact attenuating surfaces Installation must be done over level surfaces ONLY Selected location must have NO SLOPE Keep a dist...

Page 4: ...use the blower with any solid state speed control device to reduce risk of fire or electrical shock Do not direct air stream at face or other body parts to avoid risk of injury This product is intended for outdoor use ONLY Always unplug the blower before servicing Do not operate the blower with a damaged cord or plug A CAUTION KEEP BLOWER AWAY FROM WATER TRAFFIC AND CHILDREN THIS BLOWER IS A HIGH ...

Page 5: ...G CAPACITY OF 100 LBS OFWEIGHT The inflatable unit must be securely anchored to the ground before use Locate the Tie Down Straps and Anchor Point at the bottom of the unit Extend Anchor Straps to the ground and using the 1811 stakes provided by the manufacturer secure the unit Drive the stakes down in a 90 degree angle through the D Rings at the end of the straps Before driving in stakes be sure t...

Page 6: ...g the blower into a properly grounded GFCI outlet switch power ON Unit will inflate in minutes A WARNING Blower must be running continuously during use ofinflatable unit Air escaping through the seams is normal air escaping is what makes your unit bouncy 2 Make sure you have at least 7ft 2 lm obstacle free layout zone around this unit A WARNING 4 Prevent children from coming near the blower a trai...

Page 7: ...hem up 2 Make two half folds to the middle and walk around to remove air 6 This is a heavy unit be sure to ask for assistance when moving and lifting 3 Press down the collapsing pool wall to drain the water 7 Take off the shoes before stepping on the unit 3 Fold in the half folds and walk around removing remaining air 3 Place unit back inside storage bag to protect it 4 Lift the velcro flap to in ...

Reviews: