90
Primary Knob
O-ring
Incorrect
Correct
For more rotary tying techniques ask your retailer for the
Renzetti rotary tying tips video.
Jaw adjusting
Screw
Jaw adjusting
Screw
Cam
Cam
Centerline
Centerline
Cradle
Centerline
02/17/2016 C220XB
Improper hook placement will
damage jaws and voids warranty.
Hook Placement In Jaw
Rotary head
Rotary shaft
Detail 9
End Cap
Crank arm
Rotary tension screw
Detail 10
Detail 2
Detail 3
Detail 4
Jaw Gap
Rotary Tension Adjustment
If desired you can change the amount of drag
against the rotary motion of your vise.
refer to detail 9.
1. Hold the rotary shaft and the primary knob
in one hand.
2. With the other hand loosen the end cap
knob a little bit.
3. Either tighten the primary knob to increase
tension or loosen the knob to decrease tension.
4. Again hold the rotary shaft and the
primary knob in one hand and tighten the
end cap
5. Use the rotary tension screw to add rotary
tension or to stop rotation.
1: When applying dubbing remember to use your rotary action, this allows
you to always be in contact with the area you are wrapping.
2. The secret to palmering a hackle by rotary is the half hitch. After tying in
the hackle, wrap your thread to the point at which you wish to stop the
hackle. Then apply a half hitch. Hang the bobbin from the bobbin cradle.
As the hackle is palmered the thread will roll with the hook. At the end of
the palmer let your hackle pliers hang. Pick up the bobbin, swing the
cradle out of the way and tie off the hackle.
3. Remember that a rotary vise makes all sides of your fly viewable by
rotating the vise.
Tips on True Rotary Tying
Maximum Suggested Clamping Position
Excessive Clamping
Jaw Mounting
Screw
For the complete line of Renzetti products and accessories.
Please visit our website.
www.renzetti.com
or
www.truerotary.com
Cam
Centerline
Rotary shaft
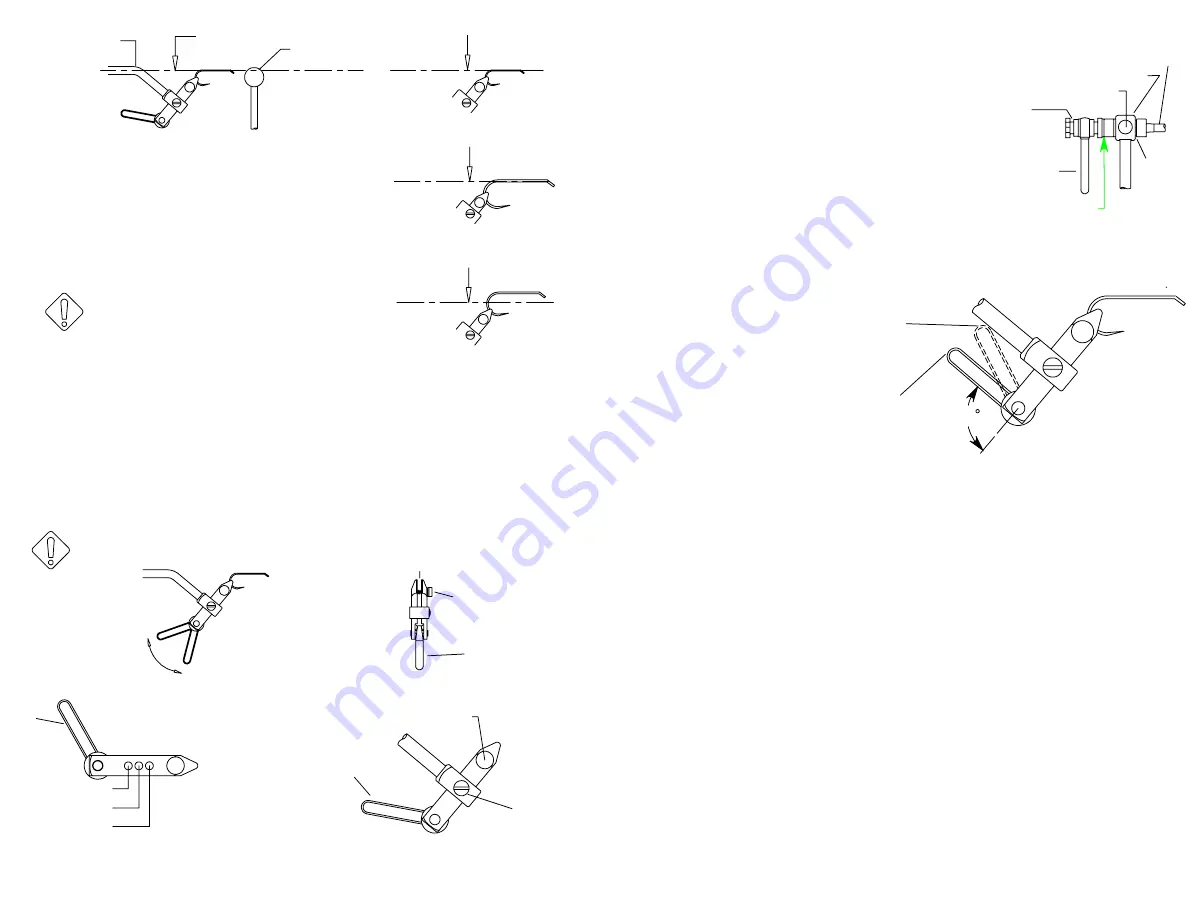
1 The most important step of rotary tying is proper
positioning of the hook in the jaw.
Always place the hook in the jaw so that the shank
of the hook rotates on the center line of the rotary
shaft as shown in detail 1.
2. As hook size increases be sure to place the hook
deeper in the jaws as shown in detail 2 and detail 3.
3. Never try to hold the hook at the extreme tip of the
jaw asshown in detail 4. This practice will cause
premature failure of the jaw clamping faces.
Detail 1
Clamp
Detail 5
1. Start w/ cam handle in release position as shown in detail 5. (note: cam handle may need to be
positioned further forward to allow for larger hook sizes.)
2. Use the jaw adjusting screw to adjust the gap until the desired hook just slips into the jaws. See
detail 6.
3. To clamp the hook, swing the cam to the clamp position. See detail 5.
Note: If the cam does not come up to the clamp position, loosen the jaw adjusting screw a little
and reclamp the hook. Repeat this procedure until the cam locks the hook in the correct position.
Note: There is no need to exert excessive force on the cam. Simply clampthe hook and test to see
if it moves. If it does slip, readjust the jaw setting screw.
Setting The Jaw Gap
NOTE: Over clamping will cause damage to the jaws.
Detail 8
Release
Jaw Adjustment
Position 1
Position 2
Position 3
Detail 7
Correct
Detail 6
The jaws of your traveller vise can be moved to any one of three positions
to accomodate hook sizes 28 to 4/0. Position 1 is for hooks 28-16, Position
2 is for hooks 16-2, Position 3 is for hooks 2-4/0. Refer to detail 7. To change
positions remove the jaw mounting screw and slide the jaw to the desired
position. Replace the jaw mounting screw and tighten. Refer to detail 8.
O-ring


