LP3-500 Owner’s Manual | 17
TANK LEVEL FLOAT CONTROL SWITCH
(optional feature)
For use with an atmospheric storage tank application
1.
Install Tank Level Float Control Switch in the
atmospheric storage tank using the directions that
came with the Float Switch.
2.
Remove the covers from both the Inlet Low Pressure
Switch and the Product Water Pressure Switch by
loosening the locking screws, tilting the covers away from the screw and lifting them off.
3.
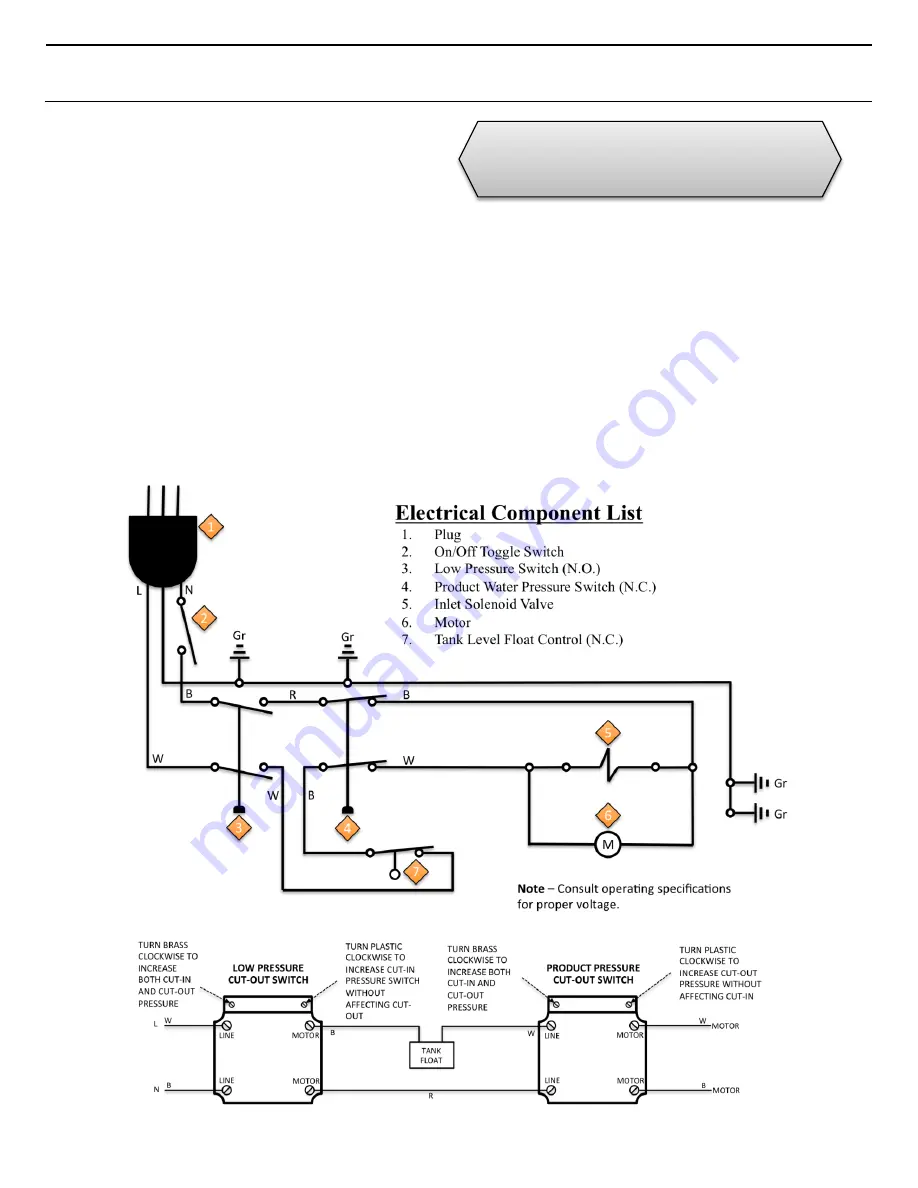
Locate and remove the RED jumper wire between the upper MOTOR terminal on the Inlet Low Pressure Switch and the
upper LINE terminal on the Product Water Pressure Switch.
4.
Remove approximately 6” of the Tank Level Float Control Switch cord jacket.
5.
Loosen the cord grip screw on the cable connector on the Inlet Low Pressure Switch and bring the Tank Level Float
Control Switch cord into the switch along side the power cord.
6.
Connect the BLACK wire from the Tank Level Float Control Switch cord to the upper MOTOR terminal on the inlet Low
Pressure Switch. Pull the WHITE wire from the Tank Level Float Control Switch cord through the chase nipple between
the two switches and connect it to the upper LINE terminal on the Product Water Pressure Switch. The use of #8 x
16/14GA insulated fork terminals is recommended. Securely tighten the terminal screws to insure good connection.
7.
Tighten the cord grip screw on the cable connector on both cords. Reinstall the covers on the pressure switches and
tighten the locking screws.
8.
Connect the power to the Reo-Pure system. Follow the Start-Up procedures found in the Reo-Pure R.O. System
Installation, Operation and Maintenance Manual.
9.
The Tank Level Float Control Switch will now start and stop the Reo-Pure R.O. System based on the level in the
atmospheric storage tank.
CAUTION
– DISCONNECT ALL POWER
FROM THE REO-PURE SYSTEM BEFORE
PROCEEDING.


