background image


KrosFlo® TFF System 

 Auxiliary Scale ACSS-20K 

User Guide 


29          repligen.com           420-14871-001 Rev. 00   

5.


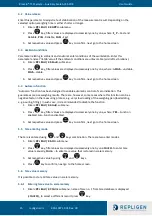
Load the weighing pan with an animal. 

6.


On exceeding the set mass value of 

<Lo threshold>

 parameter, animal weighing starts, this is 

signaled with display of ‘dash’ 

<-     >

.   

7.


Upon process completion, mass value of an animal is snapped and displayed together with 

OK

 pictogram in the upper part of the display. The snapped mass value is sent to a scale-

connected printer.   

8.


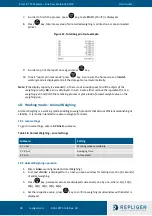
Press 

 key to restart animal weighing. 

9.


Press 

 key to reprint the snapped mass value. 

10.


Upon unloading of the weighing platform, the weighing result window with letter 

A

 is 

displayed. The scale can be loaded with an animal again.   


19.


Maintenance 

In order to ensure safety in the course of cleaning, it is necessary to disconnect the device from the 
mains. With this condition met, uninstall the weighing pan and other detachable scale components. 
 

Note:

 Cleaning the weighing  pan while still installed may cause damage of the measuring system.  


19.1


Cleaning ABS components 

To clean dry surfaces and avoid smudging, use clean non-coloring cloths made of cellulose or cotton. 
You can use a solution of water and detergent (soap, dishwashing detergent, glass cleaner). Gently 
rub the cleaned surface and let it dry. Repeat cleaning process if needed. 
 
In the case of hard to remove contamination, e.g. residues of adhesive, rubber, resin, polyurethane 
foam etc., you can use a special cleaning agent based on a mixture of aliphatic hydrocarbons that do 
not dissolve plastics. Before using the cleanser for all surfaces, we recommend carrying out tests. Do 
not use cleansers containing abrasive substances. 
 

19.2


Cleaning stainless steel components 

Avoid using cleansers containing any corrosive chemicals, e.g. bleach (including chlorine). Do not use 
cleansers containing abrasive substances. Always remove the dirt using microfiber cloth to avoid 
damage of protective coating. 
 
In case of a daily maintenance: 


Remove the dirt using cloth dipped in warm water. 


For best results, add a little bit of dishwashing detergent. 


19.3


Cleaning aluminum components 

While cleaning aluminum components use products acid by nature, e.g. spirit vinegar, lemon. Do not 
use cleansers containing abrasive substances. Avoid using hard brush, this may cause scratches. It is 
recommended to use microfiber cloth. 
 
While polishing the surface use circular movements. Use clean, dry cloth to make the surface shine. 


Summary of Contents for ACSS-20K

Page 1: ...1 420 14871 001 Rev 00 KrosFlo TFF System Auxiliary Scale Model ACSS 20K For use with KrosFlo KR2i Tangential Flow Filtration TFF System KrosFlo KMPi Tangential Flow Filtration TFF System User Guide ...

Page 2: ...erformance or use of this material No part of this document may be photocopied reproduced or translated to another language without the prior written consent of Repligen Corporation Products are not intended for diagnostic or therapeutic use or for use in vivo with humans or animals For further information please contact Repligen Corporation at www repligen com 2020 Repligen Corporation All rights...

Page 3: ...lease 15 5 3 Ambient conditions 15 5 4 Autozero function 15 5 5 Tare entering mode 15 5 6 Tare value memory 15 5 6 1 Entering tare value to scale memory 15 5 6 2 Selecting tare value from the scale memory 16 5 7 Last digit 16 6 1 RS232 1 port settings 16 6 2 USB A port 16 6 3 USB B port 17 7 1 Computer 17 7 1 1 Port 17 7 1 2 Continuous transmission 17 7 1 3 Printout interval for continuous transmi...

Page 4: ...ample mass by determining mass of a single part 24 14 1 Local settings 25 14 2 Declaring check weighing thresholds 25 15 1 Local settings 25 15 1 1 Working mode selection 26 15 2 Reference mass determined by weighing 26 15 3 Reference sample mass by determining mass of a single part 26 16 1 Local settings 26 16 2 Peak Hold operation 27 17 1 Local settings 27 17 2 Totalizing operation 27 18 1 Local...

Page 5: ... settings 25 Table 15 Percent Weighing Local settings 26 Table 16 Peak Hold Local settings 27 Table 17 Totalizing Local settings 27 Table 18 Animal Weighing Local settings 28 Table 19 Troubleshooting suggestions 31 Table 20 Error messages 31 List of figures Figure 1 KrosFlo TFF System Auxiliary Scale components 7 Figure 2 Auxiliary scale parts 7 Figure 3 Grounding spring check 8 Figure 4 Rubber fe...

Page 6: ...00 Abbreviations Acc Access CAL Calibration CdF Calibration difference Conn Communication CtP Calibration type dSh Dashed dAt Date ducE Peripheral devices Err Error Func Function InFo Information Int Interval Lo Low Othr Other Prnt Printouts rEAd Readout SiG Signature tin Time ...

Page 7: ...ing pan 1 General precautions Remove the contents from the packaging If a part is missing contact Repligen for replacement Prior to the first use carefully read this User Guide Use the device only as intended Scales to be decommissioned must be decommissioned in accordance with valid legal regulations 2 KrosFlo TFF System Auxiliary Scale Table 1 KrosFlo TFF System Auxiliary Scale parts Part descri...

Page 8: ...urces magnetic fields vibrations and air drafts to receive stable and repeatable results Balance is to not be used for explosive materials 2 1 System assembly 1 Check the grounding spring located in the rubber foot with spring The spring must jut slightly out of the hole Figure 3 Grounding spring check 2 Install the rubber foot with spring into any freely selected opening Install 3 x solid rubber ...

Page 9: ...just the feet until the air bubble takes the central position Figure 6 Leveling the scale 5 Prior to switching the balance on let it reach room temperature estimated stabilization time 1 8 hours 6 Connect the adapter cable DB9 M to the rear of the scale During this process there should be no load on the weighing pan Figure 7 Interface cable to scale connection 7 Connect the adapter cable DB9 F to ...

Page 10: ...ting instructions 2 2 1 Operational panel Figure 9 Auxiliary scale keypad Table 2 Auxiliary scale keys Key Function Press to switch the weighing device on off hold the key for about 1 second Function key press to change the working mode Press to send the weighing result to a printer or a computer Press to zero the scale Press to tare the scale ...

Page 11: ...eration related functions P8 InFo Scale information P9 Unit Units In order to navigate the auxiliary scales menu utilize the keypad Table 4 Auxiliary scale menu navigation Key Description Press to enter the main menu Press to Enter tare manually Enter tare from tare database Change value by 1 digit up Scroll the menu up Press to view date time Press to Scroll the menu down Change current parameter...

Page 12: ...maximum capacity If the zeroed value is greater than 2 of the maximum capacity then the scale displays message Err2 and short sound signal is heard 3 3 Taring 1 To determine the net weight value load the weighing pan with a package Wait for the stable indication and press key 2 The zero indication and the following pictograms are displayed Net and 3 The scale has now been tared Upon loading net ma...

Page 13: ...ounting and Percent Weighing modes are exceptions 3 4 1 Start unit 1 Enter P9 Unit 9 1 UnSt submenu 2 Press key available units are displayed successively one by one Available units are g gram kg kilogram ct carat lb pound 3 Select start unit and press key To return to home screen press key 4 Upon restart the scale runs with the set start unit 3 4 2 Temporary unit Temporary unit runs from the mome...

Page 14: ...30 of the maximum capacity value 2 Enter weight mass value and press key the text UnLoAd will be displayed 3 Remove any load from the weighing pan and press key 4 Mass of the empty weighing pan is determined this is signaled with display of dash 5 Text LoAd is displayed along with user inputted mass value i e 10000g 6 Load the required mass value press key 7 Weigh mass is determined this is signal...

Page 15: ... to enable automatic control of zero indication This guarantees precise weighing results There are however some cases where this function can be a negative factor in the measuring process e g very slow loading of the weighing pan load adding e g pouring filling In such case it is recommended to disable the function 1 Enter P2 rEAd 2 4 Aut submenu 2 Press key filter values are displayed successivel...

Page 16: ...ighing indication digit this results with less accurate measurement 1 Enter P2 rEAd 2 8 LdiG submenu 2 Press key filter values are displayed successively one by one where ALAS Last digit always on nEur Last digit always off and uuSt Last digit on only when the weighing indications is stable 3 Set respective value and press key to confirm next go to the home screen 6 Communication Communication bet...

Page 17: ... USbb USB type B 3 Set respective value and press key to confirm next go to the home screen 7 1 2 Continuous transmission 1 Enter P5 1 PC 5 1 2 Cnt submenu 2 Press key transmission options are displayed successively where nonE Continuous transmission disabled CntA Continuous transmission in basic unit Cntb Continuous transmission in current temporary unit 3 Set respective value and press key to co...

Page 18: ...ective value and press key to confirm next go to the home screen 8 Printouts 8 1 Calibration report P6 1 CrEP is a group of parameters allowing to declare variables that are to be printed on the calibration report printout Each variable allows for accessibility attribute YES print no do not print Calibration report is automatically generated at the end of each calibration process Table 6 Calibrati...

Page 19: ... a current unit 6 2 5 b Gross weight value in a current unit 6 2 6 CrS Current weighing result net weight in a current unit 6 2 7 CrP The last adjustment report generated in accordance with settings declared for the adjustment report printout Figure 11 GLP printout example 9 Miscellaneous parameters P7 Othr is a group of parameters enabling to customize scale operation 9 1 Backlight Parameter allo...

Page 20: ...ress key to confirm next go to the home screen 9 4 Date and time Parameter allowing to set current date and time and to specify date and time format Enter P7 Othr submenu and change the settings as desired Refer to the below table Table 8 GLP date and time printout variable list Submenu Description 7 4 SdAt Enter this parameter to set current date where the date format is YYYY MM DD 7 5 Stnn Enter...

Page 21: ...ts Counting control Percent Weighing Peak hold Totalizing Animal Weighing 11 1 Running working mode 1 Go to the home screen press key name of the first available working mode is displayed 2 Press key names of available working modes are displayed successively one by one 3 Enter selected working mode by pressing key to confirm Note The weighing device program has been designed to make the scale run...

Page 22: ... set mode of sending data from the weighing device to a peripheral device 1 Enter P3 Func menu and select a given working mode 2 Go to Snn function 3 Press key parameter values are displayed successively one by one where Table 11 Save mode options Option Description StAb Manual printout of stable weighing result Upon pressing key at the moment when the result is unstable no pictogram displayed the...

Page 23: ...ighing UUGG is a standard working mode to carry out the weighing operation along with record of the result to the database 12 1 Local settings To go to local settings enter 3 1 UUGG submenu Table 12 Weighing Local settings Submenu Setting 3 1 1 Acc Working mode accessibility 3 1 2 Snn Save mode 3 1 3 Int Time interval 3 1 4 Lo Lo threshold 13 Working mode Parts Counting Parts Counting is a working...

Page 24: ...rence sample mass by determining mass of a single part 1 Enter 3 2 PcS 3 2 2 UUt submenu set S_S value 2 Enter PcS working mode Parts Counting first text Set_Ut is displayed for 1s next you see a window for entering mass value of a single part 3 Press key to select one of the following options 10 10 pieces 20 20 pieces 50 50 pieces 100 100 pieces 0000 Custom reference sample quantity to enter requ...

Page 25: ...a window for declaring high weighing threshold Max 3 Enter respective value and press key for confirmation working mode s home screen is displayed along with the declared threshold value where Min Load mass lower than low weighing thresholds Ok Load mass within weighing thresholds Max Load mass greater than high weighing threshold Note If the entered low threshold value Min is greater than the hig...

Page 26: ...xt LoAd is displayed for 1s next you see weighing result window 3 Load the weighing pan with the reference sample When the indication is stable pictogram is displayed press key to confirm the mass 4 Mass of the weighed load is automatically set as reference sample mass the home screen is displayed along with 100 000 value 15 3 Reference sample mass by determining mass of a single part 1 Enter 3 4 ...

Page 27: ...Totalizing Totalizing is a working mode enabling to sum mass of all weighed ingredients and to print via scale connected printer the total mass value The pictogram allows to sum up to 30 weighing ingredients maximum within one process 17 1 Local settings To go to local settings enter 3 6 Add submenu Table 17 Totalizing Local settings Submenu Setting 3 6 1 Acc Working mode accessibility 3 6 2 Snn S...

Page 28: ...g pan and finish the totalizing process or place load of a lower weight value on the weighing pan 18 Working mode Animal Weighing Animal Weighing is a working mode enabling to weigh products that disrupt efficient establishing of stability It is mostly intended to measure weight of animals 18 1 Local settings To go to local settings enter 3 7 AnLS submenu Table 18 Animal Weighing Local settings Su...

Page 29: ...llulose or cotton You can use a solution of water and detergent soap dishwashing detergent glass cleaner Gently rub the cleaned surface and let it dry Repeat cleaning process if needed In the case of hard to remove contamination e g residues of adhesive rubber resin polyurethane foam etc you can use a special cleaning agent based on a mixture of aliphatic hydrocarbons that do not dissolve plastics...

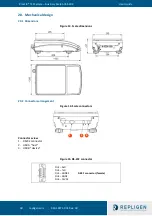
Page 30: ... 00 20 Mechanical design 20 1 Dimensions Figure 13 Scale dimensions 20 2 Connectors arrangement Figure 14 Scale connectors Connectors view 1 RS232 connector 2 USB A host 3 USB B device Figure 15 RS 232 connector Pin2 RxD Pin3 TxD Pin5 GNDRS Pin8 GNDZ Pin9 12VDC DB9 F connector female 1 2 3 ...

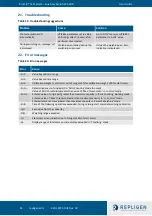
Page 31: ...e range Err 4 Calibration weight or start mass out of range 1 for calibration weight 10 for start mass Err Lo Determined mass of single part in Parts Counting mode too small Value of Min threshold is greater than value of Max threshold in control mode Err Hi Entered value of single part greater than maximum capacity in Parts Counting working mode Entered value of Max threshold greater than maximum...

Page 32: ...gen com 420 14871 001 Rev 00 23 Index Calibration 13 14 18 19 31 Connectors 30 Devices 11 16 17 Error 31 Good weighing practices 12 Installation 8 Maintenance 29 Note 14 16 21 24 25 26 28 29 Operating 11 Parameters 11 14 16 18 19 21 Precautions 7 Troubleshooting 31 ...

Reviews: