background image

23

22

Product Care

Important note:

 The person cleaning the chair 

should always

 use protective gloves to reduce 

the risk of infection transmission.

The Lynton is available in a range of fabrics.   Different fabrics will have different characteristics and 
cleaning instructions.  Always ensure that you follow the cleaning instructions for your particular 
upholstery which your supplier will be able to supply you with.  Repose cannot be held responsible 
for any damage caused by cleaning

Some general care tips:


Regular cleaning

 is required to maintain the appearance and cleanliness of your chair. Small dust 

and dirt particles can increase the wear and tear of the upholstery and may dull the fabric.

 Your 

upholstery should not be exposed

 to direct sunlight for long periods of time as this will 

cause your fabric to fade. If your furniture is positioned within prolonged light, ensure your curtains 
and blinds are drawn for protection.


Ensure

 your upholstery is protected from sharp objects or buckles as these may cause the fabric 

and/or upholstery to snag or become damaged. 


Avoid

 allowing pets onto your furniture as their claws may cause damage to the fabric and 

upholstery. All animals have a degree of oil in their coats which may transfer to your fabric if they 
go onto the chair. This will cause your fabric to wear prematurely.

 If you have fibre filled cushions regularly plump to avoid the fibres flattening.

• 

Do not 

dry clean or machine wash fabrics.

• 

Never

 apply chemicals, other than those recommended by your supplier, on the chair.

Recommended quality checks 

The chair should always be checked regularly for signs of damage or excessive wear and tear to 
ensure safe and reliable usage is maintained. 

Regular checks should include, but are not limited to:

• Damage to the cables.
• Any loose or detached parts.
• Damage to the handset.

• Damage to the transformer.
• Castors for damage or any build-up of fluff, dirt, or dust particles.
• Damage to the fabric of the chair.

Two years on mechanisms, electrics, frame and upholstery. One year on air seat cushions.

Repose will repair or replace, at our discretion and free of charge to the original purchaser, any 
parts covered by this warranty and which on examination, are found to be faulty in material and/ or 
workmanship. The warranty is for parts and labour. For full details of the warranty including return 
of faulty products, exclusions etc. please see visit our website.

Any products returned to Repose must be disinfected and should pose no health hazard.

Warranty exclusions

•  You continue to use the product after becoming aware of any faults.
•  The fault arises because you failed to follow instructions as to its storage, installation,  
   commissioning, use or maintenance.
•  Fabric damage resulting from misuse, negligence, abuse, accident or incorrect cleaning.
•  Unauthorised or incorrect repairs, alterations and modifications.
•  The fault arises, as a result of Repose following any specific drawing, design or specification  
   supplied by you.
•  Damage to the chair from misuse, negligence, abuse or accident.
•  Damage caused from normal wear and tear.
•  Damage caused by common carrier abuse or mishandling and any special, indirect, incidental and/ 
   or consequential damages.
•  Replacement of the battery if the battery is left to completely discharge.

Statutory rights 

Nothing contained in our Terms and Conditions nor in these guidelines shall affect the statutory 
rights of the customer.

Warranty claim

Please contact your supplier with your original purchase invoice and unique chair batch number and 
they will make the necessary arrangements with Repose. The batch number and supplier details are 
clearly visible on the mechanism.

Warranty

Batch Label

Fabrics and cleaning  

Summary of Contents for Lynton

Page 1: ...002 Email service reposefurniture com Calls cost 7p per minute plus your networks access charge Registered Company Number 03727157 Copyright 2021 Repose Furniture Ltd reserves the right to modify or change the specification without prior notification For terms and conditions of sale and or agreement please refer to your supplier Batch Number Supplier a company Lynton Users Manual ...

Page 2: ...NS SAFE as you will need them for reference purposes Technicians guide For supplier use only There is a Technicians Guide at the end of the manual for your chair supplier only pages 24 to 51 This guide is FOR USE ONLY BY AUTHORISED TECHNICIANS and not for users Making a supplier enquiry For any enquiries you will need to quote your unique batch number which can be found on the back of this user ma...

Page 3: ... be used to alter some of the chair dimensions to aid a client s postural requirements All of the following adjustments will be advised and made by your supplier Seat Width Adjustment Having the right seat width will support correct pelvic positioning and stability as well as reducing any pressure areas especially around the hip joint Always allow adequate room for natural movement and different c...

Page 4: ...d workings of the chair and will invalidate your warranty DO NOT try to lift the chair by the arm tops as this may damage the arms Chairs ARE NOT occupied or plugged in when they are being moved around NEVER push a chair up or down steps or stairs YOU ALWAYS lock the castors when the chair is stationary for making transfers or when altering the chair set up THIS WILL AVOID any movements that could...

Page 5: ...depreciation and continual power loss is not covered under the warranty Accupak Rechargeable Battery System Optional Accessory Problem Possible Cause Remedy Handset or mechanism movement not working mains power disconnected from chair 1 No supply voltage 2 Deep discharge protection triggered see above 3 Handset or system defective Connect chair to the mains charge the battery If connecting to the ...

Page 6: ...turn green when charging is complete The battery SHOULD BE OPERATED at normal room temperatures and never in damp environments The battery provides an average of up to 20 chair adjustments There is an acoustic warning signal a 5 second beep that notifies you of a low remaining charge during operation Charge the battery before further use DO NOT let the battery completely discharge as this will sto...

Page 7: ...t all of the features work properly Always ensure that there is enough space to recline fully and freely There should be no objects behind the chair that obstruct its movement and the back should never touch the wall The leg rest should be able to move fully and freely with no objects to restrict this movement Position the chair free from any trailing wires Ensure the chair is within easy reach of...

Page 8: ...ile model cannot have VAL fitted Handset instructions The Lynton has either a Single or Dual Tilt in Space Mechanism Please read the handset instructions for your mechanism pages 16 and 17 For safety always ensure that you store the handset on one of the loops on the chair Quick Release Handset Plug Both handsets come with a quick release clip for detaching the handset It should be attached to the...

Page 9: ...al Fully Reclined Full Rise Static Position Semi Recline Footrest Horizontal Fully Reclined Single Motor Tilt and Space STIS two button Tilt in Space Back up leg rest in Rise to Stand Position Chair rises Tilt in Space Back down leg rest out Return to Seating from Rise Position Chair lowers The following instructions will aid use of your chair Simply depress and release the desired button to reach...

Page 10: ... chosen They simply fit behind the Velcro strips as the image demonstrates Seat Cushion Adaptability REAR This Way Up IMPORT A N T The Lynton comes with an Easiform seat cushion as standard but with the option to select from our range of interchangeable seat cushions see page 49 To change the seat cushion chaise or cover slip firstly remove the back cushion Then release the chaise from the Velcro ...

Page 11: ...echargeable battery back up system Accupak rechargeable battery system for mains free operation Seat height adjusters glides VAL on the 159 Kg 25 stone model without low profile seat Replacement or alternative back cushions Channelled leg rest Enclosure Skirt Optional Accessories A range of headrests Head roll Large profile headrest Small head pillow Midline headrest Small profile headrest ...

Page 12: ...are not limited to Damage to the cables Any loose or detached parts Damage to the handset Damage to the transformer Castors for damage or any build up of fluff dirt or dust particles Damage to the fabric of the chair Two years on mechanisms electrics frame and upholstery One year on air seat cushions Repose will repair or replace at our discretion and free of charge to the original purchaser any p...

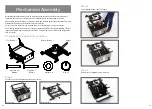
Page 13: ...lbs or less All parts are labelled with a unique reference number please quote when ordering see example on page 51 If you have any questions please contact your supplier YOU MUST ALWAYS take the necessary precautions and advice when carrying out any movement or handling operation Mechanism Assembly Step 1 Step 2 and 3 Step 4 Step 5 and 6 Step 7and 8 Step 9and 10 Backrest Installation Seat Depth A...

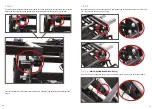
Page 14: ...quired However you may find the use of a small mallet or mole grips helpful The following images show the set up of the dual mechanism DTIS The single mechanism STIS is split and assembled in the same way minus STEP 6 This is because it does not have an independent back rest motor Step 1 Turn the top and bottom frame upside down as shown Components required for assembly Top Frame x 1 Bottom Frame ...

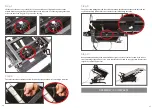
Page 15: ...m insert the 4x short pins through the brackets and hinges as shown Ensure the short pins have been pushed completely through Complete this step on both sides Step 6 NOT APPLICABLE FOR THE STIS Connect the wire coming from the motor on top frame to the main motor on the bottom frame Incorrect installation could result in injury Ensure pin is fully through both sides of the brackets and hinges ...

Page 16: ...If this is the case then the motor assembly is complete Step 9 The power cable trailing from the rear of the mechanism should thread between the base and the top frame assembly Check that it is not crushed as this will damage the cable 30 31 Step 10 Run the mechanism through the whole lift recline cycle to ensure no faults If a cable looks to be at risk of becoming trapped move it to a more suitab...

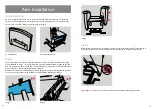
Page 17: ...you should be using the same positioned bracket on either side of the back frame blue or green Slide the brackets onto the housing pins and gently apply pressure to the top of the back and push down to ensure it is securely in place when you hear a click it s in place To release the brackets pull the tab away from the chair Step 1 Step 3 Step 2 Step 4 Wing Installation The Lynton comes with detach...

Page 18: ...op and front back of the Mechanism Bracket B image 2 A Arm Bracket B Mechanism Bracket B C A A C D2 D1 D3 B Image 1 Image 2 Image 3 Step 2 Once the arm is positioned you will need to put the chair into the rise position This enables you to secure the thumb screws into the housing holes underneath the arm Tightly secure the arm Important note Never use the arms to lift the chair as this may cause d...

Page 19: ... 1 and then push the arm front into the arm Tighten the thumb screw securely on the outside of the arm 2 We have added some photos that will assist you Seat Width Adjustment 1 2 Remove the chaise and then extend raise the leg rest so you can access the footplate from underneath Position the channelled leg rest on the footplate so it can be secured from below Step 1 Step 3 Step 4 Step 2 On the unde...

Page 20: ...hildren and some pets from accessing the mechanism Below is a set of images and instructions as to how it is fitted Step 1 Put the chair into raised position and remove the footrest and chaise Step 3 Lift the front of the chair up and slide the front of the skirt on one side at a time Step 2 Lie the skirt out and identify the Rear The front has a removable flap Please attach if not already attache...

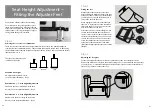
Page 21: ...and c if you have used the taller ones Standard seat height No adjustment required Hole a on the footplate illustration Step 3 Combination 1 1 Seat Height Adjustment Small x2 in the front Medium x2 in the back Hole b on the footplate illustration Step 3 Combination 2 2 Seat Height Adjustment Medium x2 in the front Large x2 in the back Hole c on the footplate illustration Step 3 Medium Large Small ...

Page 22: ...e area around the chair is clear of any obstructions as you firstly need to tip the chair forward so it rests on the back and the arms VAL Technology angle alteration Step 1 Tip the chair forward so it rests on the floor on both the end of the arms and top of the backrest ensuring that the pins on either side of the chair are visible When tipping the chair over ensure that you take care to protect...

Page 23: ...aform Liquiform To fit simply remove the existing cushion and block if a Dynaform cushion is already fitted and replace with new one Image 4 See below for Dynaform cushion fitting Image 5 Image 3 Image 3 is what you would see if the Dynaform cushion is fitted with a separate oblong foam block fitted to the rear of the foam box highlighted in green Two important things which are consistent whicheve...

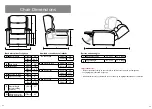
Page 24: ...k height 711mm 28 C Seat height 457mm 18 470mm 18 5 502mm 19 75 D Foot top to seat 406mm 16 E Floor to foot top 51mm 2 64mm 2 5 95mm 3 75 F Overall length normal seating position 991mm 39 G Maximum overall length full recline 1753mm 69 Available seat and overall widths H Seat width 508mm 20 559mm 22 I Overall width 800mm 31 5 851mm 33 5 J Arm height 635mm 25 648mm 25 5 705mm 27 75 K Seat depth 457...

Page 25: ...an one hour at a time and require pressure relief and supported comfort This cushion has a high density foam base which offers a supportive and firm seat base with a top layer of memory foam to allow immersion into the cushion giving stability and a large surface area to reduce pressure levels For those who have good posture and mobility but sit for long periods of time and require pressure relief...

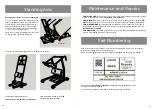
Page 26: ...ld the need arise Please see below an example of the type of label you will find which shows the part number Please contact service reposefurniture co uk regarding any replacement parts quoting the relevant part number For a full list of replacement parts please see the separate Lynton Parts List Maintenance and Repairs YOU ONLY USE approved parts on your chair These can be obtained through your s...

Reviews: