background image

GB

6

MU1H-1111GE23 R0220

6.2 Maintenance

If necessary, the outside surface of the filter 
combination can be cleaned.
Use only cold, clear drinking water to clean the 
surfaces! Any other cleansers cause damage to the 
plastic components!

6.2.1 Pressure reducing valve (FK76CS/

FKN76CS only)

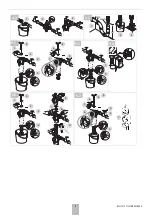
1.

Close shut-off valve on inlet

2.

Release pressure on outlet side (e.g. through water 
tap)

3.

Close shut-off valve on outlet

4.

Loosen slotted screw
• Do not remove slotted screw

CAUTION!

There is a spring in the spring bonnet. It may cause 
injuries if the spring is derailing. 

• Make sure tension in compression spring is 

slackened!

5.

Slacken tension in compression spring
• Turn adjustment handle counter clockwise (-) until 

it does not move any more

• Do not turn in too far!

6.

Unscrew spring bonnet
• Use double ring wrench ZR10K

7.

Remove slip ring

8.

Remove valve insert with a pair of pliers

9.

Unscrew filter bowl and guide piece
• Use double ring wrench ZR10K

10.

Remove old filter insert and replace by a new one!

11.

Remove slotted ring

12.

Place O-ring onto filter bowl

13.

Screw in filter bowl hand-tight (without tools)

14.

Check that sealing ring, edge of nozzle and slotted 
ring are in good condition, and if necessary replace 
the entire valve insert

15.

Reassemble in reverse order

Press in diaphragm with finger before inserting slip 
ring
Screw in filter bowl hand-tight (without tools)

16.

Set outlet pressure and adjust setting scale

17.

Slowly open shut-off valve on inlet

18.

Slowly open shut-off valve on outlet

6.2.2 Filter

The filter must be cleaned by reverse rinsing regularly, 
at least every 2 months

Non-compliance can lead to the filter becoming 
blocked This results in a drop in pressure and 
decreased water flow

The filter meshes are made of stainless steel. A red 
coating as a consequence of rust from the pipelines 
has no influence on function or the way the filter works

Do not forget to do a visual check of the ball valve. 
Replace if it is dripping!

6.3 Adjusting the setting scale

If the adjustment knob is removed, this setting is lost. A new 
setting can be achieved using a pressure gauge.
1.

Close shut-off valve on inlet

2.

Release pressure on outlet side (e.g. through water 
tap)

3.

Close shut-off valve on outlet

4.

Loosen slotted screw
• Do not remove slotted screw

5.

Slowly open shut-off valve on inlet

6.

Set desired outlet pressure (e.g. 4 bar)

7.

Align scale (e.g. 4) in middle of viewing window

8.

Retighten slotted screw

9.

Slowly open shut-off valve on outlet

7

Disposal

Observe the local requirements regarding correct waste 
recycling/disposal!

Summary of Contents for Braukmann F76CS

Page 1: ...9 001 Braukmann F76CS FN76CS FK76CS FKN76CS Installation instructions Einbauanleitung Instructions d installation Filters and Filter Combination Filter und Filterkombination Filtres et Combinaisons de...

Page 2: ...2 MU1H 1111GE23 R0220 4 2 1 2 3 DN50 70 300 DN70 4 3 1 3 2 25 l 5 3 1 2 5 1 1 3 2 0 5 10 15 bar 16 4 5 9 7 8 6 5 4 1 3 2 4 5 6 2 6 7 8 11 0 5 10 15 bar 16 6 3 1 2 3 4 5 6 7 8 9...

Page 3: ...es 7 D 1 Sicherheitshinweise 8 2 Technische Daten 8 3 Produktvarianten 8 4 Montage 8 5 Inbetriebnahme 9 6 Instandhaltung 9 7 Entsorgung 10 8 Fehlersuche 11 9 Ersatzteile 11 10 Zubeh r 11 F 1 R gles de...

Page 4: ...y after water meter Related to the EN 806 2 it is recommended to install the filter immediately after the water meter In order to avoid flooding it is recommended to arrange a permanent professionally...

Page 5: ...tating red rotor 2 Close ball valve again after approx 3 seconds Repeat procedure three times If the filter is extremely dirty the procedure may have to be repeated additional times With aid of the me...

Page 6: ...dition and if necessary replace the entire valve insert 15 Reassemble in reverse order Press in diaphragm with finger before inserting slip ring Screw in filter bowl hand tight without tools 16 Set ou...

Page 7: ...ping from the spring bonnet Diaphragm in valve insert is faulty Replace valve insert Too little or no water pressure Shut off valves up or downstream of the pressure reducing valve are not fully open...

Page 8: ...Verschmutzungsgrad bei Klarsicht Filtertasse gut beobachtbar Vereinfacht Instandsetzung und Inspektion Der Einbauort muss frostsicher und gut zug nglich sein Unmittelbar nach dem Wasserz hler einbaue...

Page 9: ...schluss so muss vor dem R cksp len ein Auffanggef untergestellt werden 1 Kugelhahn durch Drehen des R cksp lknopfs bis Anschlag ffnen Markierungsbalken muss senkrecht stehen Das patentierte R cksp lsy...

Page 10: ...ng auf Filtertasse stecken 13 Filtertasse einschrauben und von Hand anziehen ohne Werkzeug 14 Dichtscheibe D senkante und Nutring auf einwandfreien Zustand berpr fen falls erforderlich Ventileinsatz k...

Page 11: ...ritt aus der Federhaube Membrane im Ventileinsatz defekt Ventileinsatz wechseln Kein oder zu wenig Wasserdruck Absperrarmaturen vor oder hinter Druckminderer nicht ganz ge ffnet Absperrarmaturen volls...

Page 12: ...nne accessibilit Lecture facile du manom tre Constat facile du degr de contamination par le bol filtre transparent Simplifie la maintenance et l inspection Le site d installation doit tre prot g contr...

Page 13: ...r il est recommand d installer le dispositif automatique de r tro lavage Z11S L eau filtr e peut aussi tre vid e pendant le r tro lavage 5 3 R tro lavage manuel Si l limination de l eau du r tro lavag...

Page 14: ...guidage Utiliser la cl polygonale double cliquet ZR10K 10 Retirez l ancien filtre et remplacez le par un neuf 11 Retirer le joint l vres en U 12 Enfoncer l anneau torique sur le pot de tamisage 13 Vi...

Page 15: ...membrane dans la cartouche de vanne est d fectueuse Remplacez la cartouche de vanne Pression d eau trop faible ou inexistante Ouverture incompl te des vannes d isolement l amont et l aval du d tendeu...

Page 16: ...rland by its authorised representative Ademco 1 GmbH 2020 Resideo Technologies Inc All rights reserved For more information homecomfort resideo com europe Ademco 1 GmbH Hardhofweg 40 74821 MOSBACH GER...

Reviews: