GB
MU1H-1126GE23 R0220
3
4.
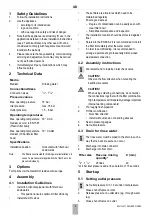
Loosen slotted screw
• Do not remove slotted screw
5.
Slacken tension in compression spring
• Turn adjustment handle counter clockwise (-) until
it does not move any more
6.
Slowly open shut-off valve on inlet
7.
Turn control handle until the setting scale shows the
desired value
8.
Retighten slotted screw
9.
Slowly open shut-off valve on outlet
6
Maintenance
In order to comply with EN 806-5, water fixtures must
be inspected and serviced on an annual basis.
As all maintenance work must be carried out by an
installation company, it is recommended that a
servicing contract should be taken out.
In accordance with EN 806-5, the following measures must
be taken:
6.1 Inspection
6.1.1 Filter
•
Non-compliance can lead to the filter becoming
blocked This results in a drop in pressure and
decreased water flow
•
The filter meshes are made of stainless steel. A red
coating as a consequence of rust from the pipelines
has no influence on function or the way the filter works
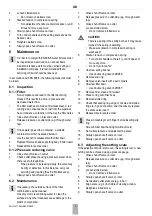
1.
Close shut-off valve on inlet and outlet
2.
Release pressure on outlet side (e.g. through water
tap)
If rinse water goes into a container, a suitable
container must first be placed below it.
3.
Use the wrench to disassemble the filter bowl.
4.
Replace filter mesh and supporting body in filter insert
5.
Reassemble in reverse order
6.1.2 Pressure reducing valve
1.
Close shut-off valve on outlet
2.
Check outlet pressure using a pressure meter when
there is zero through-flow
• If the pressure is increasing slowly, the valve may
be dirty or defective. In this instance, carry out
servicing and cleaning (See 6.2 Maintenance)
3.
Slowly open shut-off valve on outlet
6.2 Maintenance
If necessary, the outside surface of the filter
combination can be cleaned.
Use only cold, clear drinking water to clean the
surfaces! Any other cleansers cause damage to the
plastic components!
1.
Close shut-off valve on inlet
2.
Release pressure on outlet side (e.g. through water
tap)
3.
Close shut-off valve on outlet
4.
Loosen slotted screw
• Do not remove slotted screw
CAUTION!
There is a spring in the spring bonnet. It may cause
injuries if the spring is derailing.
• Make sure tension in compression spring is
slackened!
5.
Slacken tension in compression spring
• Turn control handle to the left (-) until it does not
move any more
• Do not turn in too far!
6.
Unscrew spring bonnet
• Use double ring wrench ZR06K
7.
Remove slip ring
8.
Remove valve insert with a pair of pliers
9.
Unscrew filter bowl
• Use double ring wrench ZR06F
10.
Remove filter, clean and reinsert
11.
Place O-ring onto filter bowl
12.
Remove slotted ring
13.
Check that sealing ring, edge of nozzle and slotted
ring are in good condition, and if necessary replace
the entire valve insert
14.
Reassemble in reverse order
Press in diaphragm with finger before inserting slip
ring
Screw in filter bowl hand-tight (without tools)
15.
Set outlet pressure and adjust setting scale
16.
Slowly open shut-off valve on inlet
17.
Slowly open shut-off valve on outlet
6.3 Adjusting the setting scale
If the adjustment knob is removed, this setting is lost. A new
setting can be achieved using a pressure gauge.
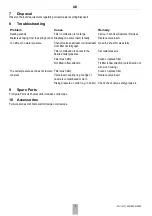
1.
Close shut-off valve on inlet
2.
Release pressure on outlet side (e.g. through water
tap)
3.
Close shut-off valve on outlet
4.
Loosen slotted screw
• Do not remove slotted screw
5.
Slowly open shut-off valve on inlet
6.
Set desired outlet pressure (e.g. 4 bar)
7.
Align scale (e.g. 4) in middle of viewing window
8.
Retighten slotted screw
9.
Slowly open shut-off valve on outlet

