background image

V8205, VR8205 DIRECT IGNITION COMBINATION GAS CONTROLS

3

69-0329—05

• Cover gas control if appliance is cleaned with water, 

steam, or chemicals or to avoid dust and grease 

accumulation.

• Avoid locating gas control where exposure to 

corrosive chemical fumes or dripping water are likely.

Install Piping to Gas Control

All piping must comply with local codes and ordinances 

or with the National Fuel Gas code (ANSI Z223.1 NFPA 

No. 54), whichever applies. Tubing installation must 

com-ply with approved standards and practices.

1.

Use new, properly reamed pipe free from chips. If 

tubing is used, make sure the ends are square, 

deburred and clean. Make sure all tubing bends are 

smooth and without deformation.

2.

Run pipe or tubing to the gas control. If tubing is 

used, obtain a tube-to-pipe coupling to connect 

the tubing to the gas control.

3.

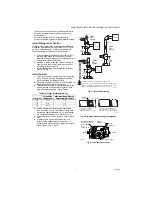
Install sediment trap in the supply line to the gas 

control. See Fig. 2.

Install Control

1.

This control can be mounted from 0 to 90 degrees 

in any direction, from the upright position of the 

gas control knob, including vertically.

2.

Mount the control so gas flow is in the direction of 

the arrow on the bottom of the control.

3.

Thread pipe into control. Do not thread pipe to far. 

Valve distortion or malfunction may result if the 

pipe is inserted too deeply, refer to Table 4.

4.

Apply a moderate amount of good quality pipe 

com-pound (do not use Teflon tape) to pipe only, 

leaving two end threads bare. On LP installations, 

use compound resistant to LP gas. See Fig. 3.

5.

Remove seals over control inlet and outlet if neces-

sary.

6.

Connect pipe to control inlet and outlet. Use 

wrench on the square ends of the control. If a 

flange is used, place wrench on flange rather than 

control. Refer to Fig. 4 and 5.

Fig. 2. Install sediment trap.

Fig. 3. Use moderate amount of pipe compound.

Fig. 4. Top view of gas control.

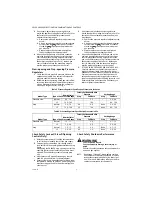
Table 4. NPT pipe thread length in (in.).

Pipe Size

Thread Pipe 

this Amount

Maximum Depth Pipe can 

be Inserted into Control

3/8

9/16

3/8

1/2

3/4

1/2

3/4

13/16

3/4

GAS

CONTROL

GAS

CONTROL

HORIZONTAL

DROP

PIPED

GAS

SUPPLY

PIPED

GAS

SUPPLY

3 IN.

(76 MM)

MINIMUM

3 IN.

(76 MM)

MINIMUM

RISER

GAS

CONTROL

TUBING

GAS

SUPPLY

HORIZONTAL

DROP

3 IN.

(76 MM)

MINIMUM

RISER

M3077C

2

1

2

2

1

2

ALL BENDS IN METALLIC TUBING SHOULD BE SMOOTH.

CAUTION:  SHUT OFF THE MAIN GAS SUPPLY BEFORE REMOVING

END CAP TO PREVENT GAS FROM FILLING THE WORK AREA.  TEST 

FOR GAS LEAKAGE WHEN INSTALLATION IS COMPLETE.

TWO IMPERFECT 

THREADS

GAS CONTROL

THREAD PIPE THE AMOUNT 

SHOWN IN TABLE FOR 

INSERTION INTO GAS CONTROL 

APPLY A MODERATE AMOUNT OF

PIPE COMPOUND TO PIPE ONLY

(LEAVE TWO END THREADS BARE).

M3075D

PIPE

OUTLET
PRESSURE 
TAP

INLET

OUTLET

WIRING
TERMINALS (2)

INLET
PRESSURE TAP

PRESSURE REGULATOR
ADJUSTMENT (UNDER 
CAP SCREW)

GAS CONTROL KNOB

M3094B

Summary of Contents for V8205

Page 1: ...s noted Approvals American Gas Association design certificate L2025006 Canadian Gas Association design certificate L2025006 Australian Gas Association design certificate 4214 Approved for Delta C applications INSTALLATION When Installing this Product 1 Read these instructions carefully Failure to follow them could damage the product or cause a haz ardous condition 2 Check the ratings given in the ...

Page 2: ...t no 394588 to convert from LP to natural manufactured gas Controls with step opening regulators cannot be converted Install Adapters to Control If adapters are to be installed on the gas control mount them as follows Flanges 1 Choose the appropriate flange for your application 2 Remove seal over gas control inlet or outlet 3 Make sure the O ring fits into the flange groove If the O ring is not at...

Page 3: ...erted too deeply refer to Table 4 4 Apply a moderate amount of good quality pipe com pound do not use Teflon tape to pipe only leaving two end threads bare On LP installations use compound resistant to LP gas See Fig 3 5 Remove seals over control inlet and outlet if neces sary 6 Connect pipe to control inlet and outlet Use wrench on the square ends of the control If a flange is used place wrench o...

Page 4: ...d other con trols as required 2 Connect control circuit to gas control terminals See Fig 4 6 and 7 3 Adjust thermostat heat anticipator to 0 50A rating stamped on valve operator NOTE Use leadwires with insulated terminals Fig 6 Wiring connections for 24 volt control in S87 direct ignition system APPLY WRENCH FROM TOP OR BOTTOM OF GAS CONTROL TO EITHER SHADED AREA WHEN FLANGE IS NOT USED APPLY WREN...

Page 5: ...n the appliance nameplate or manufacturer recommended burner orifice pressure for the size orifice s used Make certain the primary air supply to the main burner is properly adjusted for complete combustion refer to the appliance manufacturer instructions 2 IF CHECKING GAS INPUT BY CLOCKING THE GAS METER Make certain there is no gas flow through the meter other than to the appliance being checked O...

Page 6: ...ure to the control 5 STEP OPENING PRESSURE REGULATORS ONLY Carefully check burner lightoff at step pressure Make sure burner lights smoothly and without flashback to orifice Make sure all ports remain lit Cycle burner several times allowing at least 30 seconds between cycles for regulator to resume step function Repeat after allowing burner to cool Readjust full rate outlet pressure if necessary t...

Page 7: ... manual valve in the gas piping to the appliance or on LP at the tank Do not try to light any appliance Do not touch any electrical switch or use the phone Leave the building and call your gas supplier If your gas supplier cannot be reached call the fire department 2 Do not force the gas control knob on the appli ance Use only your hand to turn the gas con trol knob Never use any tools If the knob...

Page 8: ...5422 1 800 468 1502 69 0329 05 M S Rev 09 20 Printed in United States 6 If you don t smell gas turn knob on gas control counterclockwise to ON 7 Replace the burner access panel 8 Reset the thermostat to the desired temperature 9 If the burner does not come on when the room temperature is below thermostat setting turn gas control knob to OFF and contact a qualified ser vice technician for assistanc...

Reviews: