background image

6

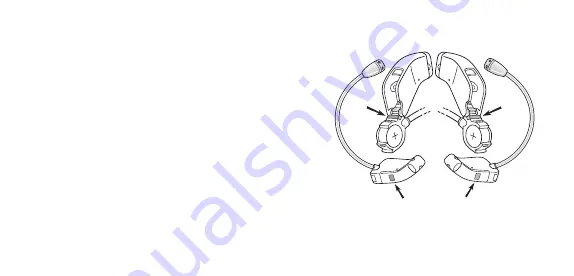
          LEFT (BLUE) 

RIGHT (RED)

Insertion:

1.  Determine if you have a left or right 

instrument in your hand. With the bat-
tery compartment open, you will see 
either a RED or BLUE marker:

•  The hearing instrument with the RED 

marker is always for the RIGHT ear.

•  The hearing instrument with the BLUE 

marker is always for the LEFT ear.

Insertion and Removal of Your Hearing Instrument

Summary of Contents for be 7

Page 1: ...User Guide be 9 by ReSound be 7 by ReSound...

Page 2: ...hat is found inside be by ReSoundTM is a trademark of GN ReSound A S Congratulations on the purchase of your new fully digital be by ReSound hearing instrument ReSound s innovative technology and desi...

Page 3: ...Selected Model 29 Hearing Instrument Disposal Precaution 31 GN ReSound Contact Information 32 Contents Page Cover 1 Introduction 2 Contents 3 The parts of Your Hearing Instrument 4 Additional Items I...

Page 4: ...3 Wax Filter 4 Battery Door 5 Microphone Tubing 6 Microphone 7 Sound Inlets 8 Model and Serial Number Additional Items Included Hard Case Wax Filter Replacement Kit see page 16 The Parts of Your be He...

Page 5: ...on for your com fort while inserting your instrument However if you find you do not like this feature your hearing care professional can turn it off On Off Function Your hearing instrument is equipped...

Page 6: ...t in your hand With the bat tery compartment open you will see either a RED or BLUE marker The hearing instrument with the RED marker is always for the RIGHT ear The hearing instrument with the BLUE m...

Page 7: ...Check that the body of the hearing instrument feels smooth before insert ing into your ear canal If the surface feels spiky or rough contact your hearing care professional 3 Grasp the instrument near...

Page 8: ...tly push the hearing instrument into the ear canal until it is flush with the opening of the ear canal 5 After the hearing instrument has been properly seated in the ear canal locate microphone and tu...

Page 9: ...ws how the hearing instrument should look when inserted properly into the ear canal It is im portant that the microphone tube fits correctly in your ear If the microphone tube irritates your ear pleas...

Page 10: ...removed from the ear canal make sure that the wax filter is still attached to the instrument If not contact your hearing care professional immediately Changing the Battery Your be by ReSound hearing i...

Page 11: ...en the battery voltage power gets too low The hearing instrument will reduce amplification and emit a beeping signal This signal will recur every five minutes until the hearing instrument automaticall...

Page 12: ...d flat side up The flat side has a on it and it is located under the yellow sticker Make sure to remove the sticker before closing the battery compartment door If the door does not close take the batt...

Page 13: ...ironment Please dispose of them according to local regulations or return them to your hearing care professional Battery Warning Information Batteries although very small contain dangerous substances a...

Page 14: ...the instrument Inspect the end that fits into your ear canal for debris and replace the wax filter as needed Also inspect the microphone for debris and the receiver for wax Clean as necessary Micropho...

Page 15: ...ecome discolored or should the hearing instrument fail to produce sound contact your hearing care professional to have the tubing replaced Optionally you can purchase a container that contains a dryin...

Page 16: ...e wax filter is located at the recei ver end of the hearing instrument This filter is designed to decrease the likelihood that wax will get into the instrument s sound outlet and cause decreased perfo...

Page 17: ...ote It is not recommended that wax filters be reused as wax filters may not reattach securely To replace the wax filter 1 Hold the hearing instrument with the sound outlet pointing down 2 Slide the pr...

Page 18: ...this may cause permanent damage to the circuitry and or internal components Protect the instrument from rough handling Avoid dropping it on hard surfaces or floors Do not leave the instrument in or n...

Page 19: ...ould you experience any feedback or whistling while trying to talk on the telephone you can avoid feedback by taking the following precautions Hold the phone lightly to the ear Slowly move the phone t...

Page 20: ...hile still under warranty your hearing instrument can be sent to the manufacturer for repair if it cannot be repaired locally Do not attempt to open the hearing instrument as this would invalidate the...

Page 21: ...ose Remove your hearing instrument when applying such things as cosmetics perfume aftershave hair spray and suntan lotion These might get into the instrument and cause damage General Precautions Do no...

Page 22: ...is case consult a physician before wearing the instrument Different types of radiation e g from NMR MRI or CT scanners may damage the hearing instrument Therefore do not wear the hearing instrument du...

Page 23: ...y time Do not wear the hearing instrument in mines oil fields or other explosive areas unless those areas are certi fied for hearing instrument use Do not allow others to use your hearing instrument I...

Page 24: ...Broken receiver Broken microphone or microphone tube POSSIBLE REMEDY Turn on Replace battery Reinsert battery properly Consult your hearing care professional or if you have been instructed to do so c...

Page 25: ...aged Hearing aid not properly inserted Microphone not properly seated With telephone use Instrument settings not at opti mum Replace battery Consult your hearing care professional Consult your hearing...

Page 26: ...ngs not at optimum Excessive ear wax Change in hearing POSSIBLE REMEDY Re insert carefully Re seat carefully Consult your hearing care professional or if you have been instructed to do so change the w...

Page 27: ...27 If there are any other problems not mentioned in this guide or should questions arise please contact your hearing care professional...

Page 28: ...ea 15 Color coding 6 General hearing instrument precautions 21 Hearing instrument handling precautions 18 Insertion 6 9 Low battery warning 11 Maintenance 14 On Off function 5 Parts of the hearing ins...

Page 29: ...ark in the table below to identify which model you have received Model variant Signature of Model received hearing care professional be 9 be 7 Technical Data Maximum Output 2cc coupler IEC 118 7 be 9...

Page 30: ...30...

Page 31: ...31...

Page 32: ...Green Oxon OX25 3SX Tel 0 1869 343 500 Fax 0 1869 343 466 www gnresound co uk Australia GN ReSound Pty Ltd Unit R1 Regent Park Estate 391 Park Road Regent Park NSW 2143 Tel 02 9743 9707 Fax 02 9743 74...

Reviews: