background image

Doc 0121830 rev. B

Page 7 of 9

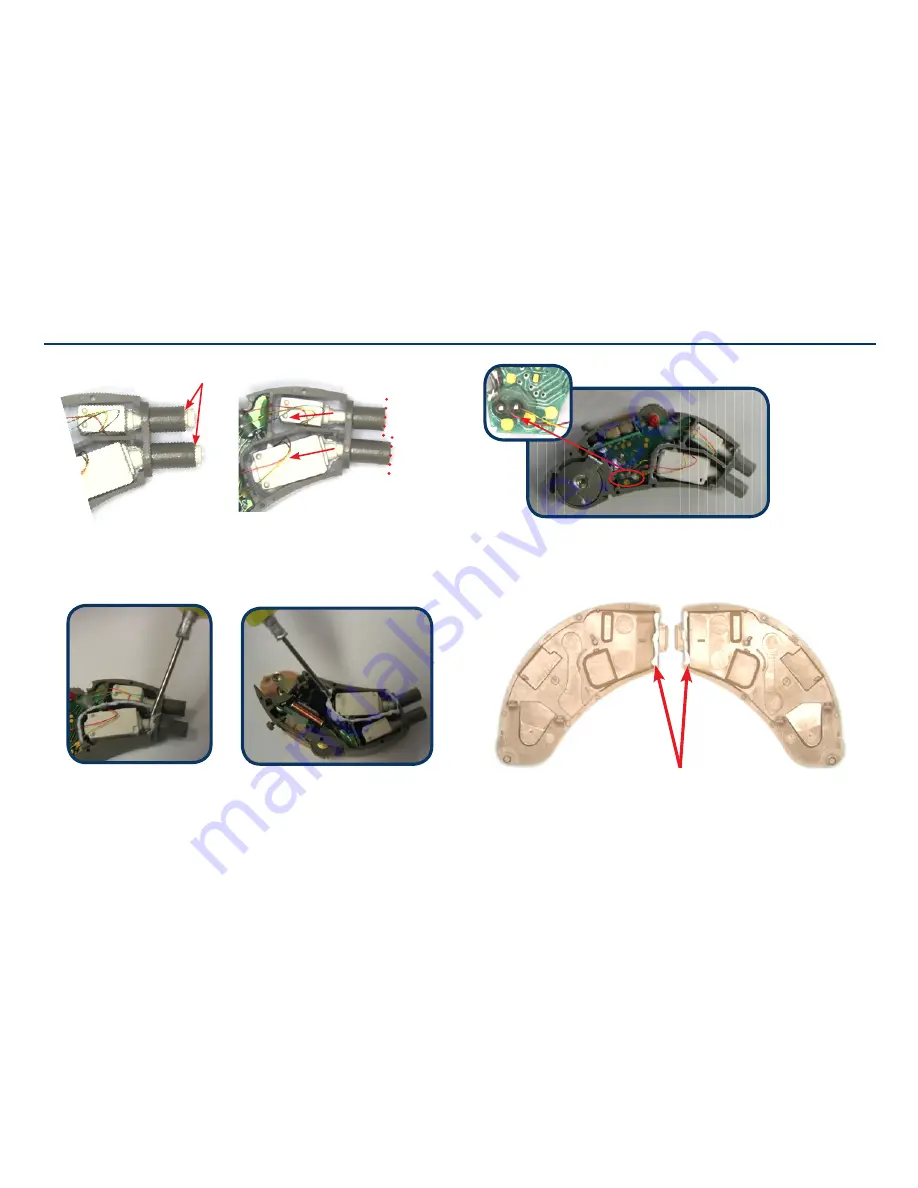
Microphone & Receiver

Add grease/Molycote on both housing parts

Add grease/Molycote onto the edge of both sides of the receiver 

compartment

Gabs

Pull back till suspensions 

flush with dotted line

Connect and place the rec wires as shown

Summary of Contents for TFP70-V BTE

Page 1: ...Technical Manual ReSound TrimFlex Plus BTE TFP70 V BTE Global Technical Operations gto gnresound com Lautrupbjerg 9 DK 2750 Ballerup Denmark E Mail Service gnresound dk...

Page 2: ...Doc 0121830 rev B Page 2 of 9 Table of contents Description 3 Part list 4 Dis assembly HI 5 Microphone Receiver 6 7 Mounting PB Battery Springs Telecoil 8 Test Trimmer Reference 9...

Page 3: ...ng the trimmers no computer or fitting software is needed ReSound TrimFlex TFP 70 V has 4 trimmer controls that allow you to personalize the fit to the individual preference The new 100 digital circui...

Page 4: ...BEIGE TFP70 V 16305105 HOUSING PTD GREY TFP70 V 16305107 HSG FRONTCAP FACETTE 502 004 100 05 BATT DOOR NOIMPRINT GR 503 003 100 05 TRIMMER COVER 504 037 100 05 EARHOOK 7 QU EVO 556 007 004 00 MIC COM...

Page 5: ...the front cap Slot Front cap Gently remove the front cap Open batt door To release the housing upper lower parts push the housing plastic locks by using a tweezer one side at a time Gently separate t...

Page 6: ...sion Mounting the rec into housing same procedure goes for the mic Get a solder wick Insert wick into the receiver hole of the frame from outside to inside Using a tweezer open the wick like a tube op...

Page 7: ...crophone Receiver Add grease Molycote on both housing parts Add grease Molycote onto the edge of both sides of the receiver compartment Gabs Pull back till suspensions flush with dotted line Connect a...

Page 8: ...ring points for TC Telecoil holder is attached to trimmer PCB and added a double sided tape to keep the TC in place Make sure the TC does not touch the battery spring Keep a small gab Unsolder the bat...

Page 9: ...t Trimmer Reference Attach the HI to the 2cc coupler and insert the battery pill size 13 into the batt door Place the HI in the test chamber as shown No frame or test fixture are required 2cc coupler...

Reviews: