background image

13

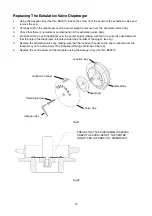
Replacing The Exhalation Valve Diaphragm

1. 

Using the Hexagon Key (Tool No. B00311) loosen the screw from the center of the exhalation valve and 

remove the cap.

2. 

Carefully stretch the diaphragm over the center spigot to remove from the exhalation valve body.

3. 

Check that there is no debris or contamination in the exhalation valve body.

4. 

Carefully stretch a new diaphragm over the center spigot making sure that it is correctly orientated and 

that the hole in the diaphragm is located under the shoulder of the spigot. (see fig ).

5. 

Replace the exhalation valve cap making sure that the location channel on the cap is located over the 

location key on the valve body. (The Respirex lettering should be at the top).

6. 

Replace the centre screw and hand tighten using the Hexagon Key (Tool No. B00311).

Fig.27

Fig.28


Diaphragm

Valve Cap

Location Key

Location Channel

Retaining Screw

Valve Body

Hexagon Key

ENSURE THAT THE DIAPHRAGM IS SEATED 

UNDER THE SHOULDER OF THE CENTRE 

SPIGOT AND IS CORRECTLY ORIENTATED.

Summary of Contents for Simplair

Page 1: ...BS 005 D 2017 EN943 1 2002 TYPE 2 EN Instructions for use of Simplair A E Suit ...

Page 2: ...pirex Soft Rubber Cuff 7 Donning The Full Suit 7 Removing the wearer from the Full Suit 9 Instructions For Lifting Harness Tank Suit Only 10 Inspection And Replacement Of Component Parts 10 Replacing A Silencer 11 Removing The Air Control Waist Belt From A Suit 11 Replacing The Exhalation Valve Diaphragm 13 Removing A Complete Exhalation Valve Assembly 14 Replacing A Complete Exhalation Valve Asse...

Page 3: ... line pressure the maximum air line pressure that the suit can be set to is 8 27 bar 120 PSI Unless otherwise stated by Respirex the material fabric of the garment does not breathe Your body temperature will rise when working in the garment therefore you are advised to leave the work area in the event you feel too much body fluid has been lost The garment must only be used in the hazardous area fo...

Page 4: ...ould be checked 1 Lines are clean externally 2 Lines are free from damage holes splits etc 3 Air line coupling connections are in good condition and the non return valves are in good working order Submerge in water to locate any leaks if any sign of external damage is evident Report any defects to the supervisor and record them The compressed air supply tube must NOT be used until the defect has b...

Page 5: ...e air flows indicated then the silencer should be replaced Note Respirex recommend customers set up their own silencer replacement programme This will be determined by the quality of the air and the frequency of use of the garment Minimum Flow Warning Device 1 With the Respirex flow meter connected to the air system turn the air pressure down to obtain the minimum air flow into the garment 2 When ...

Page 6: ... equal pressure all around its circumference see Fig 5 Fig 4 Fig 5 5 Locate the locking ring over the gauntlet of the glove and screw into the cuff body see Fig 6 If necessary the gauntlet of the glove can be cut down if it is too long and interferes with the locking ring Fig 6 Fig 7 6 Turn the sleeve the correct way out by pulling on the glove see Fig 7 Check that there are no creases in the glov...

Page 7: ...y a competent person and the details of the training be recorded 1 Open the zip fully For single slide zips pull 61cms 24 at a time keeping the zip straight with one hand as you pull the slider with the other Repeat this exercise for the whole length of the zip For double slide zips keep the zip completely straight with one hand as you pull the split ring fitted to the slider with the other and op...

Page 8: ...or front entry suits and Fig 17 for side entry suits 9 Pull the hood over your head 10 Close the zip fully as described in step 1 double slide zips should meet in the centre see Figs 18 19 20 Fig 14 Fig 15 Fig 16 Fig 17 Fig 18 Fig 19 Fig 20 6 Lift the suit to the waist Arrange the waist belt comfortably and fasten firmly see Fig 14 for front entry suits and Fig 15 for side entry suits 7 Connect th...

Page 9: ...t from the medium pressure airline 3 Remove your arms from the sleeves 4 Pull the hood back over your head 5 Lower the suit to the waist and unfasten the waist belt 6 Roll the outer leg up approximately 20 23cms 8 9 7 Step out of the suit After use decontaminate according to your company procedures If a gas tight or liquid tight zip has been fitted it should be lubricated using Max Wax once the su...

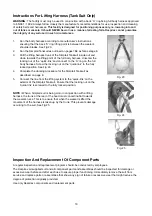
Page 10: ...ed to the fully locked position NOTE When a Simplair suit is being worn in conjunction with a lifting harness the trunk at the rear of the hood must concertina flat towards the wearer s neck This is to ensure that when the wearer is lifted the movement of the harness is taken up by the trunk This prevents damage occurring to the suit See Fig 25 10 Fig 23 Fig 24 Fig 25 Fig 23 Instructions For Lifti...

Page 11: ... air control waist belt assembly to be fitted is not damaged and that all of the parts are correctly assembly 2 Ensure that a new silencer has been fitted to the bulkhead assembly and check that the correct flow is achieved This test must be carried out with the pressure and hose length that the suit is to be used on 3 Take the air system distribution hose to be fitted and ensure the round distrib...

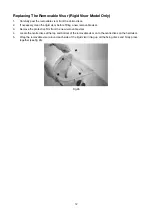
Page 12: ...isor before fitting a new removable visor 3 Remove the protective film from the new removable visor 4 Locate the centre discs at the top and bottom of the removable visor on to the centre discs on the hard visor 5 Wrap the removable visor around each side of the rigid visor lining up all the fixing discs and firmly press together see fig 26 Fig 26 ...

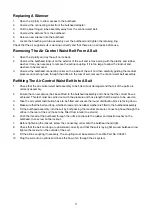
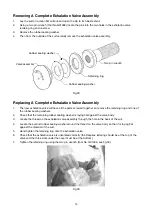
Page 13: ...aking sure that it is correctly orientated and that the hole in the diaphragm is located under the shoulder of the spigot see fig 5 Replace the exhalation valve cap making sure that the location channel on the cap is located over the location key on the valve body The Respirex lettering should be at the top 6 Replace the centre screw and hand tighten using the Hexagon Key Tool No B00311 Fig 27 Fig...

Page 14: ...r sealing washers 2 Check that the remaining rubber sealing washer is laying flat against the valve body 3 Locate the thread on the exhalation valve assembly through the hole in the back of the suit 4 Locate the second rubber sealing washer around the thread on the valve body so that it is laying flat against the material of the suit 5 Hand tighten the retaining ring onto the exhalation valve 6 Ch...

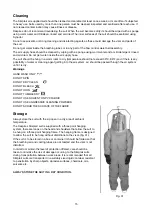
Page 15: ...he Respirex Simplair suit is supplied with a three point hanging system there are loops on the head and shoulders that allow the suit to be hung on a three point hanging frame The hanging frame is designed to allow the suit to be hung without distortions to the visor fig 31 If the suit is to be stored in a box or container it should be folded so that the breathing air and cooling tubes are not twi...

Page 16: ...port on the condition of your equipment When your garment should be returned for inspection will depend upon the extent to which the garment is used There is no pre determined life expectancy for these garments as this will depend upon usage maintenance and washing However your garment s protection will be seriously reduced by the existence of the following conditions a Lifting tape c Thinning of ...

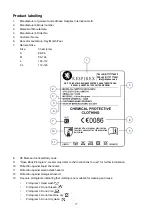
Page 17: ... II OF THE PPE REGULATION EU 2016 425 8 CE Mark and notified Body code 9 Open Book Pictogram wearer must refer to the Instructions for use for further information 10 Protection against liquid chemicals 11 Protection against electrostatic hazard 12 Protection against biological hazard 13 Five care pictograms indicating that clothing is not suitable for cleaning and reuse Pictogram 1 Hand wash Picto...

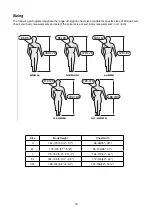
Page 18: ...s and select the correct size of suit Body measurements in cm inch Size Body Height Chest Girth S 164 170 5 4 5 7 88 96 35 38 M 170 176 5 7 5 9 96 104 38 41 L 176 182 5 9 5 11 104 112 41 44 XL 182 188 5 11 6 2 112 124 44 49 XXL 188 194 6 2 6 4 124 136 49 53 20 88 96 164 170 112 124 124 136 182 188 188 194 96 104 104 112 170 176 176 182 SMALL X LARGE XX LARGE MEDIUM LARGE Size Body Height Chest Gir...

Page 19: ...tical to the PPE which is subject of Module B EC type examination certificate CE 680569 and subject to the procedure set out in Module D of the European PPE Regulation EU 2016 425 under the supervision of the notified body BSI Davy Avenue Knowhill Milton Keynes MK5 8PP United Kingdom EC Notified Body No 0086 These garments are described in the manufacturer s technical file TF007 Issue D Done at RE...

Page 20: ...d Business Centre Philanthropic Road Redhill Surrey RH1 4DP ENGLAND Tel 44 0 1737 778600 Fax 44 0 1737 779441 Email info respirex co uk Module B and D Type Examination By BSI Davy Avenue Knowhill Milton Keynes MK5 8PP ENGLAND Notified Body No 0086 ...

Reviews: