In
st
all
at
io
n
In
st
all
at
io
n
Installation
Installation
9
10
Installation
(
1
)
Installation
(
2
)
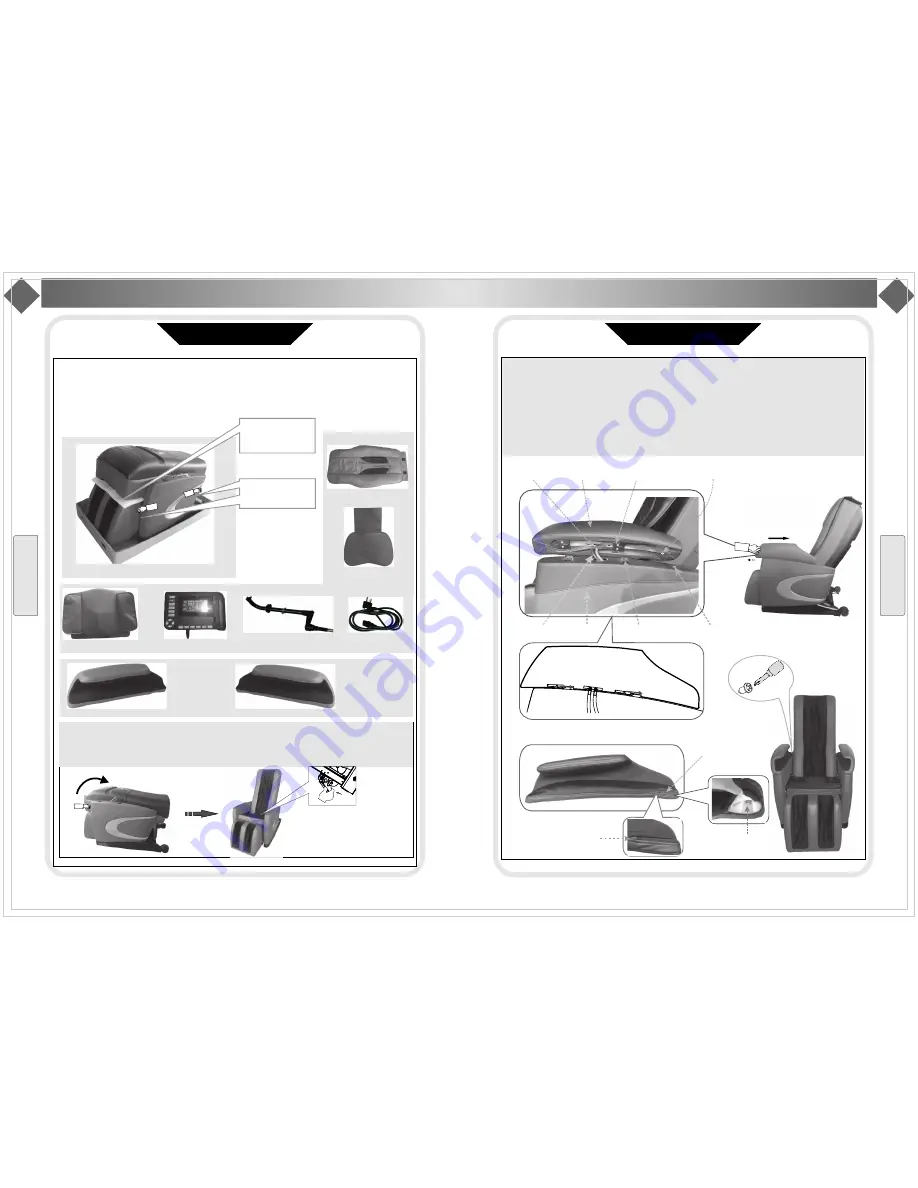
Step 1 Take out chair
Take out these pats from packaging box: chair body, cushion, pillow, left/right armrests,
remote control holder, cables, etc. It needs 2 people to take the chair body out. Hold the
metal frame(point out in below picture) and take the main body out from box slowly.
Refer to pictures
VFD control
Seat cushion
Step 3 Install upper armrest L R
/
Manual control holder
Step 2 Set the main body
Raise the back to 120 degree until a click sound comes out.
Cable
Left armrest up
Main body
Back cushion
Pillow
▲
Right armrest up
1.Airtube connect: connect the black airtube to front air cock, the white to the back one.
2. Put the upper armrest at the middle of lower armrest, the front of upper armrest is
about 30mm out, push it backward, to make sure the retaining plates of upper and lower
armrests fixed. Fasten the upper armrests by M6*30 screws. 3. Fasten the zipper, and
fill the zipper in leather cover.
Reminding (dismantle upper armrests)
Open the zipper, removing the screws of fixing
upper and lower armrests, pushing the upper armrests parallelly to make the locating
shaft out taking off the air pipes and then dismantle upper armrests
:
,
,
.
Hold here to take out
Don t take this out
when you take out
the chair
'
lower armrest
lower armrest
fixing board
lower armrest
screw hole
Lower armrest
connecting tube
Notice: In necessary maintenance,
lift the seat cover, pull the
lock catch upward, the back
of the chair could be foreraked.
Lay person is forbidden to do so.
Upper armrest
Upper armrest fixing board
Front/behind air cocks
Push the upper armrest backward parallelly
30mm
Upper armrest screw hole
Upper armrest
Zipper, uper armrest
Screw in the zipper
of uper armrest
Zipper in leather cover


