background image

6

5

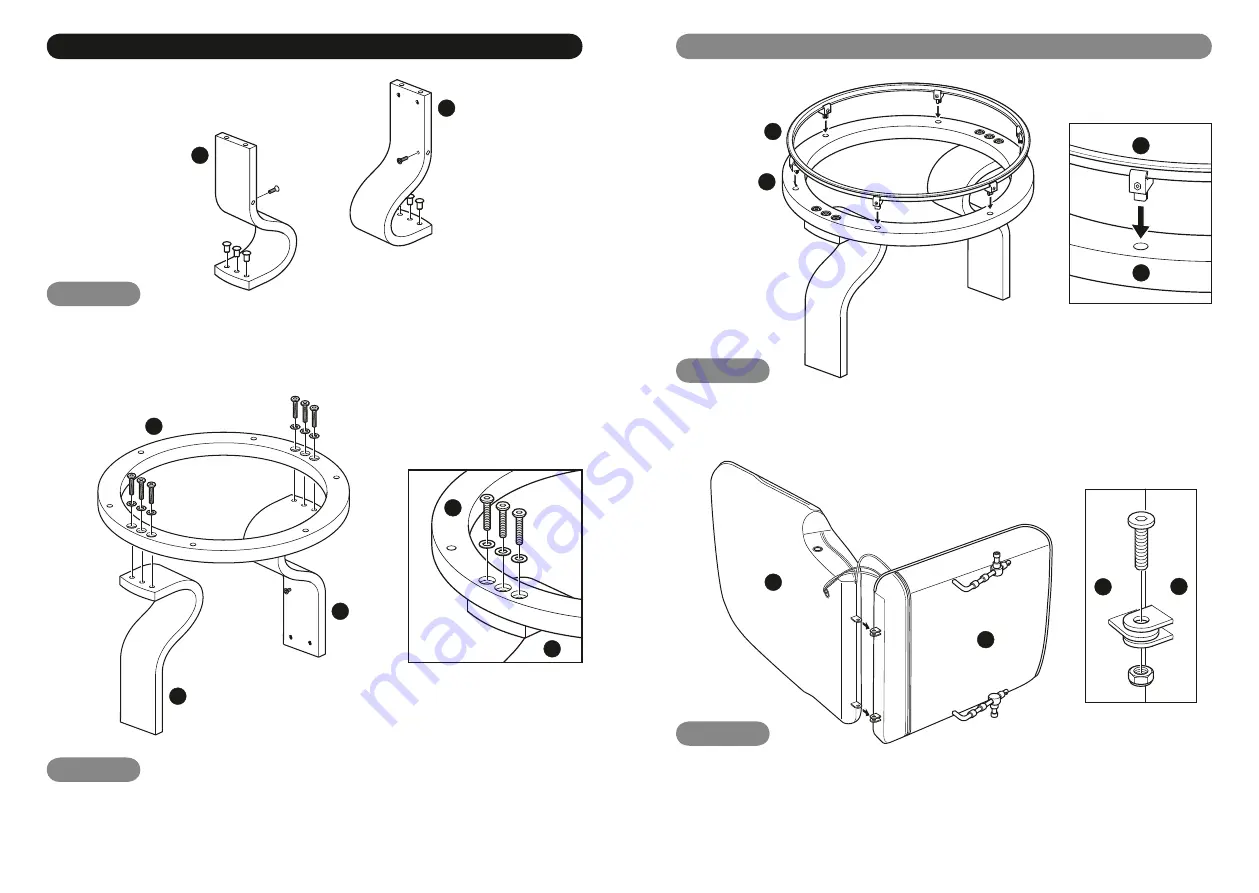
Chair Assembly

With help turn the legs (E) over and position the chair base (F) onto the legs.

Line up the holes and bolt each leg to the base using 3 x 35mm bolts ( 4) and  
washers (5). Tighten using the supplied allen key.

Push 3 x nuts (6) into each chair leg (E) as far as they will go. 

Screw a 18mm bolt (1) into the hole on the inside of each leg (do not fully insert).

Step 1

Line up a bearing support (G) with a hole in the chair base (F) and push in, enough for 
it to lock. Work your way around until all of the bearing supports are in position. Finally 
work your way around again pushing all bearing supports are completely home.

Turn the backrest (A) and seat (B) onto their sides. Position the pivot plates on the base 
of the backrest in-between the 2 pivots on the seat. Bolt together using the 2 x 25mm 
bolts (2) and lock nuts (3). Loosely tighten using the supplied spanner and allen key.

Do not over tighten as the backrest MUST be able to pivot.

Line up the 2 white connectors from the backrest and seat and push together.

Step 2

Step 4

Step 3

Chair Assembly

1

E

E

6

1

6

F

E

E

F

E

4

5

4

5

4

5

A

B

A

B

2

3

G

F

G

F

Summary of Contents for Swivel Massage Chair

Page 1: ...his product Ensure you are familiar with all of the safety and operating instructions Drive DeVilbiss Healthcare Ltd Heath eld Lane Birkenshaw BD11 2HW Web www restwell co uk Swivel Massage Chair Asse...

Page 2: ...emperature changes If possible try to gradually change the environment temperature If this is not possible do not use the armchair for the rst hour after the temperature change Be careful with the cab...

Page 3: ...Bolt x 4 12 55mm M8 Bolt x 2 13 70mm M6 Bolt x 4 14 Foot x 6 15 Bracket x 2 16 4 5 6mm Allen keys 17 Spanner 5 M8 Washer x 12 Parts 3 4 A B C D E F G H I J K L M Hardware Tools Required Medium Philli...

Page 4: ...or it to lock Work your way around until all of the bearing supports are in position Finally work your way around again pushing all bearing supports are completely home Turn the backrest A and seat B...

Page 5: ...seat over and repeat with the other side Step 5 a With help slide the seat assembly into position on the base unit The two pins on the end of each inner armrest C slide into the holes on the front of...

Page 6: ...derside using 2 x 35mm bolts 11 Step 7 a b Connect the black connector coming from the handset L to the black connector on the seat and store in the handset holder H Step 8 Push 2 x nuts 6 into each s...

Page 7: ...11 Push the 6 x feet 14 into the holes in the underside of the stool base K Step 10 Stool Assembly Place the leg assembly onto the underside of the stool seat I line up the holes and attach each leg...

Page 8: ...he unit from changing massage mode every minute Press the AUTO button to switch on the automatic mode cycle function The AUTO light is lit when the automatic mode cycle function is on Press one of the...

Page 9: ...aged due to neglect accident or improper use d The armchair or part having been altered from the manufacturer s speci cations or repairs having been attempted before the service agent dealer is noti e...

Page 10: ...18 17...

Reviews: