
Emergency Crank, Solar
AM/FM/WB Radio – HR12W
RADIO OPERATION
1. Select Li-ion battery or AAA battery before use.
2. Turn the ‘Volume’ knob clockwise to power on the radio and adjust volume.
3. Select FM/AM/WB with radio band switch, extend the antenna to get better signal reception on
FM and Weather bands.
4. Turn Radio Dial to in station. Green indicator turns on when the station selected is fully engaged.
Note: When battery is over loading or short circuit, it would stop output automatically.
When the battery voltage is lower than 2.5V, the radio will cut off automatically.
CHARGE TO THE MOBILE PHONE (Image 1)
1. Connect cell phone (or other USB 5V devices) and radio via USB
cable, it will charge automatically if internal battery is charged.
2. Cell phone or other devices can be charged by using the
hand Crank / Solar if needed, but as the last charging option,
just for emergency, not recommend this.
Note: ● Do not charge USB devices when you are using radio to
receive the AM band, or it may have noise interfere for radio.
● This feature is intended to only charge USB devices for
emergency use, not a normal power bank.
POWER SUPPLYING:
A. Hand-Cranking (Image 2)
● Turn the Hand Crank for 3-5 minutes to charge the internal
battery. While cranking the unit, the charging indicator will
turn red
● Turn the Hand Crank continuously in clockwise or counter-
clockwise at speed of 100-120 RPM to generate power,
Internal battery should be fully charged after approximately
4 hours of cranking which does not have to be continuous
● Typically, one minute of cranking supports 20 minutes of
light or 10-15 minutes of radio playing at medium volume.
B. Solar Power (Image 3)
● Expose the radio solar panel in direct sunlight.
● Solar panel will charge the entire device, including the
radio, flashlight and SOS alarm.
● It is mostly used for maintaining the battery, to extend its
life.
C. USB Port Charging
● Recharge it via supplied USB cable.
● Connect USB power (such as AC/DC adapter or computer USB power port) and the Micro USB
jack of the radio with the supplied USB charging cable.
● Power indicator turns red during charging while turns off after being fully charged.
● It takes 4.5 hours to fully charge the internal Li-ion batte
ry.
D. AAA Battery (Image 4)
● Remove batteries case cover, load the batteries inside
correctly and then close batteries case.
● Push the Battery Switch to AAA position.
● This radio supports 3 AAA batteries (not includ
ed).
SOS Alarm (Image 5)
Using the SOS Alarm in an emergency, you can turn on the
red SOS light by pushing the Alarm/Radio knob to the left,
the sound an alarm and with a red light flash.
USING THE FLASHLIGHT & READING LAMP (Image 6)
● Press the flashlight switch to turn it on/off.
● Lift up the solar panel, the lights will be on automatic
a
SPECIFICATION
● Dimensions: 140x74x45mm / 5.5x2.9x1.8 inches
● Unit weight: 310g/0.68lb
● Max consumption power: 2W
● Radio Frequency Range: AM 520~1710KHz FM 87~108MHz
NOAA 162.40~162.55MHz
● Working Voltage: 2.7-4.2V
● Water proof level: IPX3
● Internal Rechargeable battery: 2000mah 3.7V Li-ion (unreplaceable)
● Battery lifetime: >3 years (daily average use 3 hours)
● Dry battery size: 3*AAA
● LED Flashlight: 1W/20
LM
CARING AND MAINTENANCE
:
● Pull the antenna GENTLY out to get better reception and retract it properly when not in use.
● Wipe the outside of the unit with a soft, damp cloth.
● Clean the lens with a standard lens cleaning product.
● Do not clean unit with harsh abrasive or any solvents.
● Unit is NOT waterproof, only water-resistant. DO NOT submerge in water.
● When the unit is idle for more than 60 days, please hand crank for 3-5 minutes to charge the
internal battery.
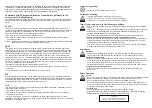
WARNINGS
Local Government Regulations
When the radios are used as a consequence of employment, the Local Government Regulations
requires users to be fully aware of and able to control their exposure to meet occupational
Before using this radio, read this guide which contains important
operating instructions for safe usage and RF energy awareness
and control for compliance with applicable standards and regulations.
(Image 1)
(Image 2)
(Image 3)
(Image 4)
(Image 5)
(Image 6)
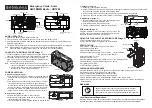
Band Selector
Speaker
Earphone Jack /
USB Port /
Charger Selector
Battery Compartment
Cover
Telescope Antenna
Solar Panel
Crank Handle
Reading Lamp
Battery Switch
Flashlight Power
Volume Control
Battery indictor
Frequency Mark
Tuning
Flashlight
SOS/Radio
Selector


