background image

OPERATING MANUAL FOR 

RETIGO

 HOLD-O-MAT

7

ver. EN-01/10/12

5. 

Operating of Retigo Hold-o-mat 1/1 Standard 

(without temperature core probe)

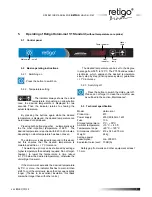
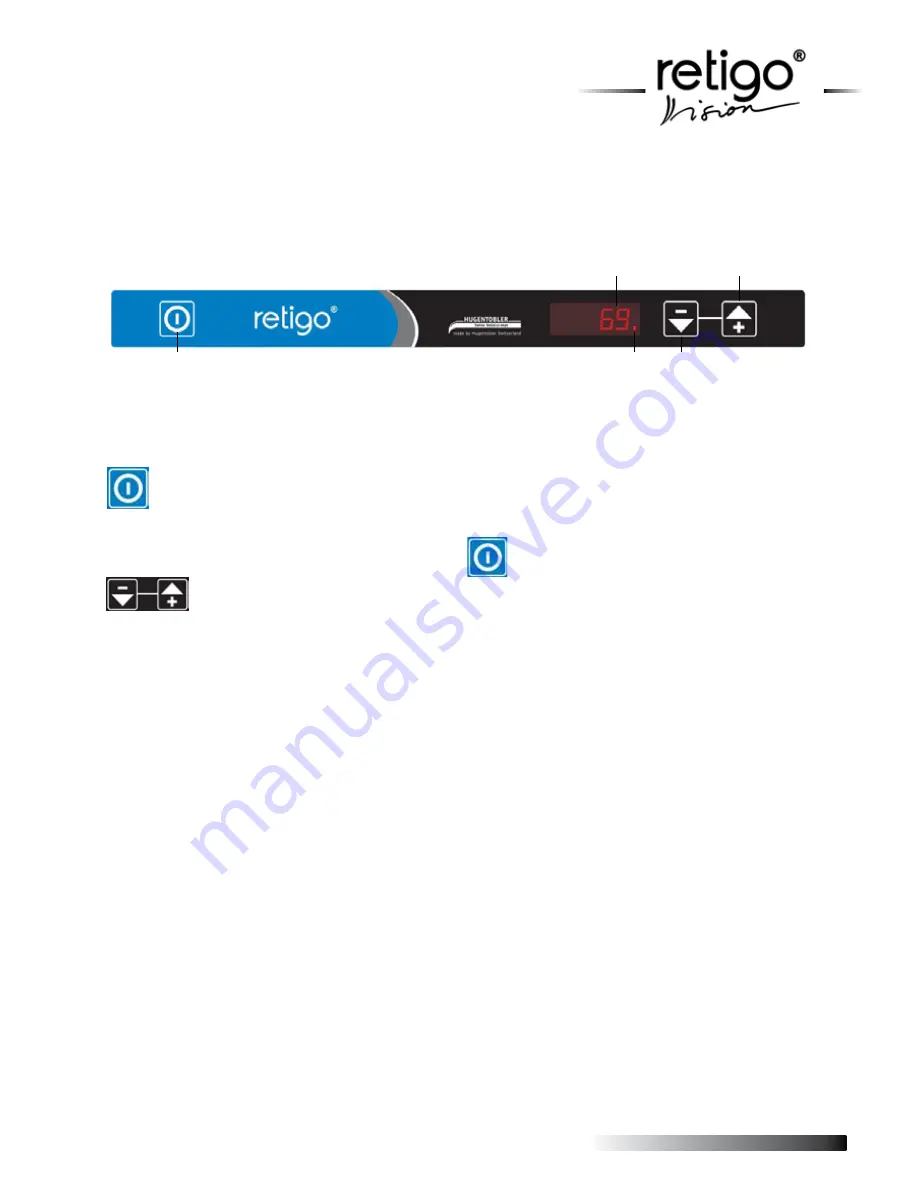
5.1  Control panel


Main switch - on/off

Heat 

indicator

Higher

temp.

Lower

temp.

Temp. indicator

5.2  Basic operating instructions

5.2.1  Switching on

 - 

Press the button to switch on.

5.2.2  Temperature setting


- The indicator always shows the actual 

temperature. By pushing an arrow button 

once, the desired temperature is displayed for two 

seconds. Then the indicator returns to showing the 

actual temperature.

By pressing the buttons again while the desired 

temperature is displayed, the desired temperature can 

be increased or decreased.

Pressing both buttons together    automatically sets 

the the most important temperature of 68°C.  The 

desired temperature is reached within 20 to 40 minutes, 

depending on what temperature has been chosen.

The Hold-o-mat is designed to respond to this slowly, 

but this ensures that the desired temperature is 

maintained within a +/- 1°C tolerance.

  The warming-up time can be shortened by setting a 

higher temperature than actually required. Do not forget, 

however, to lower the temperature in time (about 

6–10°C below the desired temperature), otherwise the 

unit will get too warm.

If the Hold-o-mat exceeds the desired temperature 

by 5°C or more, the indicator flashes to warn kitchen 

staff. To cool the unit slowly, leave the door open slightly 

longer. (Thanks to its excellent insulation, this takes 

somewhat longer than with other units.)


  The desired temperature can be set to the degree 

in a range from 50°C to 120°C. The PT 500 and excellent 

electronics, which approach the desired temperature 

slowly step by step (a timing pulse system), guarantee    

+/- 1°C accuracy.

5.2.3  Switching off

 -  Press the button to switch the Hold-o-mat off. 

Please do not forget to clean the unit after use 

as outlined in the section „Maintanance“.

5.3  Technical specification

Model: 

  Hold-o-mat 

Product no.: 


673

Power supply:   

230V, 50/60Hz, 1 kW 

Fuse:   


10 A

Storage temperature:  0°C - + 50°C 

Ambient temperature:  +10°C - + 40 °C 

Temperature range: 

+20°C - +120 °C 

Dimensions (WxHxD):  415 x 343 x 675 mm 

Weight: 

  24 

kg 

Average power

consumption:   

cca. 300 W/h 

Equivalent noise level:  70 dB(A) 

Safety gap from walls and other equipment at least 

10 mm.

Summary of Contents for Hold-o-mat Big

Page 1: ......

Page 2: ...nt Retigo s r o believes that the new Retigo VISION Hold o mat will bring you maximum comfort during everyday work and present new possibilities of food preparation In order for you to achieve great results with your new Retigo Hold o mat right from the beginning we would like to provide you with the help of this manual with all the necessary information and useful advice for trouble free work To ...

Page 3: ...e core probe use 8 6 5 Some Tips Tricks instructions for the Cook Hold method 8 6 6 Setting the buzzer volume 9 6 7 Technical specification 9 7 Operation of Retigo Hold o mat 2 3 9 7 1 Control panel 9 7 2 Basic operating instructions 9 7 3 Technical specification 9 8 Operating of Retigo Hold o mat Big 10 8 1 Control panel 10 8 2 Basic operating instructions 10 8 3 Technical specification 10 9 Prac...

Page 4: ...hers The unit is not designed for domestic use it is not for use in areas where exceptional circumstances prevail such as corrosive or explosive atmospheres dust steam gas it is not for industrial use or for the mass production of food People who are not familiar with the operating instructions such as children must not use the unit unless supervised by trained staff Persons with active physical a...

Page 5: ...eel enamelled recommended size 1 1 2 3 recommended depth 65 and 100 mm other GN offeres by Retigo company Unsuitable GN Plastic synthetic and other non heat resistant containers Never use a damaged unit Please note that the outside of the unit must not be sprayed with excessive amounts of water or other liquids Repairs must only be carried out by authorised specialist electricians or by our repair...

Page 6: ...e dehumidification vent would no longer be in the optimum position Therefore the door handle must also be repositioned To do this dismantle the door handle and fit it on the opposite side Rehinge the door on the upper door hinge pin and secure it by firmly tightening the lower door hinge 4 Commissioning Connect the power cable to a socket with a 230V 50 60Hz supply Before using for the first time ...

Page 7: ...p time can be shortened by setting a higher temperature than actually required Do not forget however to lower the temperature in time about 6 10 C below the desired temperature otherwise the unit will get too warm If the Hold o mat exceeds the desired temperature by 5 C or more the indicator flashes to warn kitchen staff To cool the unit slowly leave the door open slightly longer Thanks to its exc...

Page 8: ... work Preset values of these 1 Main switch on off 2 Lower temp 3 Higher temp 8 Start For Cook Hold programs only 6 Core temp or time display 4 Room temp display 5 Heat indicator 7 Function button C H or core porbe programes could be found in chapter 6 3 3 Programmes 6 to 10 are free programmes which you can assign as you wish Preset values of these programs could be found in chapter 6 3 3 In the c...

Page 9: ...mperature and warning horn Step 3 53 C core p 65 C in chamber Programs 6 10 Step 1 10 min 110 C in chamber Step 2 50 C core p 80 C in chamber Step 3 55 C core p 68 C in chamber 6 4 Temperature core probe use We use a single point sensor with PT 500 which is placed in the tip of the sensor Ensure that the tip of the sensor is always in the middle not the edge of the piece of meat Before plunging in...

Page 10: ...mat with temperature core probe Product no 673 KTM Power supply 230V 50 60Hz 1 kW Fuse 10 A Storage temperature 0 C 50 C Ambient temperature 10 C 40 C Temperature range 20 C 120 C Dimensions WxHxD 415 x 343 x 675 mm Weight 24 kg Average power consumption cca 300 W h Equivalent noise level 70 dB A Safety gap from walls and other equipment at least 10 mm 7 Operation of Retigo Hold o mat 2 3 7 1 Cont...

Page 11: ...mall off cuts are to be warmed together set a temperature of between 68 to 72 C With every hour that the meat is kept warm in the Hold o mat it becomes more tender Please note however that the meat should not be stored for too long as this can adversely affect its taste Best results are obtained by using relatively fresh meat kept warm for under five hours Ideally meat should be inserted into the ...

Page 12: ...and put it in when it reaches the right temperature 9 5 Accessoires It is best to warm up the Hold o mat with the requisite grilles and dishes to avoid large changes in temperature Only load the unit with warm foods using grilles or trays on the rails supplied 9 6 Cold or frozen food Loading with cold or frozen food can trigger off the heat cut out 9 7 Interior floor Using the interior floor as a ...

Page 13: ...t light The power supply has been cut off Please check the building s fusing the fusing on the unit below the po wer cable socket at the back of the unit and both plugs on the power cable The actual temperature keeps falling although it should rise A fault has occured due to a power fluctuation and the control system is no longer sending signals to gene rate heat Isolate the unit from the power su...

Page 14: ...ase ensure that the dehumidifier on the door is closed as high humidity makes the sterilisation more effective Please note that the exterior of the unit must not be sprayed with water or other liquids High pressure cleaners or steam cleaners may not be used 11 2 Service The Hold o mat has no special regular service requirements However please ensure that it is functioning properly and contact the ...

Page 15: ...AL FOR RETIGO HOLD O MAT 15 ver EN 01 10 12 13 Disposal At the end of its life the unit should be disposed of in accordance with national legislation It is recommended that a specialist disposal company be contacted ...

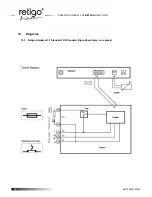
Page 16: ...OPERATING MANUAL FOR RETIGO HOLD O MAT 16 ver EN 01 10 12 14 Diagrams 14 1 Retigo Holdomat 1 1 Standard 2 3 Standard Big without temp core probe ...

Page 17: ...OPERATING MANUAL FOR RETIGO HOLD O MAT 17 ver EN 01 10 12 14 2 Retigo Holdomat 1 1 Standard with temp core probe ...

Page 18: ......

Reviews: