background image

PLAYING AT HOME… 

1.

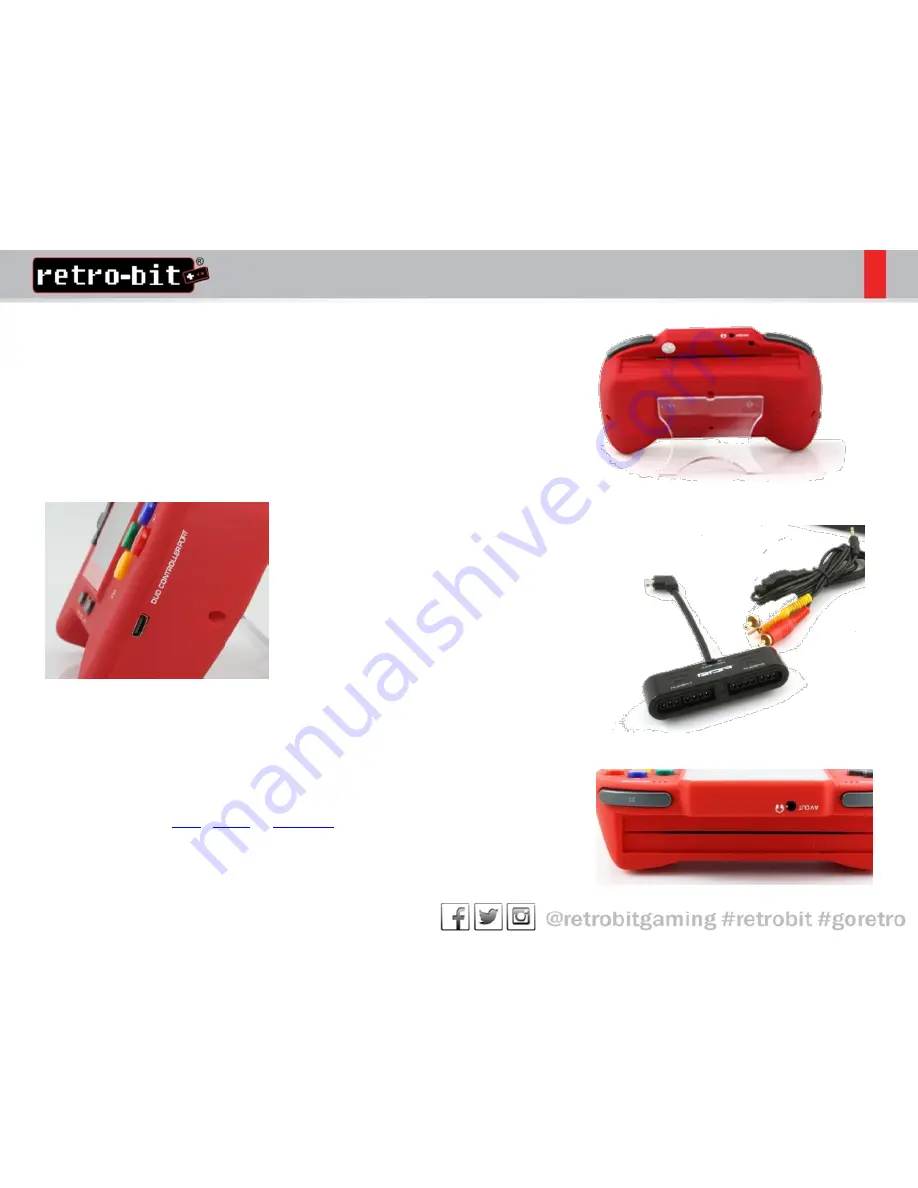
Attach Plexi Stand (included) for added stability 

2.

Ensure that the RDP is turned off before plugging in any cables or 
inserting any cartridges 

3.   Connect your controller adapter (included) on to 

the RDP DUO CONTROLLER PORT   

4.

Plug in 1-2 original or third party controllers 
(sold separately) 

5.

Turn on the controller adapter 

6.

Plug the single end of the AV cable (included) into your RDP (AV OUT)  

7.

Connect the other end of the AV cable (Red/White/Yellow) into the 
respective ports on the TV. 

8.

Insert your 

NES

,  

SNES

 or 

GENESIS

 game 

9.

Turn on the RDP & TV 


Summary of Contents for RetroDuo

Page 1: ...User Guide RetroDuo Portable V2 0 Core Edition ...

Page 2: ...1 Safety Instructions 2 What s in the Box 3 Charging your RDP Core 4 Playing at Home 5 Playing SNES Cartridges 6 Playing NES Cartridges 7 Playing GENESIS Cartridges 8 FAQ 9 TROUBLESHOOTING Contents ...

Page 3: ...n for safety However if used improperly any electrical device has the potential to cause damage or harm to others Observe all warnings precautions and instructions Stop use and unplug the AC power cord from the electrical outlet immediately if the device acts odd or produces a strange smell Contact customer support for the Retro Duo Portable console at Service retrobit com if the device is not wor...

Page 4: ...2 1 3 4 5 6 7 1 1 RDP Core system 2 1 RetroPort 3 3 RetroPort Screws 4 1 Controller Adapter 5 1 Plexi Stand 6 1 AC Adapter 7 1 AV Cable 8 1 Instructions Manual not pictured WHAT S IN THE BOX ...

Page 5: ...DP while playing at home The LED light flashes to indicate low battery CHARGING YOUR RDP CORE 1 Ensure that the RDP Core is turned off 2 Plug the AC Adapter into the RDP Core AC port DC IN 3 Wait for the red LED light to turn on 4 First time use Suggested length of 18 hour charge ...

Page 6: ...ntroller adapter included on to the RDP DUO CONTROLLER PORT 4 Plug in 1 2 original or third party controllers sold separately 5 Turn on the controller adapter 6 Plug the single end of the AV cable included into your RDP AV OUT 7 Connect the other end of the AV cable Red White Yellow into the respective ports on the TV 8 Insert your NES SNES or GENESIS game 9 Turn on the RDP TV ...

Page 7: ...e cartridge slot of the RDP until you hear a slight click 3 Turn on the RDP and begin to play Plug in the controller adapter included and 2 controllers not included to the RDP for 2 player games Adjust the LCD screen on the RDP by using the CONTRAST RESET button Adjust the volume during your game session located at the bottom of the RDP Tips ...

Page 8: ...he RetroPort included until you hear a slight click 3 Once the game is in place insert the RetroPort directly on the RDP cartridge slot 4 Once the RetroPort is in place turn on the RDP and begin to play NOTE For added stability secure the RetroPort by attaching the small screw included on the back of the RDP using a flat tip screwdriver not included ...

Page 9: ...rtridges 2 With the label facing forward insert the Genesis Cartridge into the RetroGen sold separately until you hear a slight click 3 Once the game is in place insert the RetroGen directly on the RDP cartridge slot 4 Once the RetroGen is in place turn on the RDP and begin to play ...

Page 10: ...adapters are not compatible with Q I bought a product from my local retailer and it s stopped working Can I return it to you or do I have to go through the retailer I bought it from A You can contact service retrobit com for any troubleshooting help but you will have to return the product to the retailer you bought it from Q My NES games do not fit in the RetroPort adapter that came with my RDP v2...

Page 11: ...n a different position other than the lowest volume setting Is the TV volume too low or muted Have the connection cables come loose or become disconnected Have you checked the connection between the TV and any speakers connected to the TV Has your RDP or TV come into contact with water or exposed to the sun for a prolonged period of time Picture on TV screen is not Steady Adjust the vertical and h...

Page 12: ......

Reviews: