background image

Returnstar Interactive Technology Group Co., Ltd.


3.2 Wall Mounting

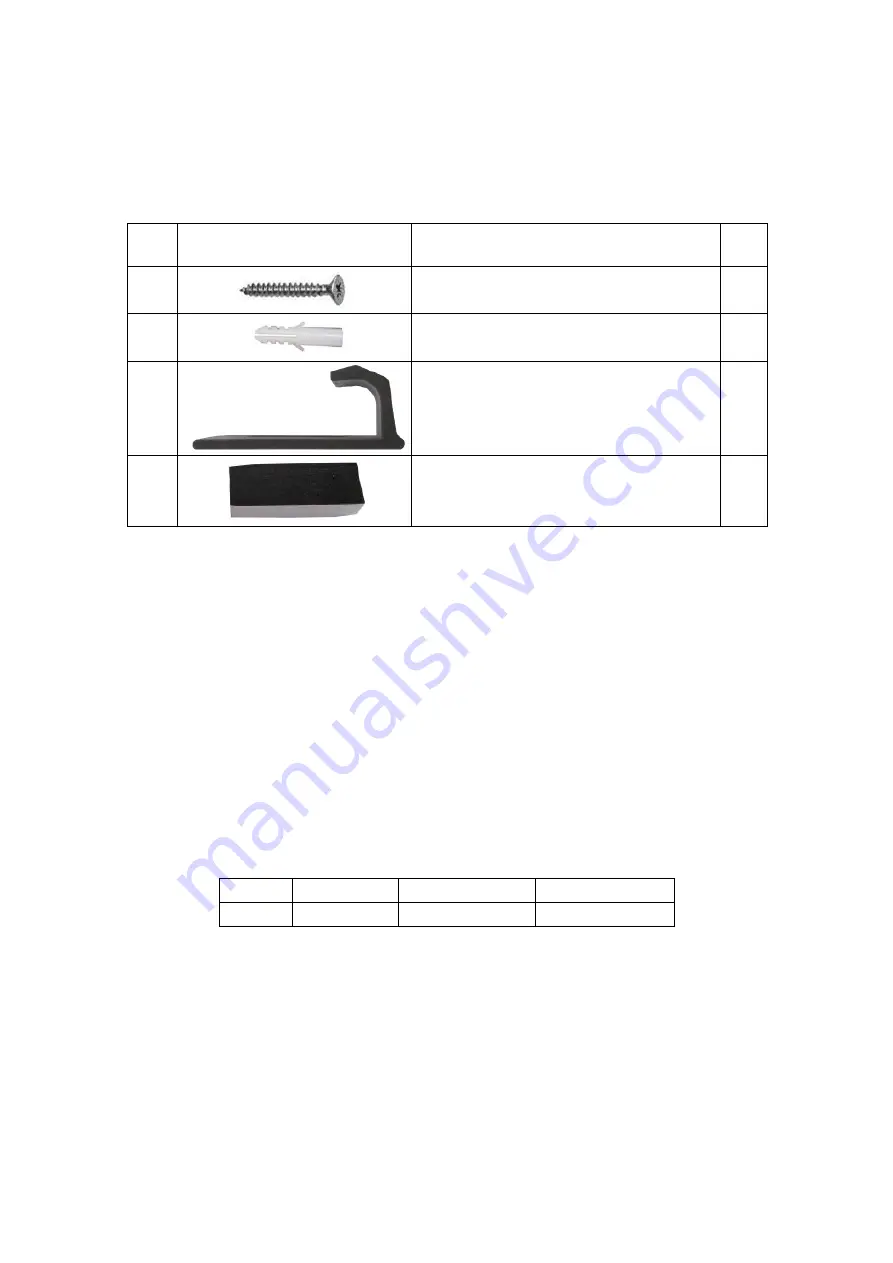
L-type Bracket


Parts list   


No. 

Picture 

Item 

Qty 


Flat Cross-tapping Screw 


Wall Anchor 


IQBoard L-type Bracket 


EVA Pad 


Installation steps 


Step 1. Determine the fixed position and height of the IQBoard according to the actual 

use of the site. 


Step 2. Determine the installation height of the bottom L-type Brackets according to 

the location of IQBoard on the wall. Then determine the installation height of the upper 

L-type Brackets according to the size of your IQBoard. Make sure when you pull up 

the  upper  brackets,  IQBoard  can  be  taken  out;  and  when  you  pull  them  down, 

IQBoard frame  can  be  clasped. Two  upper/bottom  brackets  should  be  on  the same 

height level. You will need 2 screws for each of bottom Brackets, and 1 screw for each 

of the upper ones. To determine the position of brackets, take an 82

” IQBoard for e.g. 

as below: 


IQBoard 

L(mm) 

H1(mm) 

H2(mm) 

82” 

700 

20 

1175 


Summary of Contents for IQBoard DVT V7.0

Page 1: ...Board DVT V7 0 Digital Vision Touch Interactive Whiteboard User Manual Copyright C 2003 2013 Returnstar Interactive Technology Group Co Ltd Web www recoverystar com www iqboard net Tel 0086 591 872743...

Page 2: ...roduct replacement revision and update The information in this manual is subject to regular change without prior notice Returnstar will make no warranties with respect to this product and disclaims an...

Page 3: ...TOCONNECTTOCOMPUTERANDPROJECTOR 16 CHAPTER 5 HOW TO INSTALL AND UNINSTALL DRIVER 17 5 1 HOW TO INSTALL DRIVER 17 5 2 HOW TO UNINSTALL DRIVER 17 CHAPTER 6 HOW TO SETUP IQBOARD 18 6 1 ORIENTATION 18 6 2...

Page 4: ...aracter line dimension and angle drag zoom reveal screen spotlight screen capture and save screen record and playback handwriting recognition on screen keyboard text input text to speech hyperlink to...

Page 5: ...anti abrasive coating It features with anti scratch high luminance high definition easy cleaning can be cleaned by whiteboard detergent or wet cloth and can completely eliminate bright spots The back...

Page 6: ...on steps Step 1 Determine the installation height of the Anchor Bolt 190cm above floor then measure the horizontal distance L 70cm recommended of the two holes on the wall mounting bracket according t...

Page 7: ...ign the Wall Mounting Brackets on the backboard with the Anchor Bolts and hang the whiteboard on the wall Step 4 Fasten the 2 Safety Brackets on each side of whiteboard lower frame using 2 Screws Acco...

Page 8: ...ttom L type Brackets according to the location of IQBoard on the wall Then determine the installation height of the upper L type Brackets according to the size of your IQBoard Make sure when you pull...

Page 9: ...brackets H1 Distance between the 2 screws on the same bottom bracket H2 Distance between the screw on the upper bracket and the upper screw on the bottom bracket Step 3 Put EVA pad into the inside of...

Page 10: ...per above 2 holes for each of bottom bracket 1 hole for each of upper bracket Step 5 Put a Wall Anchor into each hole and screw the brackets with M4 70 flat cross tapping screw Step 6 Put IQBoard on...

Page 11: ...on Bolt A 2 Hexagon Bolt B M8 50 with 08 22 washer 4 Hexagon Bolt C M8 50 8 Hexagon Bolt Set A M8 50 each set includes 1 hexagon bolt 1 wind nut 1 M8 nut 1 small washer and 1 big washer 6 Hexagon Bolt...

Page 12: ...ar on each Leg Bar using Hexagon Bolt A Step 3 Install the other end of each Supporting Bar on each Leg Bar using Hexagon Bolt Set A In this stage please partially screw the bolt leaving 4mm clearance...

Page 13: ...and connect the two leg assemblies with U Shaped Grooves Step 7 Secure U Shaped Grooves with Hexagon Bolt Set B In this stage do not completely tighten the bolt in order to adjust the stand width late...

Page 14: ...n the Column with the clip holes of Height Adjustable Bracket on left and right frames of backboard and hang the one side of whiteboard on the stand Then adjust the stand width to fit the whiteboard a...

Page 15: ...Returnstar Interactive Technology Group Co Ltd 15 Fully assembled whiteboard is as follows...

Page 16: ...for connecting whiteboard Start the projector after connection and adjust it to make its projection within the active area and centered Then use the trapezoid rectification function of the projector t...

Page 17: ...e drivers according to the prompt The computer will automatically find a new hardware and install the driver 5 2 How to Uninstall Driver Select Start Programs IQBoard DVT Drivers Uninstall to uninstal...

Page 18: ...ints orientation is adopted After the whiteboard is oriented you don t need to re orient under the same environment To orient the whiteboard Please do as following steps when you orient the whiteboard...

Page 19: ...er the setting window as follow Step 2 Follow the indication on screen click relevant hotkey in sequence After the setting is completed you can use these hotkeys Note 1 If you did not locate the accur...

Page 20: ...Returnstar Interactive Technology Group Co Ltd 20 Note When setting the soft hotkeys if some error occurs you can press ESC key on the keyboard to exit the setting process and then reset the hotkeys...

Page 21: ...rength Please make sure you press at the same point Right click If you use pen or finger press the surface with the pen or finger tip and hold for 2 seconds to popup the right click menu Drag If you u...

Page 22: ...key to go to the previous page Next Page Press this key to go to the next page Mouse Press this key you can use pen finger to achieve click double click and drag function When using IQBoard Software...

Page 23: ...gnition Settings and then select the Enable Touch Recognition check box Note 1 Except the Start and Orient keys all hotkeys are functional only after IQBoard Software is started 2 The functions of Fre...

Page 24: ...ou can customize its sensitivity to suit your style as follow Step 1 Every time you touch the whiteboard with your pen finger or palm the whiteboard acquires a value based on which one of the 3 functi...

Page 25: ...tions Single Double click Simply click the active area with the pen or finger tip quickly and make sure click at the same point Right click When the left click is on press the whiteboard area for 2 se...

Page 26: ...n orienting the whiteboard the pen or finger is not perpendicular to the surface please re orient with correct posture 4 When orienting the whiteboard the pen or finger tip missed the green center of...

Page 27: ...nitialization is finished 2 Make sure that you do not touch the board when the hardware initialization is processing If you touch the board it will cause this problem Please reconnect the USB cable or...

Page 28: ...to clean Please do not use sharp or pointed objects to scratch the surface and frame otherwise the scratched part may be damaged and won t work normally During the usage do not knock or press the surf...

Page 29: ...ed image stand aside when you turn back to face the students Please do not look at the projector directly to avoid its strong light damaging your eyesight Instruct students how to use the whiteboard t...

Reviews: